I love seafood - that includes not only fish but most importantly prawns and crabs. It might have something to do with me growing up in a fishing village and eating seafood almost everyday. Of all the ones I mentioned, it is only the crab that I haven't tried buying fresh and cooking here in UK. Like prawns they are quite pricey and you get less per weight because of the thick outer shell. But man, once you get into the meat it is heaven!
Of particular note is the Alaskan king crab which is particularly noted for its size. Their legs/claws are usually more than a foot long. And of course they are also known for their very white tasty meat. Unfortunately, the dwindling numbers of Alaskan king crabs, notwithstanding the dangerous environment for their fishing offshore of Alaska, means higher prices for us consumers.
Nevertheless, it does not prevent me from dreaming of cooking them, eating them, etc. I even clipped recipes of the likes of Maryland crab cakes (yum!), Singaporean chilli crabs (drool!), and even crab linguini (slurppp!) in the hope that someone (a friend?) might give me, say, a bucket of Alaskan king crabs and ask me to cook them. Hah! What a dream ...
Wednesday, 6 August 2008


Saturday, 26 July 2008
Roast Chicken

As I have mentioned several times in this blog, my main purpose here is to have an online repository of my recipes. I am doing just that except that sometimes some dishes are so simple and so common in our dining table that I've forgotten that I haven't blogged it yet. One of these is this simple roast chicken that my kids often request on weekends.
Inasmuch as I'd like to have a perfect smooth-skinned roasted chicken, my picture belies the fact that I use a rack. Having a rack tends to dry out the bottom of the pan a little. I like to have some crusted bits in there to give lots of flavour to the gravy.
There are so many ways of roasting chicken. Some recipes have the chicken positioned upright, some puts the chicken on one side then move to the other side after a period of time, for some you have to put in butter underneath the skin, some asks you to put in everything with it, and so on. What I'm recording here is the very simplest way that I know to roast a chicken while still retaining that all-important juiciness in the meat - specifically in the breast (picho) area.
To do this, you can see in my procedures that for the first half of the baking/roasting the chicken is placed breast-side down. This makes the juices to run down to the breast area and keep it moist. The downside is it will result in a little bit flattened breast in the final product. Silicone anyone? ;) But I'm sure you'd trade flat chests ... er... breasts with extra juiciness, wouldn't you?
Okay so much for breasts. Lemon is optional because recently I've been noticing that sometimes it lends some bitterness in the underside of the chicken. This comes from the lemon skin and I really have no clue how to resolve it. Though it does give a boost of a little sourness in the gravy which greatly enhances it. If I don't use lemon in the inside I just squeeze about a tablespoon of lemon juice in the gravy.
If price is no object, I would definitely suggest you use organic free-range chicken. In my experience, they consistently give the best flavour not only in the meat but results in much better gravy as well. I have heard from Stel and read from my current cookbook bible (The New Best Recipe) that brining the chicken before roasting improves the flavour by a mile. I shall try that next time and report the results here.
Roast Chicken
1 whole chicken (about 1.8 kg)
3 tbsp butter - either in room temperature or melted
salt and pepper
herbs and spices (optional)
lemon (optional)
- Preheat the oven to 190°C/fan 170°C/375°F.
- If you buy the chicken from supermarkets they are usually bound by a string around the wings, legs and feet. Remove all the strings from the chicken but keep the wings tucked under the chicken.
- Tie the chicken around the feet only.
- (Optional) You may use half or a whole lemon. Pierce it all over by a fork then put it in the breast cavity via the hole at its end.
- If using melted butter, spread it all over the chicken with a pastry brush.
- If using room temperature softened butter, use your fingers to slather the butter all over the chicken.
- Sprinkle salt and pepper all over.
- (Optional) Sprinkle all over whatever herbs or spices you want to put on it. If need be, omit the salt and pepper.
- To calculate how long to bake, give 25 minutes for every 500 g of chicken. So our 1.8 kg bird is to roast in the oven for a total of 90 minutes.
- Place the chicken breast-side down in a metal roasting pan (you may use a rack if desired). Bake in the preheated oven for half its baking time (in this case 45 minutes).
- Remove from oven and turn it so that it is now breast-side up. At this point I usually sit it on a rack but it's up to you if you want to or not.
- Immediately return back to the oven and bake for the remainder of its baking time.
- When done, remove from oven and place on a serving dish. Cover loosely with foil and let rest for about 10-15 minutes while you're making gravy.
- Serve sliced with roast potatoes, gravy and veggies.
Chicken Gravy
2 Tbsp chicken fat or butter or vegetable oil
2 heaping Tbsp flour
2-3 cups chicken stock (approximate)
salt and freshly milled black pepper
2-3 tsp lemon juice (optional)
- Remove the chicken fat or drippings from the roasting pan but retain about 2 Tbsp.
- Put the roasting tin on the cooker hob and heat up the fat.
- Once moderately hot, sprinkle the flour on it. Cook the flour (preferably with a wire whisk) with the fat for a few minutes.
- Add the stock gradually in 1/2 - 1 cup batches. For each addition, bring the mixture back to boil while continually stirring making sure to scrape the bottom for all the roasting bits left in the pan.
- Once all the stock is added, bring back to boil and then lower heat to simmer for about 2-3 minutes.
- If the stock is too thick add more water or chicken stock. If too thin then simmer it longer until the desired thickness is achieved.
- [Optional] Add a squeeze of lemon juice.
- Taste the gravy and add salt and/or pepper if necessary. Strain liquid into a serving jug. Serve hot.

Wednesday, 23 July 2008
Classic Pound Cake
The last time I remembered I ate a pound cake it was of the Sara Lee variety. You know those frozen ready-made ones you get from the supermarkets. Don't get me wrong I love them and they are of the perfect texture, taste, and richness. But I have this long-running challenge to myself of seeking out the best recipes for everything and this recipe for pound cake I found in The New Best Recipe cookbook (which I will blog separately later) certainly looked intriguing.
Pound cake would be called butter cake around here and I guess is a cousin of the Madeira cake. All are butter-based cakes with only subtle hint of vanilla, almond or lemon in them. I was intrigued enough with this recipe because it did not have any leavening (i.e. baking powder, baking soda, etc.) and relies primarily on the lifting power of six eggs. Not only that, the eggs are not added whole one by one into the batter, as you would usually do, but first lightly beaten then added as a thin stream while beating.
Thankfully, I did succumb to finally making it last weekend otherwise I would not have known the best butter-based cake I have ever baked. I kid you not, I wholly recommend this recipe just look at that high peaking cake below. Probably the only thing I would change is the type of sugar. Next time I would use caster sugar instead of the coarser grained regular granulated. It blended in fine but you can clearly see at the top crust the small round granules of the sugar. I'd like it to have a smooth golden surface next time and then it would be perfect. Move over Sara Lee!

Classic Pound Cake
250 g [1 cup] unsalted butter - soft at room temperature
260 g caster sugar (superfine)
3 large eggs - room temperature
3 large egg yolks - room temperature
1/2 Tbsp vanilla extract
1/2 Tbsp water
1/2 tsp salt
170 g [1 1/2 cups] cake flour or plain flour

Pound cake would be called butter cake around here and I guess is a cousin of the Madeira cake. All are butter-based cakes with only subtle hint of vanilla, almond or lemon in them. I was intrigued enough with this recipe because it did not have any leavening (i.e. baking powder, baking soda, etc.) and relies primarily on the lifting power of six eggs. Not only that, the eggs are not added whole one by one into the batter, as you would usually do, but first lightly beaten then added as a thin stream while beating.
Thankfully, I did succumb to finally making it last weekend otherwise I would not have known the best butter-based cake I have ever baked. I kid you not, I wholly recommend this recipe just look at that high peaking cake below. Probably the only thing I would change is the type of sugar. Next time I would use caster sugar instead of the coarser grained regular granulated. It blended in fine but you can clearly see at the top crust the small round granules of the sugar. I'd like it to have a smooth golden surface next time and then it would be perfect. Move over Sara Lee!

Classic Pound Cake
250 g [1 cup] unsalted butter - soft at room temperature
260 g caster sugar (superfine)
3 large eggs - room temperature
3 large egg yolks - room temperature
1/2 Tbsp vanilla extract
1/2 Tbsp water
1/2 tsp salt
170 g [1 1/2 cups] cake flour or plain flour
- Preheat oven to 325°F/160°C/fan 140°C. Grease a 9x5-inch loaf pan and line with parchment paper.
- Lightly beat the egg and egg yolks in a small bowl with a fork.
- Mix in the vanilla and water. Set aside.
- Using an electric mixer, beat the butter in a large bowl until smooth and shiny.
- Add the sugar in slowly while continually beating.
- Beat the butter-sugar mixture until light and fluffy, about 5 minutes.
- While the mixer is still running, slowly add the egg mixture in a thin stream.
- Finally beat in the salt.
- Sift 1/2 cup of the flour on the batter and fold gently with a rubber spatula until well incorporated.
- Repeat this procedure in 1/2 cup increments until the flour is used up.
- Pour the batter into the prepared pan and smooth the top.
- Bake for 70-80 minutes or until a skewer pierced into the middle top comes out clean.
- Remove from oven and let rest in the pan for 5 minutes.
- Turn out and let cool completely. Serve.

Monday, 21 July 2008
Hawaiian Delight

I know, Ernie, this post is way too tardy! We received these very yummy gifts from our dear architect-family friend Ernie all the way from sunny tropical Hawaii. You don't know how uplifting it was to receive such brightly packaged things in the height of winter. By the time we received his email a day or two later the macadamias were demolished! The lightly salted smoked nuts were the first one to go. I tell you once you've eaten one you can't help reaching out for more.
I love love love the wonderful aroma and flavour of the teas which thankfully we're still enjoying now (it's because the kids don't drink tea that's why). I can't decide which one I liked better but they're definite favourites of me and my husband when we sit in front of the telly at night once the kids are in bed.
Thanks very very much Ernie! We owe you lots. :)
Wish we could be there ...
Sunday, 20 July 2008
Life Lock
The advent of easy access to data and information helped by great advances in computers and in the internet spawned a great deal of new generation of thieves that deals with stealing identity data from you. This would include, but not limited to, getting hold of your personal details such as name, birthdate, addresses, phone numbers, family details, work details, etc. But more worryingly they are able to acquire financial details such as bank accounts, credit cards, credit reports, etc. The result of which usually ends up with the victim being conned and scammed of hard earned money, his/her back account emptied, or credit cards used to the limit and left the bill to be taken cared of by the victim.
There are a number of companies that you can employ to help you be protected. One of them is Life Lock - a company that has a comprehensive scheme of reporting and safeguards that can help you with a comfortable level of protection. It a well established company in the US that has assisted a lot of people in controlling and preventing identity theft.
Life Lock currently have an ongoing discount promotion. You can avail of this by simply clicking on lifelock promo code at lifelock.com and enter the word 'RD17'.
There are a number of companies that you can employ to help you be protected. One of them is Life Lock - a company that has a comprehensive scheme of reporting and safeguards that can help you with a comfortable level of protection. It a well established company in the US that has assisted a lot of people in controlling and preventing identity theft.
Life Lock currently have an ongoing discount promotion. You can avail of this by simply clicking on lifelock promo code at lifelock.com and enter the word 'RD17'.
Saturday, 19 July 2008
BBC GoodFood

One of my favourite food magazines of all time is the BBC GoodFood magazine. I've got so many of it that I reluctantly had to rip out the recipes I want and throw away the magazine to give me more space for the next issues. I keep forgetting to blog here that they already have a website where you can see recipes not only from them but also from sister magazines like Olive. I have to emphasize that this is quite different from the BBC food website which has also been a source of recipes and good advice for years.
The GoodFood magazine's big colourful pictures is especially appealing to me including the big fonts and clear instructions in recipes. They've got blogs, forums, even competitions on the site. Mind you they did not pay me to write this but I always post tips on things I found in the hope that it might help others.
Friday, 18 July 2008
Small Baths
** Sponsored Post **
Ever since we moved to our current house two years ago we have been wanting to renovate our bathroom and toilet. It's not in a very good state right now although it is still usable. There are always DIY magazines strewn about in the house for us to plan or dream on what we can do. We also visit bathroom stores from time to time and drool at the gleaming spanking new fixtures. It progressed on to even drawing out plans and a rough bill of materials for our dream bathroom.
As we found out one of the constraint in this country is the size of the houses and consequently the bathrooms. Space is cramped so wanting to have a big bathtub or a jacuzzi is a constant challenge. Fortunately, British traders supply demand for small baths and small everything for the bathrooms. So you can find lots of designs and types of small baths in all DIY and home improvement shops and on the internet market.
The one beauty of having small baths is you don't use up as much water as a big sized one. This is a boon for water-conservation minded people or people like me who hates any kind of waste. A lot of people I know, and probably most people in the UK like me, have a bath only a few times a year. Wait a minute, don't think that we stink for the rest of the time. A shower is what we usually have. My point is why have a huge bathtub if you're only going to use it a few times a year? A small bath would be good enough to have.
Ever since we moved to our current house two years ago we have been wanting to renovate our bathroom and toilet. It's not in a very good state right now although it is still usable. There are always DIY magazines strewn about in the house for us to plan or dream on what we can do. We also visit bathroom stores from time to time and drool at the gleaming spanking new fixtures. It progressed on to even drawing out plans and a rough bill of materials for our dream bathroom.
As we found out one of the constraint in this country is the size of the houses and consequently the bathrooms. Space is cramped so wanting to have a big bathtub or a jacuzzi is a constant challenge. Fortunately, British traders supply demand for small baths and small everything for the bathrooms. So you can find lots of designs and types of small baths in all DIY and home improvement shops and on the internet market.
The one beauty of having small baths is you don't use up as much water as a big sized one. This is a boon for water-conservation minded people or people like me who hates any kind of waste. A lot of people I know, and probably most people in the UK like me, have a bath only a few times a year. Wait a minute, don't think that we stink for the rest of the time. A shower is what we usually have. My point is why have a huge bathtub if you're only going to use it a few times a year? A small bath would be good enough to have.
Corned Beef Hash
It's time to update this old post that I had to put offline since it was getting a lot of hits based on a very negative and insulting post of another food blogger. He was mocking my picture saying that it looks like a dog's dinner although he didn't have the courage to post his name online (or even just his persona) in the comments section. His blog was based around all the disgusting food pictures he can find and went on great lengths to mock them. I say them lot never last.
While admittedly my picture is not a paragon of beauty (I will upload a better picture later). I think the insults and online mocking is uncalled for. If you can't say anything nice don't say anything at all. Besides, there are food that taste better than they look - like ma po tofu for example.
Well, nowadays his blog is nowhere to be found. And so is the old Frugal Fridays food blog to which I initially intended this recipe. But nevermind blogs of short endurance, I resolved to post this again for my recipe collection.
This is one of cheaper dishes you can make. As you can imagine this graces our dinner table here and when we were growing up in the Philippines whenever we want something cheap and cheerful and relatively easy to make.
Actually this is quite adaptable in terms of stretching to feed people. The principle is the more people you have to feed the more potatoes or water (or both) you have in add in. And I've seen near soup-like consistency of this that feeds a large family with a big help from heaps of rice of course. It's quite versatile in that you can have it with rice as mentioned and with almost all types of breads.
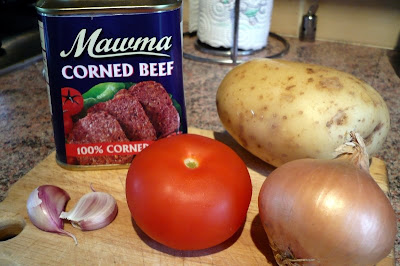
As you can see from the ingredients I used this would hardly come up to £3.00. One thing about the canned corned beef, the brands they sell in the local supermarkets like Tesco, Sainsburys, Morrisons, etc., are quite bland. They don't even taste beefy. Previously I have to look for Libby's brand in either Filipino, Chinese, or Caribbean shops. It's worth mentioning as well that the Purefoods brand from the Philippines is simply delish. Anyways, it's a good thing we found that the cut-price supermarkets of Aldi and Lidl sell brands like Mawma and Premium which taste closer to Libby's and the ones we got used to in the Phils. Besides the fact that they are much much cheaper than supermarkets.
Cooking this is a doddle. Probably the only effort you need is in slicing the garlic, onion and tomatoes. The latter is optional because I learned from experience that if you put tomatoes it spoils faster than without. If you're eating it all right away or if you refrigerate leftovers then it's not really a problem. If your corned beef brand is good then its saltiness is enough so you do not have to add salt.
As I said before the amount of potatoes and water is up to you. Me, I like it dry and even crusty at the bottom. Do have it with rice but it's especially yummy with pandesal.

Corned Beef Hash
(Ginisang Carne Norte)
1 can corned beef
1 medium onion - roughly chopped
1-2 cloves garlic - minced
1 medium tomato - chopped (optional)
1 medium potato - peeled and diced
1/4 cup water
1 Tbsp cooking oil

While admittedly my picture is not a paragon of beauty (I will upload a better picture later). I think the insults and online mocking is uncalled for. If you can't say anything nice don't say anything at all. Besides, there are food that taste better than they look - like ma po tofu for example.
Well, nowadays his blog is nowhere to be found. And so is the old Frugal Fridays food blog to which I initially intended this recipe. But nevermind blogs of short endurance, I resolved to post this again for my recipe collection.
This is one of cheaper dishes you can make. As you can imagine this graces our dinner table here and when we were growing up in the Philippines whenever we want something cheap and cheerful and relatively easy to make.
Actually this is quite adaptable in terms of stretching to feed people. The principle is the more people you have to feed the more potatoes or water (or both) you have in add in. And I've seen near soup-like consistency of this that feeds a large family with a big help from heaps of rice of course. It's quite versatile in that you can have it with rice as mentioned and with almost all types of breads.

As you can see from the ingredients I used this would hardly come up to £3.00. One thing about the canned corned beef, the brands they sell in the local supermarkets like Tesco, Sainsburys, Morrisons, etc., are quite bland. They don't even taste beefy. Previously I have to look for Libby's brand in either Filipino, Chinese, or Caribbean shops. It's worth mentioning as well that the Purefoods brand from the Philippines is simply delish. Anyways, it's a good thing we found that the cut-price supermarkets of Aldi and Lidl sell brands like Mawma and Premium which taste closer to Libby's and the ones we got used to in the Phils. Besides the fact that they are much much cheaper than supermarkets.
Cooking this is a doddle. Probably the only effort you need is in slicing the garlic, onion and tomatoes. The latter is optional because I learned from experience that if you put tomatoes it spoils faster than without. If you're eating it all right away or if you refrigerate leftovers then it's not really a problem. If your corned beef brand is good then its saltiness is enough so you do not have to add salt.
As I said before the amount of potatoes and water is up to you. Me, I like it dry and even crusty at the bottom. Do have it with rice but it's especially yummy with pandesal.

Corned Beef Hash
(Ginisang Carne Norte)
1 can corned beef
1 medium onion - roughly chopped
1-2 cloves garlic - minced
1 medium tomato - chopped (optional)
1 medium potato - peeled and diced
1/4 cup water
1 Tbsp cooking oil
- In a pan or saucepan, heat the cooking oil.
- Saute the garlic and onion in medium heat until it is translucent.
- Stir in the tomato and cook until soft.
- Open can and put the contents in the pan. Mash the corned beef and mix well.
- Add water and bring to boil.
- Add the potatoes and stir to mix. Cover pan, lower heat and simmer until potatoes are cooked.
- If you want it a bit drier, remove cover turn up heat to medium and cook for a few minutes more. Dish up and serve.

Wednesday, 16 July 2008
Winds of Change
It's nearly the fourth anniversary of this blog of mine. For most of the time, my blogging have been centred on anything food related. I thought of adding in different types of posts to fit in with the changing times - which really means the changing depth of my pocket. :) Okay okay let's call a spade a spade. In other words I will be posting paid advertisements here. I will not try to cover up my paid posts and try to pass them as personally my own. They will be here because I chose to and I hope you will still continue to visit this blog because I will definitely still be blogging on food and cooking and baking and lots of other things. If you're interested in the ad posts, do click on the accompanying links. If not, just click on by and ignore them. You'll still find nuggets of food stories and recipes around here.
Cheerio mi amigas! ;)
Cheerio mi amigas! ;)
Tuesday, 8 July 2008
Sweetcorn Soup

Occassionally when the weather is chilly you need all the help you can get to warm up. One of my favourites is this Chinese restaurant standard - sweet corn soup. It can have a variety of meat in it but the popular ones are either chicken or crab.
Before trying to cook this I didn't know that it is this easy to make. It is basically creamed corn (usually canned variety) cooked in stock then a diluted beaten egg or eggwhite is stirred in. And that is it! Of course you can prettify it with some chopped green herbs sprinkled on top but other than that it is really a doddle to make. This recipe is a hybrid from the ones in The Food of China and Deh Ta Hsiung's Taste of China.

Sweetcorn Soup
250 g minced pork or chicken or shredded crabmeat
5 cups chicken stock
3 Tbsp rice wine or cooking wine
400 g can of creamed corn
1 tsp sea salt
2 Tbsp cornstarch
2 egg whites or 1 large egg
1/2 tsp sesame oil
salt and pepper to
chopped green onions
- Mix the meat with 1 Tbsp of rice wine. Set aside.
- Mix together the cornstarch and 1/4 cup water. Set aside.
- Whisk the egg whites or whole egg until frothy. Stir in the cornstarch mixture until smooth.
- Combine the stock with the creamed corn and remaining rice wine in a saucepan and bring to boil.
- Add the meat and marinade. Stir to separate the meat.
- Lower heat and simmer for about 5-10 minutes.
- Bring the heat to medium and then slowly stir in the egg mixture in a thin stream to the soup until well blended.
- Stir in sesame oil.
- Taste and adjust seasoning with extra salt and pepper if needed.
- Serve garnished with chopped green onions on top.
*Note: The meat is entirely optional.
Sunday, 29 June 2008
Danish Braid
 This is my second Daring Bakers' challenge. Thanks to Kelly and Ben for hosting this month's challenge which is Danish Braid or to be more generic - laminated dough. Indeed it was quite a challenge for me as you will see later.
 Like my previous DB project, I wouldn't say that this is a resounding success. let me start with the dough which I found extremely sticky when it came to kneading it. Only the constant sprinkling of flour just about allowed me to finish it. One thing to bear in mind is to keep everything cold or chilled or you will have problems in stickiness and handling.

It was a very warm day when I decided to do this which made it very tricky. By the time I did the second rolling and folding I thought I was getting the hang of it and felt mighty pleased with myself when I finally parked the four-times folded dough in the fridge for the final chilling. This is when I think it all went wrong. It was supposed to be chilled for the last time for up to 24 hours. Of course the next day I forgot to take it out and bake it instead it took me another day so that was 48 hours not 24. So I rolled, filled, and braided it then proofed it in a slightly warm oven. Two hours later it still looked the same. I thought to myself maybe at baking time it will finally puff up to all its glory. It didn't! *waaah* My yeast phobia is all coming back to me.

Well actually the top puffed up a little but nothing more. The apple filling was problematic as well. I substituted Golden Delicious for the Fuji and it was sooo runny despite simmering it for more than 10 minutes. I have made the necessary adjustment in the recipe below so I won't make the same mistake next time I decide to make it. All is not lost though, the aroma was wonderful and when me and my son tasted it was actually delicious despite having a bottom crust that was on the hard side.
Danish Dough
(makes enough for 2 Danish Braid)
*For the dough:
30 g [1 oz] fresh yeast or 1 Tbsp active dry yeast
1/2 cup whole milk - chilled
1/3 cup sugar
zest of 1 orange - finely grated
3/4 tsp ground cardamom (optional)
1/2 Tbsp vanilla extract
1/2 vanilla bean - split and scraped
2 large eggs - chilled and slightly beaten
1/4 cup fresh orange juice
3 1/4 cup plain flour
1 tsp fine salt
*For the butter block:
250 g [1 cup] cold unsalted butter - cut into cubes
1/4 cup plain flour
- Combine yeast and milk in a bowl with a whisk.
- Slowly add sugar, orange zest, cardamom, vanilla extract, vanilla seeds, eggs and orange juice. Mix well.
- In another bowl combine the flour and salt. Make a well in the centre and pour in the milk mixture. Stir initially with a wooden spoon then as it gets sticky use your hand to combine.
- Once they come together, transfer to a well floured surface and knead until smooth and easy to work with (about 5-7 minutes).
- Cover with a plastic wrap and refrigerate for 30 minutes.
- Beat the cubed butter and 1/4 cup flour with an electric mixer on the slowest speed until smooth and lump free. Set aside.
- Remove the dough from the fridge and turn out on a lightly floured surface.
- Roll the dough into a rectangle approximately 18x13 inches and 1/4 inch thick. The dough may be sticky so keep lightly dusting it with flour.
- Spread the butter evenly over the right two-thirds of the dough.
- Now fold the left third of the dough over the right, covering half of the butter.
- Fold the right third of the rectangle over the centre third; pinch the edges a little. The first turn has now been completed. Mark the dough by poking it with your finger to keep track or use a stick tape and keep a tally.
- Place on a baking sheet and cover with a plastic wrap. Refrigerate for 30 minutes.
- Put the dough lengthwise on a floured surface. The open ends should be to your right and left. Roll the dough again into approximately 18x13 inches, 1/4 inch rectangle.
- Again fold the left third of the rectangle over the centre third and the right third over the centre third. No additional butter will be added. The second turn has now been completed. Refrigerate for 30 minutes.
- Roll out, turn and refrigerate the dough two more times, for a total of four single turns.
- Refrigerate the dough after the final turn for 5 hours or overnight.
- The danish dough is now ready to be used. If you will not be using the dough within 24 hours, freeze it. To do this, roll out the dough to about 1 inch thickness, wrap tightly in plastic wrap and freeze. Defrost slowly in the refrigerator for easiest handling. Danish dough will keep in the freezer for up to 1 month.
Apple Filling
4 Golden Delicious apples - peeled, cored, and chopped into 1/4-inch thickness
1/2 cup sugar
1/2 tsp ground cinnamon
1/2 vanilla bean - split and scraped
2 Tbsp fresh lemon juice
4 Tbsp unsalted butter
1 Tbsp flour
- Toss all ingredients except butter in a bowl.
- Melt the butter in a saucepan until slightly nutty in colour (about 6 minutes).
- Add the apple mixture and saute until the apples are softened and caramelised (10-15 minutes).
- Transfer to another container. Cool and set aside.
Danish Braid
1/2 recipe of Danish Dough
2 cups apple filling, jam or preserves
For the egg wash: 1 large egg plus 1 large egg yolk
- Line a baking sheet with parchment paper.
- On a lightly floured surface, roll the Danish dough into approximately 15x10-inch, 1/4 inch thick rectangle. If the dough seems elastic and shrinks back when rolled, let it rest for a few minutes, then roll again.
- Place the dough on the prepared baking sheet.
- Along one long side of the pastry make parallel, 3-inch long cuts with a knife or a rolling pastry wheel, each about 1 inch apart. Repeat on the opposite side making sure to line up the cuts with those you have already made.
- Spoon the filling you have chosen to fill your braid down the centre of the rectangle.
- Starting with the top and bottom flaps, fold the top flap down over the filling to cover. Next fold the bottom flap up to cover filling. This helps keep the braid neat and helps to hold in the filling.
- Begin folding the cut side strips of the dough over the filling, alternating first left, then right, left, right, until finished. Trim any excess dough and tuck in ends.
- Whisk together the whole egg and yolk in a bowl and with a pastry brush, lightly coat the braid.
- Lightly oil one side of a piece of plastic wrap and place over the braid.
- Proof at room temperature or if possible in a controlled 90F degree environment for about 2 hours or until doubled in volume and light to the touch.
- Preheat oven to 190°C/fan 170°C/375°F. Bake for 10 minutes then rotate pan to bake evenly.
- Lower oven temperature to 180°C/fan 160°C/350°F and bake for another 15-20 minutes or until golden brown.
- Cool and serve the braid warm or at room temperature.
Friday, 30 May 2008
Beautiful Bones: Family-style Bean Curd
 I am massively supporting Susan's (of Food Blogga) blogging event called "Beautiful Bones" to highlight osteoporosis. This is one event that I really feel close to my heart. I do feel strongly mainly because my mother's side of the family have been blighted by osteoporosis and other bone diseases. And if me and my siblings are not careful we would be victims as well later on.
 My dear old grandma, Lola Ebia, is in her 95th year. Her spine is bent forward making it difficult for her to move around. Worse off was her late older sister, Lola Ine, who was not only bent almost 90 degrees from the waist up but whose spine was shaped like a big letter S on her back. It did not seem give her that much health problems (or maybe I just didn't hear much about it) but it did present a great difficulty for her physically moving about. Me and my cousins were joking then at what shape her coffin would be when she died.
It did not end in my grandma's generation. My mother and her siblings are now beginning to feel various forms of bone diseases. And it's not confined to the women even our uncle who is very fit and follows a healthy lifestyle succumbed to some problems with his hipbone and had to be operated on when he was only 65. So me and my cousins better beware and heed the signs to take better care of ourselves or we will suffer in later years.
As what Susan mentioned in her blog, there are lots of food sources of calcium ranging from the usual dairy products to vegetables to nuts and lots of others. Bear in mind to temper the consumption of these with fibre since too much fibre restricts the absorbtion of calcium by the body. To strike a balance between consumption of calcium and fibre-rich food would be the optimum goal. As usual moderation is the key.
I have chosen to cook this dish rather than the usual dairy product sources since the soya bean in the bean curd and the green bokchoy are rich in calcium and would do well in balancing our intake of healthier food. Sorry for the limp overcooked bokchoy. Distractions while cooking can be hazardous to the final cooked products.

Family-style Bean Curd
1 pkg bean curd (4 squares)
2 green onions - sliced into 1/2-inch pieces
6 slices ginger root
5 pieces dried Chinese black mushrooms
1/2 cup sliced bamboo shoots
3 pieces bok choy - cut into quarters lengthwise
1/2 tsp hot chilli paste
1 cup stock
2 Tbsp soy sauce
1 Tbsp oyster sauce
1 tsp sugar
1/2 Tbsp cornstarch
1 Tbsp water
oil for frying
- Soak the mushrooms in hot water for about 20 minutes or until soft. Squeeze out water then slice into 1/2-inch pieces lengthwise.
- Combine stock, soy sauce, oyster sauce and sugar in a container. Stir until sugar is dissolved. Set aside.
- Mix cornstarch and water in another bowl, stir and set aside.
- Cut the bean curd into thin triangles. Deep fry or pan fry until golden brown. Set aside.
- Heat a wok and add 2 Tbsp oil. Stir fry the green onion and ginger until aromatic.
- Add the Chinese mushrooms, chilli paste and bamboo shoots, stir to mix.
- Then add the bok choy and stir fry in high heat for a few seconds.
- Add the oyster sauce mixture and fried bean curd.
- Bring to boil and cook for 3 minutes or until the liquid has reduced to half.
- Add the cornstarch mixture and bring to boil to thicken.
- Dish up and serve immediately.
Thursday, 29 May 2008
White Opera Cake
My First Daring Bakers' Challenge!I've always wanted to join in the fun of the Daring Bakers. It took me several months to muster up enough courage to send an email to the organizers and start the excitement of waiting for the next challenge's announcement. And guess what my first challenge was - opera cake! My most dreaded and nervousness-inducing pastry creation. I always tried to avoid making this, thinking it was too tedious, too difficult, or just too time and resource demanding. As it turned out, if you do parts of it ahead of time it won't be too daunting a task.
How did I fare? Not bad, though I would not qualify this as a resounding success. Despite my results I learned a lot from doing this and if ever I am brave (or nagged) enough to do this again I have every confidence I can do it well. Thanks very much to the organisers of this month's theme for their detailed instructions and their patience in answering our countless questions and shoring up our flagging confidence. Our organisers decided that the theme should not be the usual chocolate opera cake but with white chocolate and whatever light flavouring and spring-themed decoration you desire.
I didn't find much problems in the making of the joconde (cake) and syrup. They were straightforward and were easy peasy to make. I made them at least 2 days before with the syrup flavoured by lemon juice since I've decided to do a citrus flavoured opera cake.
The buttercream was another matter altogether. Me and my 7-year-old daughter were happily beating the eggs with the hot syrup very slowly dripped into it. It came out light, very fluffy and wonderfully marshmallow-like flavoured. Problem came when we beat in the softened butter. I thought it was softened enough but as I put in the first lot I actually saw it go deflate - pfffft! So the first lesson was make sure the butter is not just soft but room temperature - as in almost at melting point. The buttercream still came together but it was not as fluffy as I expected. And if I were to do this again I would make 1 1/2 of the buttercream to make sure there's enough for it to spread around.
Next was the disappointing white chocolate. I had two lots to do, one for the mousse another for the glaze. Needless to say the Mernier white choc I bought refused to completely melt! And all along I thought a more expensive one would give me an easier to handle ingredient. How wrong I was. I should have stuck to the cheap supermarket-brand baking white choc. Anyways, after my futile attempt to melt it in the double boiler I transferred it in a saucepan where it almost burned. Finally, it melted, removed from the heat and cooled it a bit. But by the time I have beaten the double cream to soft peaks the melted white choc was becoming grainy! So off it went back on the cooker with me stirring like a woman possessed. I cooled it again though this time watching it like a hawk and stirring it from time to time. When it was about room temperature I was finally able to successfully fold it into the whipped cream. The original recipe said to use 7 oz or 200 gm of white choc. I thought it was a bit much too sweet so I only used half required.
The original glaze for me is too sweet as well plus it did not spread too well. Therefore the recipe below is adjusted to double the cream and reduce the white choc a little.
The assembly was the easiest part for me. Although I could have put more syrup in the joconde to make the lemon flavour more prominent.
As I said before, I learned a lot from this exercise and have marked here all my learning points to avoid any future disasters.

White Opera Cake
Syrup
1/2 cup water
1/3 cup granulated sugar
2 Tbsp lemon juice
- Put all ingredients in a saucepan and bring to a boil.
- Simmer until all the sugar is dissolved.
- Remove from heat and set aside.
Joconde
6 large egg whites
2 Tbsp granulated sugar
2 cups ground blanched almonds
1-1/2 cups icing sugar
6 large eggs
1/2 cup plain flour
3 Tbsp unsalted butter – melted
- Preheat oven to 220°C/fan 200°C/425°F.
- Butter and line 2 swiss roll pan (about 15-inch x 10-inch) with parchment paper.
- Beat egg whites until soft peaks. Add sugar gradually and beat until stiff and glossy.
- In another bowl, beat eggs and icing sugar and ground almond until light and voluminous (about 3 minutes).
- Add flour and mix just enough to combine. Do not overmix.
- Gently fold the meringue into the almond mixture. Fold in the melted butter.
- Divide the batter between the two pans, spread evenly and bake for 6 to 9 minutes or until lightly brown and springy to the touch.
- Remove from oven. Run a knife along the edges to loosen the cake. Cover each with parchment paper, turn it over, unmold the cake and carefully remove the parchment paper lining. Let it cool to room temperature.
Buttercream
1 cup granulated sugar
1/4 cup water
1 large egg
1 large egg yolk
200 g [3/4 cup + 2 Tbsp] unsalted butter – softened to room temperature
1 Tbsp orange extract
- Combine sugar and water in a saucepan and cook over low-medium heat until the sugar dissolves.
- Continue to cook without stirring until the temperature reaches 225°F on a jam or deep-fry thermometer.
- While the syrup is heating, beat the egg and egg yolk at high speed until pale and foamy.
- Once the syrup reaches the required temperature, remove it from the heat, reduce the mixer speed to low and begin to very slowly pouring the syrup down the side of the bowl being very careful not to splatter the syrup onto the path of the whisk.
Some of the syrup might spin onto the sides of the bowl but don’t worry about this and don’t try to mix it in the mixture as it will harden. - Raise the speed to medium and continue beating until the eggs are thick and satiny and is cool to the touch (about 5 minutes).
- While the egg mixture is beating, place the softened butter in a bowl and mash it with a spatula until you have a soft creamy mass.
- With the mixer on medium speed, add the softened butter in two-tablespoon chunks. When all the butter has been added, mix in the 1 Tbsp orange extract and raise the mixer speed to high and beat until buttercream is thick and shiny.
- Chill the buttercream in the fridge, stirring often until it’s set enough to spread on the cake.
White Chocolate Mousse
100 g white baking chocolate - chopped
1-1/4 cup double cream
1 tbsp liquer of your choice such as Amaretto, Limoncello, etc. [optional]
- Put 1/4 cup double cream in a saucepan and cook on gentle heat.
- Once bubbles start to appear on the edges, add in the white chocolate.
- Stir to ensure it's smooth and that the chocolate has melted.
- Add the 1 Tbsp liquer and stir. Remove from heat and set aside to cool completely.
- In a bowl, whip the remaining 1 cup double cream until soft peaks form.
- Gently fold the whipped cream into the cooled chocolate to form a mousse. If it’s too thin, refrigerate it until it’s spreadable.
Glaze
250 g white baking chocolate
1/2 cup double cream
- Put the double cream in a saucepan and heat gently.
- Once bubbles start to appear on the edges add the white chocolate.
- Stir until melted and smooth. Let cool for about 10 minutes.
- Cut and trim each sheet of joconde (cake) so that you have 2 pieces: one 10-inch square and one 10 x 5-inch rectangle.
- Place one square of joconde on a cake stand or parchment lined baking sheet.
- Brush gently with lots of the flavoured syrup. Spread about 2/3 of the buttercream evenly over this layer.
- Top with the two rectangular pieces of joconde, placing them side-by-side to form a square.
- Again, brush these pieces with lots of the flavoured syrup. Spread the remaining buttercream on top. Then place the remaining square of joconde on top of this.
- Use the remaining syrup to moisten it and spread all of the white chocolate mousse on top.
- Refrigerate for at least two hours to let the mousse to firm up.
- Make the glaze and after it has cooled, pour and spread it on top of the chilled cake.
- Refrigerate again to set the glaze. Serve the cake slightly chilled.

Monday, 28 April 2008
CCC2: Pasta Broccoli
 Chris over at Mele Cotte is replaying for the second time his great idea of a blog event to highlight one of the scourge of our age - cancer. To encourage us to cook food that combats this disease.
I don't know if you notice, it seems cancer is spreading to epidemic proportions. Rare it is to find anyone who does not personally know someone who is afflicted with cancer. My husband's family is not stranger to it. An aunt and an uncle in his mother's side died of lung and breast cancers respectively. Then his several aunts and uncles in his father's side also has/had it in various forms. For me, an old high school classmate died of breast cancer at the age of 36 leaving behind 5 young kids whose father had long abandoned the family when he learned of her illness. How heartbreaking is that?
What I can do about it? Not much except maybe support them however I can in prayers, care, and whatever help I can extend. But I think the better way would be to take care of myself and my nearest loved ones in hopefully these would not befall us. One of the obvious thing to do is to eat healthily which this post will help in giving a recipe with several cancer-fighting ingredients.
A blogging friend sent me some of these lovely orecchiette (ear shaped) pasta which she got me from Italy. Thanks Sha! I've never tried these shapes before and quite curious of its texture and quality.

Then I got this recipe in the latest Delicious magazine. Their May edition is an all Italian issue. I had to halve the recipe because there's just too much of it. This recipe I adapted contains broccoli, garlic, and chilli peppers which are touted to be top cancer-combating food. I love the simplicity of this dish which can be had on its own or with other meats.

Pasta Broccoli
200 g orecchiette pasta (ear-shaped)
1 big garlic clove - thinly sliced
1 red chilli - deseeded and sliced
3 Tbsp extra-virgin olive oil
2 anchovy fillets (bottled or canned)
250 g broccoli - cut into small florets
- Blanch the broccoli in boiling water for 2 minutes. Drain and set aside.
- Cook the pasta 1 minute less than the pack instructions. Drain and set aside. Reserve some of the pasta water.
- A few minutes before the pasta is done, gently heat 1 Tbsp of olive oil and saute the garlic and chilli. Do not let it burn.
- Add the broccoli and cook for about half a minute. Add another 1 Tbsp olive oil. Stir to mix.
- Add about 1/4 cup of the hot pasta water and the anchovies. Cook in low heat while stirring frequently until the anchovies dissolve.
Season with salt and pepper. - Add the pasta and stir to combine. Cook for another 2-3 minutes to allow the broccoli to cook some more.
- Add the last 1 Tbsp of olive oil and mix well. Dish up and serve immediately.
Friday, 25 April 2008
Pear-Chocolate Clafoutis

I was hoping to enter this in the Hay Hay It's Donna Day #19 blogging event but it's only now that I read the rules carefully. It turned out that you have to follow a certain recipe using either berries or plums. Darn!
Never mind, I've always wanted to do this pear clafoutis recipe adapted from Green & Black's Chocolate Recipes cookbook. And I've never done clafoutis before I thought this would be a good chance to experience one.
If you don't like your clafoutis a little gooey in the middle then this is not the one for you. The extra liquid from the poached pears ensure that the middle part (at least) of the the cake is a bit wet. I absolutely love the moist, smooth texture of the conference pears with the sticky chocolate cake.

Pear-Chocolate Clafoutis
*For the poached pears:
6 pears
750 ml red wine or 3 cups water
110 g [1/2 cup] caster sugar (superfine)
juice of 1 lemon
*For the batter
110 g [3/4 cup] self-raising flour
1/8 tsp fine salt
100 g [1 cup] ground almond
165 g [3/4 cup] caster sugar (superfine)
2 large egs
1 large egg yolk
175 ml [2/3 cup + 1 Tbsp] full cream milk
75 g unsalted or slightly salted butter
100 g dark chocolate (minimum 60% cocoa solids)
- To poach pears:
- Peel pears but leave the stalks on (it's easier to turn pears around).
- Put wine (or water) in a saucepan with the lemon juice and caster sugar. Stir to dissolve sugar. Bring to boil slowly then lower the heat to a simmer.
- Cook/poach the pears the pears in the syrup for 10 minutes. Turn the pears from time to time.
- Take the saucepan off the heat and leave the pears in the liquid to cool for about 2 hours.
- After cooling, drain the pears and slice them in half lengthwise. Using a small teaspoon or melon baller remove the cores carefully. Cut off the stems if you like.
- For the batter:
- Preheat the oven to 200°C/fan 180°C/400°F/gas mark 6.
- Grease a 13 x 9-inch oval baking pan or two 9-inch baking pans.
- Break up the chocolate and melt with the butter in a heatproof bowl over a saucepan of simmering water. Mix well then set aside and cool a little.
- Put the flour, almond, sugar and salt in a bowl and mix well.
- Whisk the eggs, egg yolk, and milk together then add to the flour mixture. Blend until smooth.
- Stir in the melted chocolate mixture until well combined.
- Pour the batter into the prepared pan(s) and arrange the poached pears in the batter placing the thin end facing towards the centre of the pan.
- Bake for 20-25 minutes. The centre of the cake will always be gooey because of the extra liquid in the poached pear so do not be alarmed if a skewer inserted in the middle does not come out clean.
- Serve hot or cold with some cream or creme fraiche.

Saturday, 19 April 2008
Canteen

Pictures of my lone dinner to the restaurant in the Spitalfield Market area called Canteen didn't come to the surface until now. I went there last October when I had a training down in London. Because of my long illness right after that I didn't get a chance to review all the pictures I took until now that I'm generally better.

Canteen is one of the most ideal restaurant for me. I never hid the fact from anyone that when it comes to dining places the environment and ambiance are way down my list of criteria. First and foremost for me is the food (that's what it's all about innit?) secondly is the price - it had to be at least good value for money. So you can just about guess that down to earth places with reasonable prices and great food are my absolute favourites. If the surroundings and cutlery are nice then I would consider that a bonus.
This restaurant is no fancy place but had good settings in a minimalist way. The name was true to its word - it looks like a canteen. Most of the food are standard pub fodder but done in the best way possible. I likened the whole enterprise as like stripping a restaurant naked and exposing and highlighting the fabulous food it offers at prices that would not break the bank - I promise!

I ordered a steak (and ale ?) pie with mash and greens. The mash was the best I've tasted outside of my kitchen. Very buttery, creamy and ultra smooth. And the pie? On the outside the pastry was crisp and the inside was a great thick and flavourful beef stew. Although the filling was quite hot making me regret scoffing a spoonful as soon as I broke into it. I was wondering to myself how they managed to retain the crispiness of the pastry. Maybe they have them ready as baked shells and then fill it, top it then baked to crisp the outside. Hmmm ... food for thought.
Thank god the greens didn't come out cooked to death. It was handled just right making a fine complement to the pie and creamy mash. Oh before I forget, the gravy was delicious enough to bind them all together to give me a very satisfying meal.

Now I couldn't remember exactly the ice cream I had for dessert. I think it was raspberry one with a pistachio biscotti sticking like a tower on the side. But I could distinctly remember that the fruit flavour was vivid in a starring-role style not like some insipid ice cream whose intended flavours barely registered in your tongue. And did I say it was as creamy as a premium Italian gelato?
Well, what else can I say? It's obvious that I enjoyed my food in Canteen and will be definitely be back with a vengeance if I'm in the vicinity. I just hope they keep up the quality of their offerings and hope they won't get diluted once they start branching out. Please Canteen promise me you won't be another Wagamama ...
Canteen
2 Crispin Place
Spitalfields
London E1 6DW
Tel. No.: 0845 686 1122
Monday, 10 March 2008
White Chocolate-Blueberry Cheesecake

Look ma, no baking so no oven needed! Gary Rhodes' article in the BBC Good Food magazine provided me with the recipe to adapt for this confection which is really very easy to make!
I know, I know, the picture doesn't look too polished. I brought this to our nephew's baptism reception and there wasn't any plate big enough nor a knife to properly slice it. So a squashed pie plate was produced and everybody just hacked it with plastic forks and spoons. Not a pretty sight but well worth having as it was not too sweet with just the right balance of the white chocolate and cream cheese and with nary a smidgen of sour cream. The topping of course are lovely blueberries that always marries well with cheesecakes.
White Chocolate-Blueberry Cheesecake
*Biscuit Base:
225 g plain Hobnobs* - crushed to fine crumbs
100 g unsalted butter - melted
*Cheesecake:
300 g white chocolate - chopped
200 g cream cheese (or Philadelphia cheese) - at room temperature
25 g [5 tsp] caster sugar
2 cups double cream
*Topping:
350 g blueberries
100 g icing sugar (confectioner's)
2 Tbsp water
- Line bottom and sides of a 23cm/9-inch round springform pan with greaseproof paper.
- Mix crumbs and butter. Press into the bottom of the prepared pan. Chill in the fridge.
- While the the crust is chilling, melt white chocolate very gently in a heatproof bowl set over simmering water in a saucepan. Remove from heat and cool a little until warm.
- Beat cream cheese and sugar until smooth.
- Stir in melted chocolate. Mix well.
- Whip double cream to very soft peaks then gently fold into the white chocolate mixture.
- Pour into the prepared pan. Spread and smooth top. Chill in fridge for 2-3 hours or overnight.
- For the topping:
- Place blueberries, icing sugar and water in a saucepan and warm gently until sugar has dissolved and the berries are starting to soften but still retains their shape.
- If syrup is too thin, take the blueberries out with slotted spoon into a container. Leave a few pieces and mash these to release the juice. Continue simmering the syrup for a few minutes to thicken.
- Remove from heat and mix back in the blueberries. Leave to cool.
- To assemble:
- Remove cheesecake from baking pan then spoon the cold blueberries with syrup over the top.
*Note: For the crust, you can use either Hobnobs (or any oaty biscuit), Digestives, or graham crackers.
Friday, 15 February 2008
Buttermilk Scones

Scones here are more or less the equivalent of what the Americans call biscuits. They are favourite staples of afternoon teas. I love to have them with some clotted cream and strawberry jam plus a steaming cup of Earl Grey. They are one of the more easier quickbreads to make. So easy even my daughters can make them without my help at all.
One of the secrets in making a flaky, fluffy and well-risen scones is by using buttermilk. It reacts with the baking powder in the self-raising flour to give us light and airiness in the scones. Also when rubbing the butter into the flour, lift it a little bit to incorporate more air in the mixture. The other one is in dipping the cutter in flour before cutting into the dough. If it's not well floured it tends to crimp the edges which prevents it from rising well.
This particular recipe is adapted from Angela Nilsen's The Ultimate Recipe Book. I reduced the milk to make it less sticky and increased the sugar a little for more sweetness.
Buttermilk Scones
450 g self-raising flour
1/2 tsp fine salt
75 g [5 Tbsp] caster sugar (superfine)
100 g chilled butter
1 cup buttermilk
1/4 cup milk
a little flour for dusting
- Preheat oven to 220°C/fan 200°C/425°F/gas mark 7. Lightly grease a baking sheet.
- Mix flour and salt in a bowl.
- [Optional] Cut butter into small pieces.
- Add butter to the flour mixture and using a pastry cutter or two butter knives, cut the butter into the flour mixture until they are pea-sized. Then shift to using your fingers and rub the butter and flour mixture lifting as you go along to aerate the mixture until it more or less resembles bread crumbs. Try not to over rub as the scones will be lighter if the mixture is a bit flaky.
- Add sugar and mix well.
- Mix the buttermilk and milk. Make a well in the middle of the flour mixture and pour the buttermilk mixture in it.
- Gently mix them together until it forms a soft and sticky dough.
- Put the dough in a lightly floured surface and knead 3 or 4 times only to get rid of the cracks. Do not overwork the dough or it will become tough.
- Pat the dough gently to a thickness of about 1-inch. Dip a 2-1/2 inch round fluted cutter in flour and cut out the scones by pushing down quickly without twisting. Make sure to dip the cutter in flour every time before cutting through the dough.
- Cut out the rest of the dough by gathering the trimmings lightly then patting to 1 inch thick again.
- Place in the baking sheet and sift a light dusting of flour on top or glaze with beaten egg. Bake for 10-12 minutes or until well risen and golden.
- Cool on a wire rack uncovered for crisp tops or loosely covered with a tea towel if you prefer it soft.
- Serve with clotted or whipped cream and strawberry jam.
Friday, 4 January 2008
Roasted Teriyaki Salmon

We usually go for something different on either Christmas lunch or dinner. In the last one we had the kid's favourite roast rib of beef for lunch so I thought of keeping it a little lighter for dinner.
Often salmon is dealt with in our kitchen by grilling it. This time it is baked with some veggies stuffed in it. I think it still needs a little more seasoning although my husband it was just right. Anyway he said we always have a dipping dish of soy sauce and lemon on the side. However as a variation, this dish can be marinated first with teriyaki sauce to make the salmon more flavoured. But forget my gripes, I highly recommend this as an alternative to your usual turkey or beef roasts.
This was adapted from the Good Housekeeping magazine from the mid 90s. Enjoy!
Roasted Teriyaki Salmon
4 spring onions
225 g asparagus (optional) - halved lengthwise
225 g carrots - peeled and julienned
225 g leeks
1 large red or orange bell pepper
3 garlic cloves - finely minced
50 g canned water chestnuts - julienned or roughly chopped
4 Tbsp olive oil
1/4 cup teriyaki sauce*
2 salmon tail fillet (about 1.8 kg in weight) - skin on and scaled
sea salt flakes
fresh ground pepper
- Cut off the ends of the leek and into about 4-inch lengths crosswise then cut into julienne strips.
- De-seed the bell pepper and cut into julienne strips.
- Heat 2 Tbsp of oil in a wok. Saute the garlic for a few seconds.
- Stir fry the rest of the vegetables for 2-3 minutes.
- Add in the teriyaki sauce and cook for about 1 minute.
- Remove from pan and set aside to cool.
- Preheat the oven to 200°C/fan 180°C/400°F.
- Put the salmon fillets cut side up on a work surface. Sprinkle some teriyaki sauce, sea salt and pepper on them.
- Place the cooled vegetable on top of one then cover with the other salmon fillet, cut side down.
- Tie the salmon tightly together at intervals using cotton strings.
- Brush the of the salmon on top with the rest of the olive oil and sprinkle with sea salt and pepper.
- Put the salmon in a roasting pan and bake in the oven for 20-25 minutes or until cooked through.
- Remove from oven and put under a hot grill (or increase the oven to 250°C/fan 230°C/490°F) for 2-3 mins to brown the salmon.
- To serve, cut into thick slices and with lemon and soy sauce.
*Notes:
- You may use store-bought teriyaki sauce.
- This can be prepared ahead by doing to end of step 10 up to one day ahead. Chill in the fridge until ready to use.
- When baking from chilled, cook for 35-40 mins.
- The salmon may also be marinated with the teriyaki sauce for about 15 minutes to increase flavour.
Saturday, 29 December 2007
Sticky Toffee Pudding

This was intended as an entry for the SHF #38 with a theme of pudding. I thought the deadline was end of the month I forgot that this is a Friday event. Duh! So I missed it again as I always do ... arrrgggghhhh!
Nevermind, I still want to include this in my list of recipes here as a reference for moi. For I have found my ultimate sticky toffee pudding - at last! I first sighted this in the Good Food magazine as far back as 2006. I have made this before but just forgot (there's that word again) to take a picture. So Christmas dinner this year provided the perfect excuse to indulge in our most favourite of all puddings.
Among the commercial varieties the only one that pass my family's finicky taste is Marks & Spencers. My husband buys only their sticky toffee pudding when he occasionally hankers for one. The rest of the store-bought ones didn't get enough points for us to buy a second time.
This type of pudding is typical of traditional British ones. Though upon research I found out that it was anything but ancient. There is controversy regarding its origins. Some say it's from a Lake District hotel some say it's from somewhere else. In any case, hats off to whoever it was for inventing a totally addictive pud.
When I was making this I realised that the most important bit is really the toffee sauce. Once you get the right balance of the ingredients for the sauce, it does not matter whether the pudding itself does or not have any dates in it. Actually I think even if you have just plain sponge as a base but have the perfect toffee sauce then it is all well and good exactly like the better store-bought ones.
The recipe is very good and easy to do. My only gripe is the black tracle in the toffee sauce causes it to turn a slight greyish tint when it cools off which can be a little off-putting for some people. So I'm recording that down as optional. I highly recommend this especially when served warm with cream or custard. Yum!

Sticky Toffee Pudding
*Pudding:
200 g pitted and chopped dates
2/3 cup boiling water
1 tsp vanilla extract
2 eggs
175 g self-raising flour
1 tsp bicarbonate of soda (baking soda)
85 g butter - softened
140 g demerara sugar
2 tbsp black treacle or dark molasses
1/3 cup + 1 1/2 Tbsp milk
cream or custard to serve
*Toffee Sauce:
175 g light muscovado sugar
50 g butter
1 cup double cream
1 Tbsp black treacle or dark molasses (optional)
- Pour the boiling water on the dates in a bowl. Let soak to soften for at least 30 minutes. Mash the dates with a fork or puree with a liquidiser. Set aside.
- Pre-heat the oven to 180°C/fan 160°C/350°F/gas mark 4. Butter and flour seven small pudding molds or cups (about 200 ml in size).
- Mix the flour and bicarbonate of soda well. Set aside.
- Cream the butter and sugar with an electric mixer for several minutes.
- Add eggs one at a time mixing well after each addition.
- Beat in the vanilla extract, then the black treacle.
- Using a large metal spoon, fold in one-third of the flour mixture alternately with half of the milk while making sure not to overmix. Repeat until all the flour and milk are used.
- Add in the mashed dates and stir until just incorporated.
- Divide the batter evenly among the seven pudding molds. Place molds on a baking sheet and bake for 20-25 minutes.
- Remove from the oven, cool for a few minutes then loosen them by running a butter or pallet knife on its side. Turn out from the molds to cool completely.
- While the pudding is baking, make the sauce by combining the sugar, butter and half of the double cream in a saucepan.
- Bring to boil in medium heat while stirring all the time until sugar has dissolved.
- (Optional) Stir in the black treacle if using.
- Let it simmer away for about 2 minutes while stirring from time to time making sure it does not burn.
- Remove from heat then stir in the rest of the double cream.
- To serve, pour the sauce over the upturned pudding in individual plates or bowls with cream or custard.
*Note: The pudding will taste even better if it sits in the sauce for a day or two. Cover the bottom of a baking dish with some of the sauce. Sit the upturned puddings on the baking dish and pour the rest of the sauce over it. Cover with a loose tent of foil so it will not smudge the sauce.
To reheat, you can put the covered baking dish in a 180°C/fan 160°C/350°F oven for 15 minutes. Though I prefer to microwave the individual puddings because baking tends to dry out the sauce a little making it a tad sweeter than I would like it to be.
Thursday, 29 November 2007
Fish Fillet with Broccoli

Here's a recipe for fish fillets with a healthy dose of veg. The sauce is mild and not overpowering at all. Such a nice detour from the usual spicy or strong flavoured dishes we do with fish fillets. I got this from my good 'ol favourite Chinese Cuisine by Huang Su-Huei.
Fish Fillet with Broccoli
500 g white fish fillet
1 Tbsp cooking wine
1/2 tsp sea salt flakes
1 egg white - beaten lightly
1 1/2 Tbsp cornstarch
oil for frying
1 green onion - cut into 1/2-inch slices
6 slices ginger root - julienned
250 g broccoli - cut into small florets
*Sauce:
1 tsp sea salt flakes
1 tsp sugar
dash of black pepper
dash of sesame oil
5 tbsp water
1 1/2 Tbsp cornstarch
- Mix all the ingredients for the sauce in a small bowl and set aside.
- Steam the broccoli for about 3 minutes or until just cooked. Set aside.
- Score the fish fillet lightly in criss-cross pattern.
- Cut the fillets in bite-sized pieces.
- Add cooking wine and salt. Mix well.
- Add in egg whites - mix.
- Add the cornstarch - mix again. Set aside for a few minutes.
- Heat a non-stick pan with about 1 1/2 Tbsp oil.
- Before frying add 2 Tbsp oil into the fish mixture and mix well.
- Once the pan and oil is hot, fry the fish fillets in batches until cooked.
- In a wok, heat about 2 Tbsp oil.
- Stir fry the green onion and ginger for about 30 seconds.
- Add in the broccoli. Stir fry for about 30 seconds until heated through.
- Add the fried fish fillets and the sauce.
- Turn the heat to high and stir quickly to mix.
- Remove from heat and dish up.
Monday, 29 October 2007
Lasang Pinoy 21: Pancit Bihon Guisado
 The 21st edition of Lasang Pinoy is brought to you by Bryan of Fire Water Husband (blog under renovation) who has this great idea of Cooking for Heroes. It's just as well that our current logo features the exact hero I want to cook for - Andres Bonifacio.
Even in my elementary school days I feel our dear old Andy Boni got a raw deal. I do believe he should be our national hero for he started the Katipunan, he started the ball rolling to begin the revolution and break free from the colonial masters. And what did he get for all his heroism and troubles? He got salvaged (executed) for being a rival party in the election for the head honcho of the revolutionary government. Then he lost out again almost a hundred years later in being a national hero. If that's not a raw deal I don't know what is.
It's no use arguing now about his place in history but what is undeniable is his courage, heroism, and his love of his country and fellow Filipinos. To you Andres, a big lambanog toast for being a real Pinoy! Thank you for all the things you have done for us.
What I have in mind to cook for him is something that can be considered essentially Filipino and at the same practical and nutritious for a revolutionary who had to eat on the go. And I thought why not our classic pancit. It's a complete meal in itself. It's got carbs, protein from the meat, and some wholesome veggies thrown in the process. Sounds like a good idea to me. :)

For the pancit recipe itself, this is the culmination of several years of my family's sacrifice of eating pancit as soggy and undercooked or dry and a bit tough or almost tasteless (prompting lots of toyo and lemon juice heaped on it). It took me awhile to get the hang of cooking the noodles just right. There is also the case with the oil, I used to put as little oil as possible while at the same time wondering what makes my mother's pancit well separated and really nice. Well I increased the oil exponentially with each batch - et voila! The oil is crucial! (I bet my doctor's not happy about this.) Too little will make it dry (obviously) and will tend to make it clump together. I also took my mother's advice of cooking the veggies separately to prevent it getting soggy. So like most dishes, cooking pancit successfully has a lot to do with timing. One revelation as well is that the richer your stock the better tasting your pancit will be. That my friend is guaranteed. :)
Pancit Bihon Guisado
250 g thin or medium rice noodles (bihon)
3 Tbsp oil
1 Tbsp minced garlic
1 medium onion - sliced
1/3 cup jullienned carrots
1/4 cup sliced celery (optional)
15 pieces mangetout (sitcharo)
1 cup shredded cabbage
1 cup sliced meat - chicken, pork, shrimp or combination of these*
1 1/2 cups rich stock
2 Tbsp dark soy sauce
freshly ground pepper
salt
additional stock or water
- Soak the noodles in tepid water for about 20 minutes or until soft. Using scissors, cut into desired lengths. Drain and set aside.
- In a wok, heat 1 Tbsp of the oil in medium heat. Saute half of the garlic and half of the onions.
- Add the meat and stir fry a little. Season with salt and pepper.
- Add about 1/4 cup stock or water and simmer until done. You may have to add a bit more stock from time to time to keep it from drying out.
- When the meat is done, add the carrots, mangetout, and celery. Stir to combine. There should still be some liquid in the wok if not add about 2-3 Tbsp stock and then cook under cover for 2 minutes.
- Add the cabbage, stir fry for a few seconds and cook under cover for 1 minute.
- Remove from heat and transfer to a dish. Set aside.
- Using the same wok (no need to wash unless there's some burnt crust in the bottom), heat the remaining 2 Tbsp oil on medium heat.
- Saute the remaining garlic and onion until onion is translucent.
- Tip in the stock and any sauce drained from the meat and veg mixture.
- Add the soy sauce and season with black pepper.
- Bring to boil then add the noodles. Cover and bring to boil again then lower heat to medium-low.
- Once the sauce starts getting absorbed by the noodles (about 5 minutes), toss and stir the noodles (preferably with large forks for easier tossing) until all the sauce is absorbed and the noodles are fully cooked. The tossing also make sure that the strands are separated and do not clump together. Don't worry if the bottom is getting a bit crusty. At the end there should be no sauce left but the noodles should still be moist, cooked but not soggy.
- Add half of the meat/veg mixture and toss to mix.
- Dish up and transfer to a dish. Top with the rest of the meat/veg mixture. Serve with calamansi or lemon on the side.
Tuesday, 23 October 2007
Prawns with Peas

The short-lived summer here UK is only alleviated by the onslaught of fresh seasonal vegetables. One of my favourites - green peas - is a very much welcome addition to our table anytime. I tell you frozen peas is no match to the sweetness of fresh green peas especially if it's freshly picked right off your garden. I'm still trying to find the numerous ways of cooking it though this marriage with prawns is not bad at all. In fact, it's more than good because in all its simplicity I love it! This is adapted from my all-time trusted Chinese Cuisine by Huang Su-Huei.
Stir-fried Prawns With Peas
250 g raw prawns or shrimps - shelled and deveined
1 tsp cooking wine
1 Tbsp egg whites - slightly beaten
1 Tbsp cornstarch
1 green onion - cut into 1-inch pieces
6 slices of ginger root
1 cup green peas - precooked
oil for frying
*Sauce:
1 tsp cooking wine
1 tsp sesame oil
1/8 tsp salt
2 tsp cornstarch
1/4 cup water
ground black pepper
- Combine all sauce ingredients in a container. Set aside.
- Place prawns in a bowl and season with salt.
- Add cooking wine, egg whites, and cornstarch. Mix well.
- Heat a wok then add about 2 Tbsp oil. Swirl the wok around so the oil coats it well.
- Fry the prawns in medium heat for about 3 minutes. Remove from the wok and set aside.
- Put 1 Tbsp oil in the wok, heat up and stir fry the green onions and ginger over medium heat.
- Add the prawns, stir fry for a few seconds.
- Add the sauce, turn heat to high and stir fry quick just enough to mix.
- Dish up and serve.
Subscribe to:
Posts (Atom)