 It's that time of the year again where baking and blogging for breads is compulsory for the World Bread Day. I don't mind it at all. In fact, I look forward to it come October knowing that I will add something in my list of breads that I've tried. As always every year this is hosted by the very generous Zorra of Kochtopf.
I have decided to bake something with chocolate to hit two birds with one stone. For it is also Chocolate Week here in UK. This recipe I adapted from a special insert in the current September issue of Waitrose's magazine. It is very good except that the filling was quite runny. So the instructions said to cut it in half lengthwise and then twist them together, I knew that it will be a messy affair if I did that. Hence, I just twisted them intact. I expected that it won't be too good looking when finally baked but I was rewarded with a nice swirl inside that was revealed when cut. And the taste of the bread itself was excellent. This is a definite keeper of a recipe. I just have to tweak that filling so it won't ooze out too much.

*Dough:
7 g sachet easy bake yeast
250 g strong white bread flour
3 Tbsp dark brown sugar
1/2 tsp fine salt
1/4 cup whole milk
1 large egg - beaten
75 g unsalted butter - softened
*Filling:
1/4 cup whole milk
75 g milk chocolate - finely chopped
50 g dark chocolate - finely chopped
1 Tbsp cocoa
3 Tbsp caster sugar
1/2 tsp vanilla extract
1/2 tsp ground cinnamon
*Glaze:
3 Tbsp dark brown sugar
3 Tbsp water
*For the dough:
**Manual method:
- Gently warm the milk in a pan until it is just lukewarm, remove from heat. Stir in the yeast and set aside for about 5-10 minutes. By then, then yeast should be foaming (it is activated). If not, discard it and start again from the beginning with fresh milk and yeast.
- Mix all the dry ingredients in a bowl. Make a well in the centre and add the milk-yeast mixture, egg, and butter.
- Knead mixture in an electric mixer with a dough hook attachment for 6-8 minutes or mix and knead by hand for 10 minutes until smooth.
- Cover with cling film, put in a warm place and leave to double in size (about 2 hours).
**Bread machine method:
- Put all ingredients according to the manufacturer's instructions (usually with the yeast first) and put on the dough program. This will include its first rising.
*For the filling:
- While dough is doing its first rise, heat the milk until steaming. Remove from heat and then add the chopped chocolates.
- Stir until chocolates has completely melted.
- Add in all the other ingredients. Stir to mix completely. Set aside to cool completely.
**Assembly:
- Punch down dough and lay out on a floured surface. Roll out to a rectangular size about 12 x 18 inches (30 x 45 cm).
- Spread the chocolate filling all over the dough. Roll up tightly like a log starting from the short end. Pinch the edges to seal it.
- Trim the ends of the roll. Cut in half lengthwise with a floured knife.
- Tightly twist the two strips over each other with the filling facing outwards.
- Transfer to the prepared tin. Cover with cling film or tea towel and leave to rise in a warm place to double size (about 1 hour).
**For the glaze:
- While the dough is doing its second rise, place the sugar and water in a saucepan and boil for about 2 minutes until syrupy. Set aside.
**Baking:
- Preheat oven to 180°C/fan 160°C/350°F. Bake for 25-30 minutes until cooked through.
- Brush half the syrup over the babka and leave for 15 minutes.
- Brush again with the rest of the syrup then cool completely on a wire rack.

I've always wanted to combine the two most favourite fruits our family like to include in baking - apples and bananas. The experimentations over the years were not very successful at all. Most of the recipes were from the internet and they range from the really soggy ones (too much bananas) to the dry ones (not enough moisture) and the too sweet ones.
This one fits the bill, although I have to adapt and reduce or increase some of the ingredients, but generally it's quite good and not overly sweet which I guess is why it's called a 'bread'. That's one of my dilemna, do I call it a bread or a cake? For me, it can be classified as a cake but then it's not very sweet so a bread then? Whatever it is, teatime or coffee time would be better with this addition.
Thanks to Kelly in Just A Taste for the great recipe I adapted.
Banana Apple Bread
260 g [2 cups] plain flour plus 1 Tbsp extra
1 tsp bicarbonate of soda (baking soda)
1/2 tsp fine salt
1 tsp ground cinnamon
95 g [6 Tbsp] unsalted butter - melted
150 g [3/4 cup] granulated sugar
2 large eggs
2 tsp vanilla extract
1/4 cup buttermilk
1 cup mashed overripe bananas (about 2-3 bananas)
1 large baking apple - diced small (about 1 1/4 cups)
2-3 Tbsp demerara sugar or granulated sugar for sprinkling
- Preheat oven to 180°C/fan 160°C/350°F. Line a 9x5-inch loaf pan with baking parchment.
- Combine flour, cinammon, salt, and bicarbonate of soda in a bowl.
- Sprinkle 1 Tbsp flour on the diced apples and toss to coat. Set aside.
- In another bowl, mix sugar with melted butter.
- Add eggs one at a time and beat each time.
- Add bananas and vanilla, stir to mix.
- Fold dry mixture to the wet mixture alternately with the buttermilk.
- Then fold in the apple.
- Pour into the prepared loaf pan.
- [Optional] Sprinkle top generously with demerara sugar.
- Bake for 55 minutes or until a skewer pierced in the middle comes out clean.
This is more like a cake than a bread to be honest. But it's very very nice especially when straight out of the oven and slathered with butter. This is adapted from the Betty Crocker website and is obviously for a bread machine. You will have convert when doing it manually such as activating the yeast first, then putting them all together in a bowl. Then proving twice and finally baking. Right now I don't have the time nor the energy to do it that way. So to the bread machine I will stick!
Sour Cream and Vanilla Bread
1 sachet [2 tsp] fast action dry yeast
3 cups bread or strong flour
3 Tbsp sugar
1 1/2 tsp fine salt
1 Tbsp vanilla extract
1 egg - slightly beaten
1/3 cup sour cream
1 Tbsp butter - softened
1/2 cup water
- Put all ingredients in a bread machine in the order given (or according to your bread machine's instructions).
- Select White/Basic bread cycle. Do not use delay timings. After baking, remove from pan and cool on a wire rack.
 It's that time of the year again for the World Bread Day to celebrate anything to do with breads in the food blogging world. Zorra of Kochtopf as usual is ably hosting this fine blogging event.
I always loved fruited breads like tea breads/cakes, fruit loafs, etc. Toast them lightly then slather with butter and scoff down with some Earl Grey tea - yum! So what better way to try making a fruited bread than baking the Irish Barm Brack. The timing is quite right, too. For it is also traditionally served during Halloween.
I first had Barm Brack when an Irish family friend gifted us with one. It was the dark variety but packed chock-a-block full of fruits. Oh wow, it was a great introduction to this wonderful tea-time bread.
Sue Lawrence's Book of Baking provided me with a workable recipe with the help of my trusted Panasonic bread machine.

500 g strong white flour (or bread flour)
1/8 tsp ground nutmeg
1 tsp ground mixed spice
7 g sachet of easy-blend dried yeast
1 tsp fine sea salt
50 g [scant 1/4 cup] unsalted butter
50 g nbsp;[1/4 cup] caster sugar
150 g [1 cup] currants
50 g [1/3 cup] dried mixed peel
50 g [1/3 cup] sultanas
300 ml [1 1/4 cups] tepid milk
*Glaze:
1 Tbsp sugar
1 Tbsp water
- Hand Method:
- Combine the flour, yeast, spices, and salt in a bowl. Rub in the butter.
- Stir in the sugar and dried fruits; then the milk.
- Once combined, turn out on a floured surface and knead for about 10 minutes until smooth.
- Place in an oiled bowl, invert dough so that the top is oiled. Cover with cling film and let rise in a warm place for 2-3 hours.
- Bread Machine Method:
- Put all ingredients according to the bread machine instruction and set to dough setting.
- Butter a 20 cm/8 inch baking pan. Punch down dough and shape into a round to fit into the prepared pan. Cover with greased cling film and let rise in a warm place for another hour.
- Preheat oven to 220°C/fan 200°C/425°F/gas mark 7. Bake the bread for 15 minutes, then lower temperature to 200°C/fan 180°C/400°F. Bake for a further 30-35 minutes. Cover loosely with foil in the last 15 minutes. It is cooked when it sounds hollow when tapped at the bottom.
- While it is baking, make the glaze - boil the water in a small saucepan; add the sugar and cook on low heat until dissolved. Brush the syrup glaze on top of the bread and return to the oven for 2 minutes.
- Remove from baking pan and cool completely on a wire rack before slicing.
Sometimes when we like to have doughnuts but don't want the accompanying grease, we take out this recipe to make some baked doughnuts. Yes it is possible. Although in this instance a special doughnut pan has to be employed to create that round sweet bread with a hole in the middle. I got this pan from Lakeland ages ago that sometimes I forget that it exists in my pantry. Its accompanying recipe almost got lost before so I thought I better document this recipe before I lose the only hard copy we have.

225 g plain flour
175 g caster sugar
10 ml [2 tsp] baking powder
5 ml [1 tsp] fine salt
175 ml [scant 3/4 cup] whole milk
2 eggs - beaten
15 ml [1 Tbsp] melted butter or olive oil or cooking oil
5 ml [1 tsp] vanilla extract
extra icing or caster sugar for dusting
- Preheat oven to 160°C/140°C fan/325°F. Lightly brush the doughnut cups in the pan with cooking oil making sure that the centre stem is well covered by the oil.
- Sift the flour, caster sugar, baking powder, and salt into a large bowl.
- In another bowl, whisk the milk, eggs, oil, and vanilla together.
- Add the wet ingredients into the dry ingredients mixing thoroughly.
- Fill each doughnut cups around 3/4 cups full with the batter.
- Bake for about 8 minutes or until firm and springy to the touch.
- Remove from pan and cool slightly. Dust with sifted icing sugar or caster sugar.

I am very new to bread baking so this challenge is very important since it will be my first time ever to bake a savoury filled bread. I certainly am no stranger to these type of bread. One of my fondest food memory was having pork adobo roll at a kiosk in my former university. I would eagerly buy one especially if there was a freshly delivered batch. It was a wonderful snack wolfed down with ice cold Coke. Yum!
For the filled bun I make here - I will call them rolls since the word siopao in my native Filipino ears always mean buns that are steamed not baked. I decided on doing an asado filling first. An email to my sister for her asado recipe was duly dispatched because I really don't want to mess this up with an untried recipe. I just tweaked it a little bit and it was the kind of asado I always wanted to make myself.
As for the bread itself, I used Betty Crocker's all-time favourite dinner roll recipe. I will say it again, I am a newbie baker, so forgive me if it came out a little denser than normal. I think I put in too much flour. It did rise quite a bit but I was hoping it would be fluffier. Oh well, maybe I'll give it another go in the coming weeks.

1 recipe of Pork Asado (see below)
1 recipe of Dinner Rolls (see below)
melted butter
- Cool down the pork asado completely.
- After the first rising of the dough, punch down dough and knead a few times to make it smooth again.
- Divide into about 10 pieces. For each piece, knead briefly and roll into a circle of about 6 inches diameter.
- Put about 3 Tablespoon of the pork asado filling (with some sauce) in the middle of the rolled dough.
- Gather the edges of the dough and seal to make a round bun.
- Put in a greased baking sheet sealed side down.
- After filling all buns, cover sheet with kitchen towel or greased cling film and let rise until double in a warm place (about 1 hour).
- Brush top with melted butter.
- Bake in a preheated oven of 190°C/fan 170°C/375°F for 15 minutes or until golden brown.
Pork Asado
500 g pork - cut into 3/4-inch pieces
1 Tbsp cooking oil
1 Tbsp minced garlic
3-4 shallots - chopped
1 Tbsp rice wine
1 Tbsp soy sauce
1 Tbsp oyster sauce
1 Tbsp hoisin sauce
1 Tbsp brown sugar
1 Tbsp granulated sugar
1/2 cup hot water
1 tsp cornflour (cornstarch) dissolved in 1 Tbsp water
- Saute the garlic and shallots in a saucepan with cooking oil. Cook on low heat for about 5 minutes.
- Turn up heat to high and add in the pork. Saute until it brown all around.
- Add the rice wine and let sizzle until it has evaporated.
- Add in all the ingredients except the cornflour mixture.
- Bring to boil and then turn heat to low and simmer until meat is tender (about 1 hour).
- Add the cornflour mixture and bring to boil. Turn off heat and serve.
Dinner Rolls
1/4 cup butter - room temperature or melted
1/4 cup sugar
1 package fast-acting or regular dry yeast (2 1/4 tsp)
3 1/2 bread flour
1 large egg - slightly beaten
1/2 cup milk
1/2 cup water
extra melted butter for brushing and greasing
- Mix the water and milk in a saucepan and heat gently until warm (about 50°C/120°F).
- Combine butter, sugar, 2 cups of the bread flour, and yeast in a big bowl.
- Add the warm milk mixture and egg into the bowl.
- Beat with electrix mixer (or wooden spatula) for about 1 minute until flour mixture is moistened.
- With a wooden spatula, add in enough of the flour 1/2 cup at a time until the dough is soft, leaves the side of the bowl and is easy to handle.
- Remove the dough from the bowl and place on a floured flat surface. Knead for about 5 minutes, sprinkling more flour on the surface to keep the dough from sticking, until the dough is smooth and springy.
- Put dough in a greased bowl, turn so that all sides are greased. Cover with greased plastic. Let rise in a warm place for about 1 hour or until doubled in size.
- Punch down dough and turn out on a lightly floured surface. Divide into 15 pieces. Shape each piece into a ball.
- Grease a 13 x 9-inch baking pan. Arrange the shaped dough in it and brush with melted butter. Cover with plastic wrap and let rise for about 1 hour or until doubled in size.
- Bake in a preheated oven at 190°C/fan 170°C/375°F for 15 minutes or until golden brown.
- Remove from pan onto a cooling rack. Brush top with more melted butter.
My pictures are a bit lame but don't let that detract you from the fluffiness and delectable taste of this mashed potato-based bread. I already did a similar one before so I was not a complete newbie when I tried this. The bread machine was deployed for the kneading and initial proofing so it certainly was a breeze to do. As you can see, I was so satisfied with the result. Just look how fluffy they are!
The King Arthur Flour website is where I got the recipe I adapted. They have loads of interesting recipes there that I'd like to try someday.

2 1/4 tsp [1 package] active dry yeast
3/4 cup slightly warm water or potato water*
2 eggs
1 cup unseasoned mashed potato
4 1/4 cups plain flour
1/3 cup sugar
1 1/2 tsp fine sea salt
6 Tbsp butter - room temperature
*Bread Machine Method:
- Put all the ingredients in the bread machine according to the instructions of the bread machine manufacturer. Set the machine for the dough program and press start.
- Allow the machine to complete its cycle. For most bread machine the rising of the dough is included in the cycle. If not, allow the dough to remain in the machine to rise for for 1 hour or until double in bulk.
*Manual Method:
- Dissolve 1 tsp of the sugar in the water. Add the yeast and stir to slightly dissolve. Set aside for 10-15 minutes. By this time, it should foam up to indicate that the yeast is active. If not, discard mixture and start again with a new batch of yeast.
- Combine all the dry ingredients in a bowl. Add the rest of the ingredients and mix until the dough starts to leave the side of the bowl.
- Turn out the dough onto a lightly greased or floured surface and knead for 6 to 8 minutes or until it's smooth and satiny.
- Place the dough in a lightly greased bowl. Turn it to coat all around with grease. Cover with lightly greased plastic wrap and let rise for about 90 minutes or until double in bulk.
*To Shape Rolls:
- Punch down dough, turn out onto a floured surface and knead for a few turns until smooth again.
- For standalone rolls: divide dough into 16 equal pieces and shape into balls. Place in lightly greased baking sheets leaving about 2 inches of space between them.
- For pull-apart rolls: divide dough into 15 equal pieces (I used weighing scale for this). Place in a greased 9 x 13-inch baking pan into 3 rows of 5 balls each. Space them evenly.
- Cover with lightly greased plastic wrap and let them rise for about 2 hours. The pull-apart rolls should be touching each other.
*Baking:
- Bake in a pre-heated 180°C/fan 160°C/350°F oven for about 20 to 25 minutes or until golden.
- Remove from oven and carefully remove from the baking pan.
- [Optional] Brush with melted butter.
- Serve warm or at room temperature.
 The lovely Zorra of Kochtopf is again hosting the World Bread Day 2014 food blog event. An annual virtual gathering of food bloggers to celebrate anything to do with bread.
For my entry, I'm harking back to the very first bread I ever successfully baked. When I started baking more than two decades ago I got really stressed when baking with yeast (well nowadays I still get a little anxious). I think it's the worry that the dough won't rise that I constantly peek while it is proving. This might have contributed to my first few attempts at bread making to fail. So when I saw the Make-Ahead Potato Bread Rolls in my beloved hardbound Betty Crocker cookbook, I lost no time in trying it. See, in that recipe the rising is not done in a warm place but in the fridge - overnight! How great is that? No more stressing, hand wringing and peeking to see if the dough rose at all. Anyway, the bake was successful but I never got to bake that bread again until now more than 25 years later.
One thing I only remembered now is that the shaping of the dough into balls can be a bit hard. They would not follow easily the shape I want. Maybe I should let it come to room temperature first before shaping? I'll find out next time. There's also one thing I remembered - how delicious it is especially when warmed. My youngest daughter loved it so much she slathered it with strawberry jam - one of the few times I saw her do that. This is a definite keeper of a recipe.
Potato Bread Rolls
1 package [2 1/4 tsp] active dry yeast
1 1/2 cups warm water
2/3 cup sugar
1 cup unseasoned mashed potato
2 eggs
1 1/2 tsp fine sea salt
2/3 cup butter - softened
7 - 7 1/2 cups plain flour
- In a bowl, dissolve the yeast in the warm water together with 2 tsp of the sugar. Set aside. It should foam and bubble after 10 minutes. If it did not, this means the yeast is dead so discard the mixture and start again with a new batch of yeast.
- Add the sugar, potatoes, eggs, butter, salt and 3 cups of the flour. Mix with electric mixer on low speed until smooth.
- Add in enough of the rest of the flour to make the dough easy to handle. Knead on a floured surface for about 5 minutes of until smooth and springy.
- Grease a bowl and place dough in it. Turn dough to grease all over. Cover tightly with cling film and let rise in the fridge for at least 8 hours but not more than 5 days.
- Punch dough gently and knead for a few turns. Divide dough into 2 equal pieces for loaf and 4 equal pieces for rolls.
*For small dinner rolls:
- Shape dough into 1 1/2 inch balls. Arrange on a greased baking sheet 1 inch apart. Cover and let rise in a warm place until double (about 1-2 hours).
- Brush with melted butter or egg wash (beaten egg with 1 Tbsp water or milk).
- Bake in an oven preheated to 200°C/fan 180°C/400°F for 15-20 minutes.
*For clover leaf rolls:
- Grease muffin pans. Shape into 2-inch balls and put in the muffin pans. Using scissors, cut balls into halves and then into fourths.
- Brush with melted butter and let rise in a warm place until double (1-2 hours).
- Bake in an oven preheated to 200°C/fan 180°C/400°F for 15 minutes.


Actually, the challenge was to do either the kurtoskalacs or the ensaymada. Naturally, I chose ensaymada - the Filipino version that is. This recipe from my sister-in-law (Ate Eva) has been in my to-do list for years! I finally had a good kick in the butt to do it.
The ensaymada of my childhood were very much like the original Spanish version. They were coiled flat and more flaky with lard often used for this purpose. Sometimes there were nuggets of raisins in it that were like little oasis of delight in my juvenile mouth. Yum! Nowadays, the modern Filipino ensaymada are more brioche-like. In fact some of them are so rich they resemble cakes more than a pastry. Nevertheless, they are equally wonderful and great as a midday snack. As with most things in Filipino food, the modern ensaymada combines the buttery sweet taste of the butter-sugar topping with the saltiness of the grated cheese so you get that familiar salty-sweet flavour with the soft pillow-like pastry.
This recipe is indeed a challenge for me. I am not very experienced with pastry so when the dough came out very very sticky after the first rising, it took me a looong time to get it to a manageable state with all the kneading and adding of more flour. In the end it was still sticky but did not cling too much when handled. I think I'll reduce the liquid a lot the next time I bake this. This particular recipe is not the 'special' ensaymada variety they call in the Philippines. That one has *a lot* of eggs and butter which make it more cake-like and quite rich. Ate Eva's is less rich and more bread-like. As a matter of fact, when I tasted the finished product bare without any toppings I thought it was okayish. But when you combine it with slathered soft butter, sugar, and grated cheese on top it was great! Exactly what I intended to make.
As a note to myself, this is the actual recipe from my SIL (with some adjustments in some ingredients and more elaborate procedure steps). And it makes a ton of ensaymada! It roughly makes about 30 medium-sized ensaymada and probably double that for the muffin-sized ones. In which case I believe this can be done with just a third of the recipe if only to keep me from eating ensaymadas for weeks!
The freezer is my friend now.

*Yeast mixture:
3/4 cup lukewarm water
3 tsp dry active yeast
1 tsp sugar
*Dough mixture:
6 1/2 cups strong flour (bread flour)
1 cup sugar
3 Tbsp melted butter
3 egg yolks
2 tsp vanilla
1 1/4 cups whole milk
1/2 cup cooking oil
*Topping:
butter - softened to room temperature
granulated sugar
grated cheddar cheese or edam
- Mix the yeast mixture in a small bowl, cover and set aside. After about 15 minutes it should start to foam. If it didn't that means your yeast is probably old. In that case, throw away the mixture and start again. If you are using instant, rapid-action, or fast-action dry yeast you can skip this step and add the yeast and sugar directly with the flour and the water with the other wet ingredients.
- Combine the flour with the sugar in a large bowl.
- In separate bowl, mix the melted butter, egg yolks, and vanilla.
- Add in the milk. Mix well.
- With a wooden spoon or with a mixer on low speed, stir in the milk mixture and the yeast mixture into the flour mixture. Combine well.
- Add in the cooking oil and mix until well combined.
- Cover and let it rest to rise in a warm area for about 1 hour or until double the size.
- Punch down dough and turn out onto a well-floured surface.
- Knead the dough while adding more flour. In the end it should be soft and sticky but should come away from fingers when kneading.
- Prepare the baking moulds by brushing the bottom and sides with softened butter.
- Divide into portions - 75-80 g for medium-sized ensaymada and 25-30 g for small ones.
- On a greased surface, roll out each portion thin into a rectangle shape and brush generously with softened butter or with your choice of fillings - cheese, chocolate, ham, etc.
- Roll portion from the long side into a thin log (about 1/2-inch or less in diameter).
- Coil the rolled dough into a spiral shape inside the prepared moulds taking care to tuck in the outer end.
- Cover loosely with tea towel and let rest at room temperature for 1-2 hours. They will double in size again.
- Bake in a preheated oven at 180°C/fan 160°C/350°F for about 18-20 minutes for medium-sized ensaymada.
- Cool completely on a wire rack.
- Put toppings - slather softened butter then press top onto a small bowl full of sugar then sprinkle grated cheese on top.

 It's World Bread Day! The previous year's blog event for this special day always passed me by. Bread making wasn't really in my arsenal of kitchen skills. But now that I've done bread making more often than I used to, I thought taking part in this once-a-year event would be the best thing. Zorra has been wonderfully hosting this event for the past three years.
One thing that helped me recently is my Panasonic bread maker. It's more than a year old actually but I've only used it several times. We're not too keen with the quality of the baked bread it churns out. The bread itself (or the middle) comes out too moist or wet. We've tried making many different kinds of bread in it (using the recipe book that it comes with) but they all come out the same. I tried reducing the liquid but the bread was worse. So nowadays I just use it as a bread kneader and first riser which it does beautifully. My bread making efforts are definitely reduced and there is less mess all around.
Okay this is not the first ever bread that I did but I was hoping to perfect this bread to use as a staple in our pantry. Perfect as in looking, smelling, and tasting like ones we buy from shops. My benchmark actually is Warburton Toastie which my family loves and in our opinion is the best commercial sandwich bread around. The Best Recipe Cookbook (my constant guide mowadays) provided the recipe that I adapted.
How did it go? It was good although my youngest and my husband was put off by the yeasty smell. So I guess next time I will reduce the yeast considerably. Mind you, I used active dry yeast successfully in the bread maker which in all its instructions always say to use instant dry yeast. But active dry yeast is just fine. All you have to do is 'wake it up' or activate it by dissolving in warm liquid and letting stand for a few minutes. I find it's helpful as well in knowing if your yeast is still good when you see (or not see) it foaming. With the instant dry yeast you won't know until after the first rising and by then all that dough is wasted.

520 g bread flour
1 tsp fine salt
1/3 cup warm water
1 cup warm milk
3 Tbsp sugar
2 Tbsp unsalted butter - melted
1 package (2 1/4 tsp) instant yeast or active yeast
- Mix the flour and salt in a bowl. Set aside.
- Mix the water, milk, butter, sugar, and yeast. Stir to dissolve yeast and sugar. If using active dry yeast, let stand for about 10 minutes until the mixture starts to foam.
- Hand method: Mix yeast mixture with the flour until it comes together enough to handle. Turn out on a lightly floured surface and knead for about 5 minutes until the dough is smooth and satiny. Shape into a ball. Put the dough in a lightly oiled bowl, rubbing it around to coat it lightly with oil. Cover with a plastic wrap and place in a warm place until the dough doubles in size (about 2 hours).
- Bread machine method: Pour the yeast mixture in the bread machine then pour the flour and salt mixture on top. Set machine to dough setting and turn on. This will take about 2 hours to complete the kneading and rising.
- Once the first rising is done, place the dough on a lightly floured surface and knead for a few minutes. Shape into a log and place in a greased 9 x 5-inch loaf pan. Press it gently so it touches all four sides of the pan. Cover with greased plastic wrap and place in a warm place to rise until double in size (about 1 hour).
- Bake in a 180°C/fan 160°C/350°F pre-heated oven for 40 to 50 minutes.
- Remove from pan and tap bottom of bread. If it sounds hollow the bread is ready, if not return to pan and oven for another 5 minutes. Turn out onto a wire rack and cool completely.
Note: If you want a crispy crust, put another baking pan below the loaf pan in the oven. Fill this with about 1-2 cups of boiling water. This will provide moisture throughout the baking of the bread making the crust crispy.


I remembered reading something about the celebrity chef Giorgio Locatelli concocting all sort of non-allergenic recipes for his daughter who is suffering from allergies to a number of food stuff. Thankfully Google yielded his recipe for an eggless and nutless chocolate cake. I just adapted it to cupcake sizes and reduced the baking time.
It came out quite nice actually in a non-rich cake sort of way. I baked it the night before my daughter took it to school. Come morning I took a bite of one and realised that it was not sweet enough and needed a sugar boost. So the next few minutes saw me frantically beating a chocolate icing worthy enough of this recipe. It was really hectic. My daughter was almost out of the door and I was still desperately trying to smear icing on the cupcakes!
Thank goodness the feedback from her classmates were quite positive. In fact, the teachers asked for some as well.
Eggless & Nutless Chocolate Cupcakes
450 g plain flour
2 tsp baking powder
1 tsp bicarbonate of soda
6 Tbsp unsweetened cocoa powder
350 g caster sugar
300 ml [scant 1 1/4 cups] water
2 Tbsp distilled white vinegar
125 ml [1/2 cup] vegetable oil
2 tsp vanilla extract
- Preheat the oven to 180°C/fan 160°C/350°F/gas mark 4.
- Mix the wet ingredients in one bowl.
- Sift the dry ingredients into another bowl.
- Slowly add the wet to the dry ingredients and beat until smooth.
- Pour into lined cupcake/muffin tin and bake for 20-25 minutes or a skewer poked in the middle comes out clean.
- Remove from oven and cool completely in wire racks.
- Add chocolate icing on top.
Chocolate Buttercream Icing
1/2 cup unsalted or slightly salted butter - softened to room temperature
1 1/3 cups icing sugar (confectioner's)
3 Tbsp cocoa powder
1/4 cup double cream
1/2 tsp vanilla extract
- Sift the icing sugar and cocoa powder onto the softened butter in a bowl. Beat until smooth.
- Add the double cream and vanilla. Beat until well mixed.
- Pipe or swirl on top of cupcakes.
 It's the first time I've baked pizza completely from scratch - well actually I didn't make the mozarella and pepperoni - but other than those I made ones from raw flour, yeast, etc. to make the dough. I especially like the dough kneading and rising. One tick in my list of things I wanted to do all my baking life plus one less block off my phobia of yeast.
I love the texture and billowy softness of the dough after the overnight rising. It was like a baby's bottom. Though it's also this quality that makes it a bit tricky to stretch and toss since the softness makes it so easy to expand it too thin. My dough actually suffered holes in the first two times which reminded me not to do too much stretching. Only one toss is for me is enough. More than one toss and you're really stretching it too far.
The Daring Bakers are the 'culprits' in this latest experimentation. This month's theme is currently hosted by Rosa and is also done in memory of Sherry who was supposed to be the co-host until her untimely death last July of a massive heart attack. Here's to you Sherry wherever you are.
It's funny, we were asked by Rosa to take pictures of ourselves tossing the pizza but my kids were more afraid of me dropping the dough on them or worse on the floor. Nothing of the sort happened of course but no picture materialized.
I know what you're gonna say - why make a boring pepperoni pizza? Well it's the topping that my family likes so I don't really care what anyone says. Also, for me to experiment I have to start from the most basic before moving on to more adventurous pastures. Avoiding waste was also in mind since I was wary that it would all go wrong so I don't really want to buy exotic pizza toppings for now.
I don't have a pizza stone so I thought the next best thing would be to use the smooth underside of my cast iron grill. It worked particularly well if I must say so, turning out crisp evenly baked crust.
My problem was in the transferring of the assembled pizza to the hot cast iron pan in the oven. I didn't have any semolina or cornmeal to slide it in easily. So I used a lot of flour on the chopping board though it doesn't work all the time which sometimes make the pizzas into odd shapes. Well, rounded or not the pizzas were gobbled up as soon as they come out of the oven. So the irregular shape really does not matter as much as the all important taste.
I'd just like to say thank you for the great dough recipe which is adapted from The Bread Baker's Apprentice by Peter Reinhart. It's something that me and my family would definitely have again and again.
Basic Pizza Dough
4 1/2 cups white bread flour, chilled
1 3/4 tsp fine salt
1 tsp instant yeast
1/4 Cup olive oil or vegetable oil
1 3/4 Cups water, ice cold (4.5°C/40°F)
1 Tbsp sugar
Semolina/durum flour or cornmeal for dusting
*Day One
- Mix together the flour, salt and instant yeast in a big bowl.
- Add the olive oil, sugar and cold water and mix well with a wooden spoon to form a sticky ball of dough.
- On a clean surface, knead for about 5-7 minutes, until the dough is smooth and the ingredients are well distributed. If it is too wet, add a little flour (not too much, though) and if it is too dry add 1 or 2 teaspoons extra water.
NOTE: If you are using an electric mixer, switch to the dough hook and mix on medium speed for the same amount of time.The dough should clear the sides of the bowl but stick to the bottom of the bowl. If the dough is too wet, sprinkle in a little more flour, so that it clears the sides. If, on the contrary, it clears the bottom of the bowl, dribble in a teaspoon or two of cold water. The finished dough should be springy, elastic, and sticky, not just tacky, and register 10°-13°C/50°-55°F.
- Flour a work surface or counter. Line a baking sheet with baking paper/parchment. Lightly oil the paper.
- With a metal or plastic dough scraper, cut the dough into 6 equal pieces. You may weigh them to divide them equally. Each piece should be about 180 gm in weight.
NOTE: To avoid the dough from sticking to the scraper, dip the scraper into water between cuts.
- Sprinkle some flour over the dough. Make sure your hands are dry and then flour them. Gently round each piece into a ball.
NOTE: If the dough sticks to your hands, then dip your hands into the flour again.
- Transfer the dough balls to the lined baking sheet and mist or brush them generously with spray oil. Slip the pan into plastic bag or enclose in plastic food wrap.
- Put the pan in the frige and let the dough rest overnight or for up to three days.
NOTE: You can store the dough balls in a zippered freezer bag if you want to save some of the dough for any future baking. In that case, pour some oil(a few tablespooons only) in a medium bowl and dip each dough ball into the oil, so that it is completely covered in oil. Then put each ball into a separate bag. Store the bags in the freezer for no longer than 3 months. The day before you plan to make pizza, remember to transfer the dough balls from the freezer to the refrigerator.
*Day Two
- Exactly 2 hours before you make the pizza, remove the desired number of dough balls from the refrigerator. Dust the counter with flour and spray lightly with oil. Place the dough balls on a floured surface and sprinkle them with flour. Dust your hands with flour and delicately press the dough into disks about 1/2 inch/1.3 cm thick and 5 inches/12.7 cm in diameter. Sprinkle with flour and mist with oil. Loosely cover the dough rounds with plastic wrap and then allow to rest for 2 hours.
- At least 45 minutes before making the pizza, place a baking stone or a cast iron pan upside down (you will use the underside of the pan for baking) on the upper third of the oven. Preheat the oven as hot as possible (around 260°C/fan 240°C/500°F).
- Generously sprinkle the back of a jelly pan or chopping board with semolina/durum flour or cornmeal. Flour your hands (palms, backs and knuckles). Take 1 piece of dough by lifting it with a pastry scraper. Lay the dough across your fists in a very delicate way and carefully stretch it by bouncing it in a circular motion on your hands, and by giving it a little stretch with each bounce. Once the dough has expanded outward, move to a full toss.
NOTE: Make only one pizza at a time. During the tossing process, if the dough tends to stick to your hands, lay it down on the floured counter and reflour your hands, then continue the tossing and shaping. In case you would be having trouble tossing the dough or if the dough never wants to expand and always springs back, let it rest for approximately 5-20 minutes in order for the gluten to relax fully, then try again. You can also resort to using a rolling pin, although it isn’t as effective as the toss method.
- When the dough has the shape you want (about 9-12 inches/23-30 cm in diameter - for a 180 g/6 oz piece of dough), place it on the back of the jelly pan, making sure there is enough semolina/durum flour or cornmeal to allow it to slide and not stick to the pan.
- Lightly top it with sweet or savory toppings of your choice.
NOTE: Remember that the best pizzas are topped not too generously. No more than 3 or 4 toppings (including sauce and cheese) are sufficient.
- Slide the garnished pizza onto the stone in the oven or bake directly on the jelly pan. Close the door and bake for abour 4-6 minutes.
NOTE: After 2 minutes baking, take a peek. For an even baking, rotate 180°. If the top gets done before the bottom, you will need to move the stone or jelly pane to a lower shelf before the next round. On the contrary, if the bottom crisps before the cheese caramelizes, then you will need to raise the stone or jelly.
- Take the pizza out of the oven and transfer it to a cutting board or your plate. Rest it for 3-5 minutes before slicing or serving to allow the cheese to set a little.
Scones here are more or less the equivalent of what the Americans call biscuits. They are favourite staples of afternoon teas. I love to have them with some clotted cream and strawberry jam plus a steaming cup of Earl Grey. They are one of the more easier quickbreads to make. So easy even my daughters can make them without my help at all.
One of the secrets in making a flaky, fluffy and well-risen scones is by using buttermilk. It reacts with the baking powder in the self-raising flour to give us light and airiness in the scones. Also when rubbing the butter into the flour, lift it a little bit to incorporate more air in the mixture. The other one is in dipping the cutter in flour before cutting into the dough. If it's not well floured it tends to crimp the edges which prevents it from rising well.
This particular recipe is adapted from Angela Nilsen's The Ultimate Recipe Book. I reduced the milk to make it less sticky and increased the sugar a little for more sweetness.
Buttermilk Scones
450 g self-raising flour
1/2 tsp fine salt
75 g [5 Tbsp] caster sugar (superfine)
100 g chilled butter
1 cup buttermilk
1/4 cup milk
a little flour for dusting
- Preheat oven to 220°C/fan 200°C/425°F/gas mark 7. Lightly grease a baking sheet.
- Mix flour and salt in a bowl.
- [Optional] Cut butter into small pieces.
- Add butter to the flour mixture and using a pastry cutter or two butter knives, cut the butter into the flour mixture until they are pea-sized. Then shift to using your fingers and rub the butter and flour mixture lifting as you go along to aerate the mixture until it more or less resembles bread crumbs. Try not to over rub as the scones will be lighter if the mixture is a bit flaky.
- Add sugar and mix well.
- Mix the buttermilk and milk. Make a well in the middle of the flour mixture and pour the buttermilk mixture in it.
- Gently mix them together until it forms a soft and sticky dough.
- Put the dough in a lightly floured surface and knead 3 or 4 times only to get rid of the cracks. Do not overwork the dough or it will become tough.
- Pat the dough gently to a thickness of about 1-inch. Dip a 2-1/2 inch round fluted cutter in flour and cut out the scones by pushing down quickly without twisting. Make sure to dip the cutter in flour every time before cutting through the dough.
- Cut out the rest of the dough by gathering the trimmings lightly then patting to 1 inch thick again.
- Place in the baking sheet and sift a light dusting of flour on top or glaze with beaten egg. Bake for 10-12 minutes or until well risen and golden.
- Cool on a wire rack uncovered for crisp tops or loosely covered with a tea towel if you prefer it soft.
- Serve with clotted or whipped cream and strawberry jam.
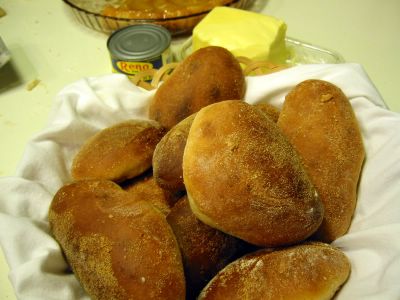 Gising na! Wake up! Breakfast time ... that's the current theme of the 7th Lasang Pinoy ably hosted by the early-morning-food blogger Joey of 80 Breakfasts.
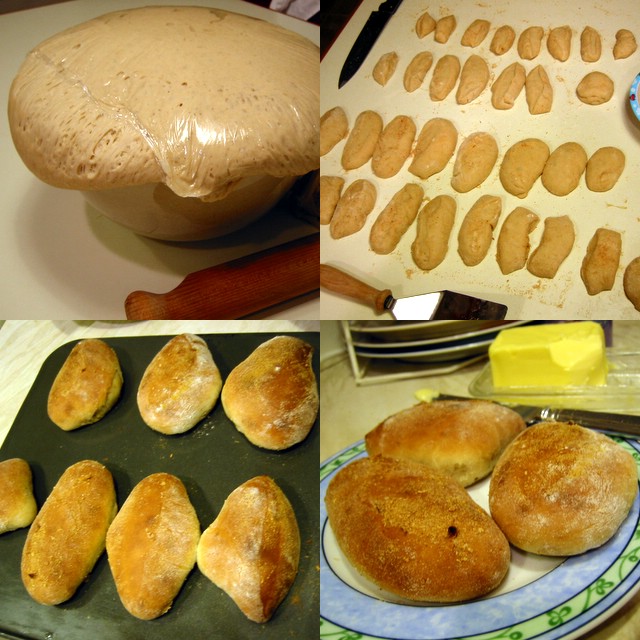
The traditional breakfast of Filipinos has been rice or garlic fried rice with either fried/grilled fish, tocino, or longganisa. But in our family, a lot of our mornings are filled with that ubiquitous crusty roll endemic to Filipinos called Pan de Sal (also spelled without the spaces - pandesal) which means literally bread with salt. I could imagine the original pan de sal must have been more on the salty side rather than the sweet one that is common now which is how I have always known what a pandesal should taste. There was a long time in my youth that I could not imagine a morning without a warm pandesal to satiate my hunger. It's very versatile you see, you can spread a variety of things between its fluffy insides such as butter, liver spread (pate), jams, preserves, matamis na bao, peanut butter, pancit, ice cream - you name it. Or you simply dunk it in coffee or tea.
Sometimes even in the evenings when someone in the household comes home late, passes by a bakery then buys fresh-off-the-oven pandesal. You can bet that anyone among us kids will awaken with the fragrant waft of the hot pandesal. Down the stairs we came to partake in the midnight snack. I love it smeared with liver spread. Yum!
This is my very first time to bake pandesal and I had to call my aunt in Cavite to get her recipe which she got from her Home Economics subject when she was studying in Teacher's College about 35 years ago. Yeah that long ago. Now I don't know if I misheard the measurement of the liquids because the dough turned out very sticky and really hard to handle. I don't know if it's supposed to be like this. I think I'll be calling my aunt again in the weekend. Despite the intense stickiness, I managed to knead it (with a lot of help from sprinkled flour) and let it rise. She said it will double in bulk after 2 hours, I think mine tripled that's one reason why I suspect there's too much yeast. Maybe the yeast that I use here is more potent/concentrated. I'll certainly have to play around with the proportions in this recipe later. It was also hard for me to cut it to uniform-sized individual rolls since it's very soft. Thank goodness it came out alright from the oven - fragrant and crusty though somewhat moist inside. I don't know if it's supposed to be like this but it certainly was good enough for my family. :)
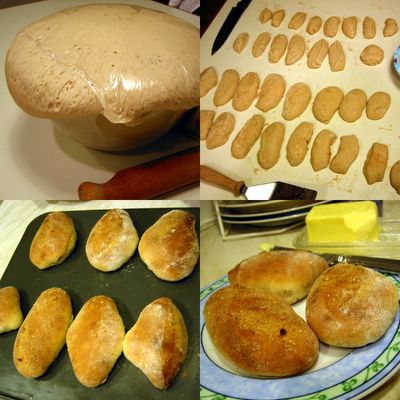 Pan de Sal
8 cups plain flour
1/4 tsp salt
1 cup sugar
1/2 cup cooking oil
2 1/2 cups cold water
1/2 cup lukewarm water
1 Tbsp yeast
- In a small bowl, combine the lukewarm water, 1 tsp of the sugar and yeast. Let stand for about 15 minutes in a warm area. By this time it will be foamy; whisk well.
- In a big bowl, mix cold water with oil, salt and the rest of the sugar. Stir until sugar and salt are dissolved.
- Add the yeast mixture and 1 cup of the flour. Stir to combine.
- Add the rest of the flour a little at a time. Mix with a wooden spoon until dough pulls away from the sides of the bowl.
- Knead the dough on a floured surface until smooth. If needed sprinkle some more flour to keep the dough from sticking too much.
- Put in a greased bowl and turn to coat the dough all over with oil.
- Cover and let rise in warm place for 2 hours.
- Punch dough and turn out on a floured surface.
- Divide into 4 and roll each into logs. Cut the logs into individual rolls.
- Sprinkle breadcrumbs on the rolls and arrange in greased baking sheets.
- Cover with a damp cloth and let rise for 30 minutes.
- Bake in a preheated oven of 200°C/fan 180°C/400°F for 13-15 minutes.
- Remove from baking sheet. Serve hot or cold.