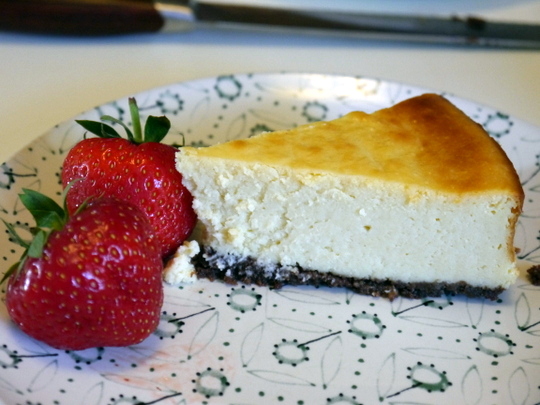
I got this from bonus recipe card from the BBC FoodFood magazine years ago. We paired it with sweet English strawberries which are very much in season today. I only ever buy English strawberries and only when it is in season which is around late May to August.
This is a baked cheesecake compared to some of my other cheesecake here in this blog which required no baking. Maybe later I would try baking this in a waterbath.
White Chocolate Cheesecake
*Base:
12 chocolate digestives (or graham crackers)
85 g [1/3 cup] butter - melted
2 tsp cocoa powder
1 Tbsp caster sugar (superfine)
*Filling:
900 g cream cheese (room temperature)
4 eggs
3 Tbsp plain flour
200 g [scant 1 cup] caster sugar
1/2 tsp vanilla extract
100 g white chocolate - finely grated
*Topping:
2-3 chocolate flakes (optional)
icing sugar (optional)
- Preheat oven to 180°C/fan 160°C/350°F. Grease and line the bottom of a 23 cm/9-inch springform pan.
- Crush the digestives by putting it in a plastic bag and then bashing it with a mallet or rolling pin.
- Mix the crushed biscuits with the rest of the base ingredients. Pour this in the prepared pan. Press the mixture with the back of a spoon to cover the bottom of the pan.
- Bake in the oven for 5 minutes. Remove from oven and cool.
- In a big bowl, combine all the filling ingredients with an electric mixer until well combined.
Pour mixture on top of the biscuit base in the pan.
- Bake for 50 minutes until almost firm but with a slight wobble in the middle.
- Remove from oven and cool completely in the pan.
- To serve, remove the cheesecake from the cake pan.
- [Optional] Dust the cheesecake with icing sugar. Break a few pieces of the chocolate flakes on top.

This is this year's birthday cake for myself. Very nice, moist and chocolatey. I especially like the cream cheese icing. I think I prefer it chilled straight from the fridge since the icing is on the soft side when at room temperature which caused a bit of problem when I brought it to work for my colleagues. The cling film covering it stuck on it so much that it didn't look too appetising.
This recipe is from my favourite epicurious.com food website
Sour Cream Chocolate Cake
195 g [1-1/2 cups] plain flour
3/4 cup cocoa powder
3/4 tsp bicarbonate of soda
1-1/2 tsp baking powder
1/2 tsp fine salt
1 cup sour cream
1/3 cup water
2 tsp vanilla extract
250 g [1 cup] unsalted butter - softened
270 g [1-1/3 cups] light brown sugar - firmly packed
3 large eggs
*For icing:
185 g [3/4 cup] unsalted butter - softened
250 g [1 cup] cream cheese - room temperature
115 g dark chocolate (70% cocoa) - melted and cooled
1 tsp vanilla
2 cups icing sugar - sifted
- Preheat oven to 180°C/fan 160°C/350°F.
- Grease and flour two 9-inch pans or 13 x 9-inch baking pan.
- Sift all the dry ingredients into a bowl. Set aside.
- Combine the sour cream, water, and vanilla in another bowl. Set aside.
- In a large bowl, using an electric mixer, beat butter and brown sugar until fluffy.
- Add eggs one at a time making sure to beat well after adding.
- Add flour mixture in batches alternating with the sour cream mixture beating well until well blended.
- Pour and spread the batter equally between the pans and smooth the top.
- Bake for 25 - 30 minutes for the 9-inch pans (40 minutes for 13x9-inch) pan or until a skewer poked in the middle comes out clean.
- Cool in pans for about 10 minutes. Turn out in rack and cool completely.
- Cake layers can be made 1 week ahead and frozen, wrapped well in plastic wrap. Thaw layers before putting on the icing.
*For the icing:
- Cream butter and cream cheese until light and fluffy.
- Add remaining ingredients and beat until well combined.
*To assemble:
- Lay first layer on the cake plate and spread some icing on it.
- Top with the second layer and spread the rest of the icing on top and around the cake.
Tried jazzing up the brownies with fruit and nuts. So I got this recipe from the BBC Good Food magazine of years gone. I don't even know what month and year it came out. All I had is the torn out page with the recipe. It turned out quite nice being a quite different variation of the usual brownies. Although I noticed that it isn't as popular as the ubiquitous intensely chocolatey brownies. Nevertheless, quite a good change from the usual especially if you have some dried fruits and nuts to use up in your pantry.
Cranberry Pistachio Brownies
200 g [1/2 cup + 1/3 cup] butter
300 g dark chocolate (at least 50% cocoa content)
300 g [1-1/2 cups] light muscovado sugar
4 Tbsp milk or cranberry juice
4 medium eggs
200 g [1-1/2 cups] plain flour
1/2 tsp ground cinnamon
80 g dried cranberries
100 g [1 cup] pistachio - chopped
icing sugar for dusting (optional)
- Heat oven to 180. Grease a 9-inch/23 cm square baking tin.
- In a saucepan, heat the butter, sugar, chocolate, and milk (or cranberry juice) gently while stirring constantly until the chocolate is melted and everything is well combined. Remove from heat and cool completely.
- Whisk in the eggs one at a time.
- Add the flour, cinnamon, and dried cranberries. Mix well.
- Pour in half the batter to the prepared baking tin. Sprinkle the pistachio over and then pour the rest of the batter.
- Bake in the oven for about 30-35 minutes or until a skewer poked in the middle comes out with no wet batter.
- Turn out and cut into squares while still warm.
This is another hit from my trusted The New Best Recipe cookbook from Cook's Illustrated. I especially love the intense chocolate taste of this cookie while remaining quite soft and chewy. I do have to go grocery shopping for 50% cocoa content dark chocolates since my baking chocolates in my pantry is always 70%. The coffee in my opinion can be omitted since it really made the flavour very intense. But other than that they were very nice cookies indeed.
Double Chocolate Cookies (Thick & Chewy)
260 g [2 cups] plain flour
35 g [1/2 cup] cocoa
2 tsp baking powder
1/2 tsp fine salt
4 large eggs
450 g dark chocolate (50% cocoa content) - chopped
2 tsp vanilla extract
1 tsp instant coffee (optional)
185 g [3/4 cup] unsalted butter - softened
300 g [1 1/2 cups packed] light brown sugar
100 g [1/2 cup] granulated sugar
- Mix flour, baking powder, salt and cocoa in a bowl and set aside.
- Combine eggs and vanilla and beat lightly. If using, sprinkle the coffee over and beat until dissolved.
- Melt chocolate in a heat-proof bowl over a simmering saucepan of water. Cool slightly and set aside.
- Beat the butter with the sugars.
- Add the egg mixture while beating.
- Mix in the melted chocolate.
- Add in the combined dry ingredients while mixing at low speed or with a wooden spoon.
- [Optional] Cover bowl and chill in th fridge until scoopable (about 1 hour).
- Pre-heat the oven to 180°C/fan 160°C/350°F.
- Scoop or shape the dough into balls about 1 1/2-inch in diameter or about 55 g in weight and arrange in baking sheets 1 1/2-inches apart.
- Bake in the oven for about 11-12 minutes or until the edges have begun to set but the middle is still soft.
- Cool in the sheets for about 10 minutes and then transfer to racks and cool completely.
 It's that time of the year again where baking and blogging for breads is compulsory for the World Bread Day. I don't mind it at all. In fact, I look forward to it come October knowing that I will add something in my list of breads that I've tried. As always every year this is hosted by the very generous Zorra of Kochtopf.
I have decided to bake something with chocolate to hit two birds with one stone. For it is also Chocolate Week here in UK. This recipe I adapted from a special insert in the current September issue of Waitrose's magazine. It is very good except that the filling was quite runny. So the instructions said to cut it in half lengthwise and then twist them together, I knew that it will be a messy affair if I did that. Hence, I just twisted them intact. I expected that it won't be too good looking when finally baked but I was rewarded with a nice swirl inside that was revealed when cut. And the taste of the bread itself was excellent. This is a definite keeper of a recipe. I just have to tweak that filling so it won't ooze out too much.

*Dough:
7 g sachet easy bake yeast
250 g strong white bread flour
3 Tbsp dark brown sugar
1/2 tsp fine salt
1/4 cup whole milk
1 large egg - beaten
75 g unsalted butter - softened
*Filling:
1/4 cup whole milk
75 g milk chocolate - finely chopped
50 g dark chocolate - finely chopped
1 Tbsp cocoa
3 Tbsp caster sugar
1/2 tsp vanilla extract
1/2 tsp ground cinnamon
*Glaze:
3 Tbsp dark brown sugar
3 Tbsp water
*For the dough:
**Manual method:
- Gently warm the milk in a pan until it is just lukewarm, remove from heat. Stir in the yeast and set aside for about 5-10 minutes. By then, then yeast should be foaming (it is activated). If not, discard it and start again from the beginning with fresh milk and yeast.
- Mix all the dry ingredients in a bowl. Make a well in the centre and add the milk-yeast mixture, egg, and butter.
- Knead mixture in an electric mixer with a dough hook attachment for 6-8 minutes or mix and knead by hand for 10 minutes until smooth.
- Cover with cling film, put in a warm place and leave to double in size (about 2 hours).
**Bread machine method:
- Put all ingredients according to the manufacturer's instructions (usually with the yeast first) and put on the dough program. This will include its first rising.
*For the filling:
- While dough is doing its first rise, heat the milk until steaming. Remove from heat and then add the chopped chocolates.
- Stir until chocolates has completely melted.
- Add in all the other ingredients. Stir to mix completely. Set aside to cool completely.
**Assembly:
- Punch down dough and lay out on a floured surface. Roll out to a rectangular size about 12 x 18 inches (30 x 45 cm).
- Spread the chocolate filling all over the dough. Roll up tightly like a log starting from the short end. Pinch the edges to seal it.
- Trim the ends of the roll. Cut in half lengthwise with a floured knife.
- Tightly twist the two strips over each other with the filling facing outwards.
- Transfer to the prepared tin. Cover with cling film or tea towel and leave to rise in a warm place to double size (about 1 hour).
**For the glaze:
- While the dough is doing its second rise, place the sugar and water in a saucepan and boil for about 2 minutes until syrupy. Set aside.
**Baking:
- Preheat oven to 180°C/fan 160°C/350°F. Bake for 25-30 minutes until cooked through.
- Brush half the syrup over the babka and leave for 15 minutes.
- Brush again with the rest of the syrup then cool completely on a wire rack.

I quickly post any recipe I find that worked marvellously first time I tried it. This particular one came from the recent Waitrose Magazine for September 2016. The combination of chocolate (milk or dark) with the banana and toffee glaze is so moreish. My only complaint is that it is hard to make the glaze settle on top since the suggested cake tin is a bundt cake pan. Next time I will bake this in a square or rectangular pan so that the delicious glaze will stay on top and nothing will go to waste.
For the Daim chocolate bars, the equivalent of these are Hershey's Skor or Heath bars or any chocolate covered hard toffee bars.
Chocolate Banana Toffee Cake
200 g unsalted butter - softened
75 g caster sugar (suprefine sugar)
100 g light muscovado sugar
4 large eggs
4 very ripe medium bananas - mashed (about heaping 1-1/2 cups)
3 Tbsp sour cream
2 tsp vanilla extract
50 g cocoa powder (plus extra for dusting)
225 g plain flour
50 g cornflour (cornstarch)
2 tsp baking powder
1 tsp bicarbonate of soda (baking soda)
75 g chopped Daim bars or dark/milk chocolate chips (plus some chopped for topping)
Glaze:
200 g light muscovado sugar
75 g unsalted butter
100 g double cream
25 g dark chocolate - chopped
1/2 tsp vanilla extract
pinch of salt
- Preheat oven to 190°C/fan 170°C/375°F. Butter 10-inch bundt pan and then dust with cocoa powder. Tap out the excess cocoa powder.
- In a bowl, mix thoroughly the plain flour, cocoa powder, cornflour, baking powder, and bicarbonate of soda.
- In another bowl, add sour cream to mashed banana and vanilla.
- Cream the softened butter and the caster and muscovado sugars in a big bowl for about 5 minutes or until light and creamy.
- Keep beating while adding eggs one at a time.
- Add the banana mixture. Beat until well combined.
- Using a wooden spoon or spatula, fold in the flour mixture.
- Fold the chopped Daim chocolate bars or chocolate chips (whichever you're using).
- Pour into the prepared pan and bake for 40 minutes or until a skewer poked in the middle comes out clean.
- Take out of the oven, cool for 5-10 minutes and then invert into a rack and cool completely.
*For the glaze:
- Gently heat butter, cream and sugar in a small saucepan until the sugar is dissolved.
- Bring to boil, lower heat and simmer for 30 seconds.
- Remove from heat and add dark chocolate, vanilla and pinch of salt. Stir until smooth.
- Cool for 10 minutes or until a bit thickened while stirring from time to time.
- Drizzle over the cake. Let set for a few minutes.
- [Optional] Scatter chopped Daim over the top.
This recipe is from one of the hundreds of torn-off magazine pages that I save in the hope of trying it out "later". That "later" is now ten years and I reckon it's high time I try it again. The first time it was quite bland so I upped the sugar this time. It turned out quite good although it's more cake-like than a chewy/crispy cookie. The self-raising flour has a lot to do with that.
I adapted this from an advertisement feature in the BBC GoodFood magazine of December 2006 - almost 10 years!

125 g [1/2 cup] unsalted butter - softened
200 g [1 cup packed] light muscovado sugar
2 eggs
2 tsp vanilla extract
225 g wholemeal(or plain) self-raising flour
25 g cocoa
75 g dried cranberries
100 g white chocolate chips
100 g milk chocolate chips
12 pecan halves (optional)
- Mix together the butter and sugar in a bowl using a wooden spoon.
- Add eggs one at a time making sure to mix well everytime.
- Add vanilla extract.
- Sift the flour and cocoa into the bowl and mix well.
- Add in the cranberries and chocolate chips and combine well.
- Cover with cling film and chill in the fridge for about 1 hour.
- Preheat oven to 180°C/fan 160°C/350°F.
- Shape the dough into 2-inch (about 75 g) balls - yields 12-14 pieces.
- [Optional] Press a pecan piece on top of each of the balls.
- Arrange the balls about 1-inch apart on greased baking trays. Flatten them slightly. If necessary bake in batches.
- Bake for 15 minutes or until firm to the touch.
- Leave on the tray for about 5 minutes and transfer on a rack to cool completely.
Here's one very simple sweets recipe that's very much welcome all year round especially during the holidays. My youngest was especially proud of this since she did most of this for her Girl Guides confectioner's badge. Granting that was more than 4 years ago, this post took sometime to publish I have to admit.
Some versions of rocky road involves biscuits both in chunks and crumbs. We prefer this version adapted from 101 Cakes & Bakes by BBC GoodFood magazine where no biscuits mar the beauty and deliciousness of chocolates, nuts, marshmallows plus our preferred Maltesers.

500 g milk or dark chocolate - broken into pieces
10 marshmallows - cut into small pieces*
85 g pecans, walnuts, or almonds (or combination) - roughly chopped
200 g Maltesers (optional)
- Melt chocolate in a heatproof bowl over a saucepan of simmering water. Cool a little.
- Add in the rest of the ingredients, mix well.
- Pour mixture into an 8-inch (20 cm) square baking pan lined with baking paper.
Leave to set for around 2 hours.
- Remove from baking pan and cut into 1-inch squares with a knife dipped in hot water and wiped.
Note: You may add biscuits, dried fruits, and other things that may take your fancy.
'Twas my birthday and the kids decided to bake something for me. How nice! They were thinking of doing the Chocolate Date Fudge Cake. But I told them that it's too complicated for beginners like them and just steered to something simpler. They came up with this keeper of a recipe from Sue Lawrence's Book of Baking.
Why is it called a 'surprise' cake? Well, it's got mayonnaise in it! At first I thought it was odd but come to think of it - mayonnaise consists of eggs and oil which is precisely what you put in a cake. I tell you, it was really easy to do and it turned out quite well. It's a shame my pictures don't give it justice. We had slices of it with custard and it was so delicious.

250 g self-raising flour
50 g cocoa powder
1/4 tsp baking powder
200 g caster sugar
2 tsp vanilla extract
200 g good quality mayonnaise
1 medium egg
160 ml [2/3 cup] cold water
- Preheat oven to 180°C/fan 160°C/350°F. Butter and flour a 9-inch/23cm round pan or 8-inch/20cm square pan.
- Sift (optional) the flour, cocoa, and baking powder into a large bowl.
- Stir in the sugar. Make a well in the centre.
- Add in all the other ingredients.
- Beat with electric mixer until smooth.
- Pour into the prepared pan and bake for 30 minutes or until a skewer inserted into the centre comes out clean.
- Cool on a wire rack and remove from pan.
- Ice with fudge frosting or serve with custard/cream.
The work 'scrumptious' can aptly describe this cake. It is really that good. Funny enough, like most of my experimental recipes, I stumbled across this one because I have a white chocolate bar that's about to expire and a bunch of overripe bananas nearer to the side of rotten. Thanks to member toms112 of the BBC GoodFood website who provided this delicious loaf cake. I will always go back to this recipe whenever a banana cake is requested - promise!
Banana White Chocolate Chip Cake
125 g [1/2 cup] butter
150 g [2/3 cup] caster sugar (superfine)
1 large egg
1 tsp vanilla extract
3 very ripe bananas - mashed
190 g self-raising flour
1/4 cup milk
100 g white chocolate chips
- Grease a 9 x 5-inch loaf pan. Pre-heat oven to 170°C/fan 150°C.
- If the butter is softened to room temperature, beat in a bowl with the caster sugar using an electric mixer until fluffy and light.
OR
Melt the butter with the sugar over medium heat. Remove from heat and cool slightly. Transfer to a mixing bowl.
- Add in the egg and vanilla, mix well.
- Add the mashed banana and mix well.
- Fold in the flour alternately with the milk using a wooden spoon. Mix just enough to incorporate the flour.
- Add the white chocolate chips and fold to mix.
- Pour batter into the prepared cake tin. Bake for 50-55 minutes or until a skewer poked in the middle comes out clean.
This is more on the periodically running saga of using up ingredients about to expire. We had several bars of excellent Cailler baking white chocolate from my sister in Switzerland. It was expiring at the end of last month so we had to think of a way of using it very quickly! Fortunately, the cookie recipe we found in the Nestle website was really spot on. And it was so easy that my youngest was able to do all by herself. I think we just made a few adjustment on some ingredients and reduced the cooking time. Other than that it was really really good and delicious especially for a first time bake by a 13-year-old.

1 cup [250 g] butter - softened to room temperature
3/4 cup granulated sugar
2/3 cup firmly packed light brown sugar
1 tsp vanilla extract
2 large eggs
2 1/4 cups plain flour
2/3 cup cocoa
1 tsp bicarbonate of soda [baking soda]
1/4 tsp fine salt
2 cups [350 g] white chocolate chips
- Preheat oven to 180°C/fan 160°C/350°F.
- [Optional] Grease and line baking sheets.
- Combine the flour, baking soda, and salt in a small bowl. Set aside.
- Cream butter and both sugars in a bowl with an electric mixer. Beat until light and fluffy - about 5 minutes.
- Add vanilla and the eggs one at a time, mixing well after each addition.
- Mix in the flour mixture in batches into the butter mixture.
- Using a wooden spoon, stir in the white chocolate chips until well combined.
- Form into balls, about 1-inch in diameter, then arrange on the baking sheets making sure to leave enough room between for it to expand.
- Bake for 11-12 minutes.
- Cool on the baking sheets for 5 minutes then remove and cool completely on wire racks.
Look, a yummy cookie recipe with only 5 ingredients! How's that for simplicity? I was trying to find a cookie recipe that would include M&M chocolates instead of the usual chocolate chips. The allrecipes website turned up with this gem of a recipe that not only is simple to make but is scrumptiously delicious, too. Plus, it does not use eggs so perfect for those with egg allergies. It was a definite thumbs up from the kids. We did change the volume, however, as in cut it in half since we don't really need that much cookies.

250 g butter - softened to room temperature
125 g caster sugar (superfine)
200 g condensed milk (half of a 397 g can)
312 g self-raising flour - sifted
250 g chocolate M&Ms
- Preheat oven to 180°C/fan 160°C/350°F. Grease baking trays.
- Beat together butter, sugar and condensed milk until light and creamy.
- Add flour and mix until well combined.
- Stir in the M&Ms with a wooden spoon and mix well.
- Roll tablespoonfuls of the mixture into balls (about 3/4 inch in diameter).
- Place on prepared trays and flatten slightly with a fork.
- Bake for 11-12 minutes or until lightly golden.
- Cool in the tray for 5 minutes then remove and transfer to wire racks to cool completely.
I wanted to make something different for the latest cake sale in my youngest daughter's school. So I went hunting for a recipe of Maltesers cupcake. There were quite a number in the internet and I chose Amy Jones' of She Cooks She Eats food blog. Thanks Amy for this scrumptious cupcake. I just tweaked it a little here and there to fit our taste. But for a first time bake it was fabulous! It would have been better if I had the proper piping nozzle for the icing. As you can see, I smeared it on using only a spoon which isn't so bad though it could have looked as good as Amy's.

175 g butter - softened
175 g caster sugar
175 g self-raising flour
1/2 tsp baking powder
3 medium eggs
1/2 tsp vanilla extract
3 Tbsp Ovaltine or Horlicks
2 Tbsp milk
- Preheat oven to 180°C/fan 160°C/350°F. Grease or line muffin pans.
- Combine the flour, baking powder, and Ovaltine in a bowl.
- In another bowl, beat the butter and sugar until fluffy.
- Add eggs one at a time beating well after each addition.
- Add vanilla, mix well.
- Add in the flour mixture - beat just enough to make batter smooth.
- Divide batter among the prepared muffin tins filling them up to 2/3 full.
- Bake for 13-15 minutes or until a skewer poked in the middle comes out clean.
- Cool in the tin for 10 minutes then transfer to a rack to cool completely.
- Decorate cupcakes with Milk Chocolate Icing and top with a Maltesers each.
Milk Chocolate Icing
100 g milk chocolate
125 g butter - softened
200-300 g icing sugar (about 1 1/2 - 2 cups) - sifted
2-3 Tbsp cocoa powder (optional) - sifted
2-3 Tbsp milk
bag of Maltesers
- Very gently melt the milk chocolate on a double boiler. Watch carefully, if you see that the chocolate is getting lumpy at the bottom remove from double boiler and stir like crazy to keep it melted and not clumpy.
- Leave to cool slightly.
- Beat the butter until pale and fluffy.
- Add the icing sugar in batches beating well after each addition.
- Pour in the melted chocolate and cocoa (if using), beat and mix well.
- Beat in milk adding just enough to make the icing smooth.

Originally, this was sourced from the BBC Food website but has since discovered that it was virtually the same as Hershey's Perfectly Chocolate Cake except for the salt and sugar! So I will credit them both since I combined them for this version of mine.
Easy Chocolate Cake
225 g [1 3/4 cups] plain flour
375 g [1 3/4 cups] granulated sugar
90 g [3/4 cup] cocoa powder
1 1/2 tsp bicarbonate of soda (baking soda)
1 1/2 tsp baking powder
1/2 tsp salt
1 cup milk
1/2 vegetable oil
2 eggs
2 tsp vanilla extract
1 cup boiling water
*For icing: use Chocolate Ganache or Chocolate Buttercream Icing (even plain buttercream is good)
- Preheat oven to 180°C/fan 160°C/350°F.
- Grease and flour two 9-inch round (or one 13 x 9-inch) baking pans.
- Combine all ingredients except the boiling water in a bowl and beat until well combined.
- Add the boiling water a little at a time while beating until the batter is smooth.
- Divide the batter into the prepared pans and bake for 30-35 minutes (for 13x9 cake tin - 35-40 mins.) or until a skewer poked in the middle comes out clean.
- Remove from the oven and cool completely while still in the pan.
*To assemble: Remove the cakes carefully from the tin and spread a little of the icing on top of one then put the other cake on top. Spread the rest of the icing on top and all around of the cake stack.

It was the apple monster's 19th birthday and this is what he requested - the same chocolate cake I made about two years ago for his father. Although I have to reduce *a lot* of the sugars since my lasting memory of it was tooth-achingly sweet. He loved the icing which was buttercream-based so that stayed in. The caramel filling has to go because it packs in too much of the sweetness and we really don't want it too sweet. I adapted this from the Great American Food cookbook by Lesley Allin. Well, actually in the book it was titled - Chocolate Fudge Turtle Cake. I couldn't for the life of me make turtle-looking mounds with the icing and you have to put in pecans as their 'feet'. My kids don't like nuts in cakes so I didn't have to do it - yay! The cake itself was very moist and the icing really lovely especially if you chill the cake first in the fridge. Very nice. I hope you like it, too.

80 g [1/2 cup] chopped pitted dates
1/2 cup boiling water
3/4 tsp bicarbonate of soda (baking soda)
170 g dark chocolate (at least 70% cocoa content) - broken into pieces
65 g [1/3 cup] caster sugar
4 large eggs - separated
125 g [1/2 cup] unsalted butter - room temperature
220 g [1 cup firmly packed] brown sugar
240 g plain self-raising flour
1 tsp baking powder
1/2 tsp fine salt
1/4 cup cold water
1/2 cup sour cream
1 tsp vanilla extract
- Put the chopped dates in a heat-proof bowl and pour the boiling water over them. Add 1/4 tsp of the bicarbonate of soda and stir to combine. Let stand for at least 30 minutes.
- Puree the mixture in a food processor or with a stick blender. If you don't have a blender, mash it with a fork. Set aside.
- Combine the dark chocolate, date puree, caster sugar, and 1 egg yolk in a saucepan. Cook over low-medium heat while stirring constantly until all of the chocolate is melted and the mixture well combined. Do not allow to boil. Remove from heat and cool.
- In a bowl, sift and combine together the flour, baking powder, remaining bicarbonate of soda, and the salt. Set aside.
- Mix the sour cream, cold water, and vanilla in another container. Set aside.
- Butter and flour two 9-inch round cake pans. Preheat the oven to 180°C/fan 160°C/350°F.
- In a big bowl, beat the butter with the brown sugar with an electric mixer until light and fluffy.
- Add the remaining 3 egg yolks, one at a time, beating well after each addition.
- Mix in the flour and sour cream mixtures alternately in 3 parts ending with the dry ingredients. Make sure to beat well after each addition.
- Add in the cooled chocolate mixture until evenly combined.
- In a separate clean bowl, whisk the 4 egg whites until stiff but not dry.
- Using a metal spoon, fold the egg whites into the cake batter gently but thoroughly.
- Pour the batter equally between the two prepared cake pans and bake in the oven for 25-30 minutes or until a skewer poked in the middle comes out clean.
- Cool in the pan for 5 minutes then turn out on a rack and cool completely.
* To assemble:
- Level the top of one of the cake layers by slicing off the excess. Spread about 1/2 cup of the chocolate frosting on it.
- Put the other cake layer on top and spread the rest of the frosting generously over the top and sides of the cake. Refrigerate for about 30 minutes before serving.
Chocolate Frosting
130 g [2/3 cup] granulated sugar
375 ml [1 1/2 cup] double or whipping cream
170 g dark chocolate (at least 70% cocoa content) - broken into pieces
pinch of salt
125 g [1/2 cup] unsalted butter
1/4 - 1/2 tsp instant espresso or ordinary coffee granules
1 tsp vanilla extract
- Mix the sugar, cream in a heavy saucepan and bring to a gentle boil over low-medium heat.
- Reduce to heat to low and simmer while stirring occasionally until the sugar is completely dissolved.
- Remove from the heat, add in the chocolate and coffee granules. Stir until chocolate has melted.
- Add the rest of the ingredients and stir until butter has melted.
- Cool the mixture and put in the fridge for about 30 minutes-1 hour.
- By this time the mixture should be thicker. Beat the frosting with an electric mixer until the colour changes slightly and it has a spreading consistency.


I remembered reading something about the celebrity chef Giorgio Locatelli concocting all sort of non-allergenic recipes for his daughter who is suffering from allergies to a number of food stuff. Thankfully Google yielded his recipe for an eggless and nutless chocolate cake. I just adapted it to cupcake sizes and reduced the baking time.
It came out quite nice actually in a non-rich cake sort of way. I baked it the night before my daughter took it to school. Come morning I took a bite of one and realised that it was not sweet enough and needed a sugar boost. So the next few minutes saw me frantically beating a chocolate icing worthy enough of this recipe. It was really hectic. My daughter was almost out of the door and I was still desperately trying to smear icing on the cupcakes!
Thank goodness the feedback from her classmates were quite positive. In fact, the teachers asked for some as well.
Eggless & Nutless Chocolate Cupcakes
450 g plain flour
2 tsp baking powder
1 tsp bicarbonate of soda
6 Tbsp unsweetened cocoa powder
350 g caster sugar
300 ml [scant 1 1/4 cups] water
2 Tbsp distilled white vinegar
125 ml [1/2 cup] vegetable oil
2 tsp vanilla extract
- Preheat the oven to 180°C/fan 160°C/350°F/gas mark 4.
- Mix the wet ingredients in one bowl.
- Sift the dry ingredients into another bowl.
- Slowly add the wet to the dry ingredients and beat until smooth.
- Pour into lined cupcake/muffin tin and bake for 20-25 minutes or a skewer poked in the middle comes out clean.
- Remove from oven and cool completely in wire racks.
- Add chocolate icing on top.
Chocolate Buttercream Icing
1/2 cup unsalted or slightly salted butter - softened to room temperature
1 1/3 cups icing sugar (confectioner's)
3 Tbsp cocoa powder
1/4 cup double cream
1/2 tsp vanilla extract
- Sift the icing sugar and cocoa powder onto the softened butter in a bowl. Beat until smooth.
- Add the double cream and vanilla. Beat until well mixed.
- Pipe or swirl on top of cupcakes.
Once upon a time when I was still in my early 20s, I decided to start teaching myself to bake. After all, I thought to myself, we've got an oven I've got all my baking utensils and most of all I've got my handy Betty Crocker cookbook so what could be harder than bake some cakes? Like most people I tackled my first baking project with a brownie which was a resounding success. So feeling very brave I decided to bake another chocolate concoction - a 2-layer chocolate cake complete with buttery icing.
I went about buying all the ingredients and baking pans including a brand new hand mixer. I followed the recipe religiously (or so I thought) and in it went in the oven. When it came out I noticed it was looking particularly dark but I just shrugged thinking maybe that's what it was supposed to be. I proceeded to lovingly put icing on and in between the whole structure. Then I took a slice and eagerly tasted it. Ackk! I spat it out as quickly as I put it in my mouth. It was the most bitter cake I've tasted in my life! Which means I forgot to put in sugar!! Oh the agony and disappointment after all the trouble I went through. But most of all I dreaded getting teased by relatives for the rest of my life! Mwahahaha!
The cake was ready to be consigned to the rubbish bin but my father came to the rescue. He ate it despite the extremely bitter cake. He just slathered more of the icing. For 1 whole week he diligently ate 1 slice a day until he finished it - all by himself as you would have guessed since not even our dogs nor cat wanted it. I'd like to think he did it just for me but probably he just hated to have all the ingredients and my efforts go to waste. ;)
Ever since then I never attempted baking a chocolate cake until a few years ago when I came upon Angela Nielsen's recipe she dubbed The Ultimate Chocolate Cake in the BBC Good Food magazine. Well, I liked the idea of a recipe tested so many times to perfection and I tell you she did not lie. It was indeed a moist and very chocolately with just the right balance of sweetness. I had to alter the chocolate ganache since my kids are not fond of dark chocolate so I had to put in half dark and half milk chocs. I didn't bother to decorate it with chocolate curls since it would get readily devoured anyway. As proof just look below how I found my newly baked cake when I left it to cool ... hmmm ... there must be lots of chocolate monsters around my house stealthily scarfing down slices of it.
Next time, I will experiment with buttercream and whipped cream icings to see which ones can better complement it.
Have some?
Chocolate Cake
200 g butter - cut in pieces
200 g dark chocolate (about 70% cocoa solids)
85 g [1/2 cup + 1 Tbsp] self-raising flour
85 g [1/2 cup + 1 Tbsp] plain flour
1/2 cup hot water
1 Tbsp instant coffee granules
1/4 tsp bicarbonate of soda (baking soda)
200 g [1 cup + 1 Tbsp] golden caster sugar
200 g [1 cup + 2 Tbsp firmly packed] light muscovado sugar
13 g [2 Tbsp] cocoa powder (optional)
3 medium eggs
5 Tbsp buttermilk
grated chocolate or curls for decoration (optional)
- Preheat oven to 325°F/160°C/fan 140°C/gas mark 3. Butter a 20cm (8-inch) round baking pan and line the base.
- Dissolve the instant coffee in the hot water, set aside.
- Put a heatproof bowl over a saucepan of simmering water and melt the dark chocolate and butter in it.
- Once melted remove from heat and add in the coffee. Stir just enough to combine.
- In a small bowl, beat the eggs and stir in the buttermilk, set aside.
- In another large bowl, combine the flours, sugars, cocoa (if using), and bicarbonate of soda.
- Stir in the melted chocolate mixture and the egg mixture. Mix everything until well blended and have a smooth consistency.
- Pour the batter into the prepared baking pan and bake for 1 hour 25 minutes or until a skewer poked in to centre comes out clean.
- Cool slightly in the baking pan then turn out to cool completely on a wire rack.
- When completely cool, slice horizontally in half.
- Spread a little of the ganache in the bottom layer and sandwich it with the top layer.
- Spread the rest of the ganache on top and sides of the cake smoothing with a spatula or palette knife.
*For the Chocolate Ganache:
100 g dark chocolate (like above)
100 g milk chocolate
1 cup double cream (heavy cream)
2 Tbsp golden caster sugar
- Break the dark and milk chocolates into pieces in a heatproof bowl.
- Meanwhile, put the double cream and sugar in a saucepan and heat until it is about to boil.
- Pour immediately onto the chocolates. Stir until all the chocolates have melted. Cool for a few minutes then whisk until smooth and thickened.
- Set aside to cool for 1-2 hours (may put in the fridge) or until it is thick enough to spread on the cake.
'Chocolate by Brand' is the current theme of one of the longest running event in the blogging world. David Lebovitz hosts this 27th edition of Sugar High Friday. He encourages us to make a dessert out of our chocolate bars and write about them.
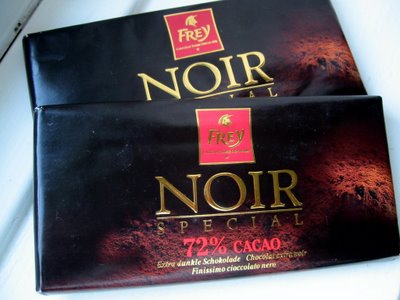
The chocolate bars I nabbed is by Frey - dark variety with 72% cocoa content. Wow, that's the highest I've used for cooking. Why I got it? It was on sale at the local Migros grocery near my sister's place when I visited her in Geneva a few months ago. You know me, I love value for money that means anything on sale!
Unlike some 70% chocolate I had before, this one is very deeply dark brown almost black actually. I savoured a small bite of it that showed it had smoothness, just the right amount of sugar and creaminess, a hint of coffee, with a little bitterness in the finish. Although I couldn't really tell how it would compare to one of those single-estate-organic-super-high-end types that your get from uber cool chocolate boutiques. All I can say is I like its smell, colour, and taste. Now let's see how it would fare when cooked.
I wanted to make something uncomplicated that would show the real qualities of chocolate. First thing that came to mind was chocolate truffles which I thought was perfect but then I've already posted one and for SHF, too! So out came this recipe from my burgeoning clippings from the BBC GoodFood magazine. It looks simple enough until I read closely about 'finely chopped' and 'crushed'. Turned out it requires more elbow grease. Oh well, things I have to do to have my sugar fix. :) The recipe originally asked for dried apricots but I bet any dried or candied fruit would be lovely in it. Things like cherries, pineapples, cranberries, even crystallised ginger! I did not include any chopped nuts because I thought there's too many things in it already. Maybe next time I'll lose the ground almond and put in the nuts. The chocolate itself had to be sufficiently chilled after melting to make it easy enough to mold into a log. Once you've done that the rolling on the crushed biscuits is easy peasy.
How did it taste? Well, the honey had a definite influence on it so other honey flavours would give it a different slant (even golden syrup would be interesting). Despite the number of distractions on this log (did I say I'm making something uncomplicated?), the chocolate still shone through. Dark, very slightly bitter, at the same time meltingly smooth in the mouth. Such a nice change from the gritty chocolates my husband brought home last Christmas.
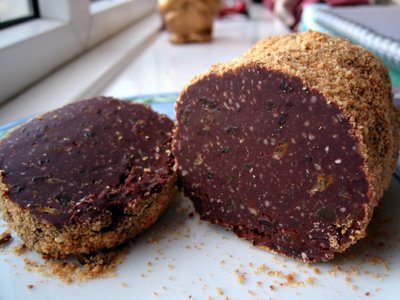 Chocolate Salami
250 g dark chocolate or combination of milk and dark chocolates
100 g butter
3 Tbsp clear honey
100 g ground almonds
100 g dried or candied fruits (apricots, cherries, etc.) - finely chopped
50 g toasted nuts (optional) - finely chopped
100 g amaretti biscuits - crushed
- Melt chocolate, butter and honey in a heatproof bowl over simmering water in a saucepan.
- Remove from heat and add almonds, toasted nuts (if using), and dried fruits.
- Cool completely and chill in fridge for about 1-2 hours until it is of dough-like consistency.
- Shape into a log (about 2 inches thick) and roll on crushed amaretti biscuits.
- Wrap in greaseproof paper and again tightly in foil.
Chill overnight in fridge.
- Before serving slice into rounds with sharp knife.
 Johanna of the Passionate Cook was very enthusiastically encouraging us to create one of the more lusciously delicious concoctions man has ever created - chocolate truffles. I've always wanted to make one of these little pieces of delight. The sheer sensation of creamy melting chocolate in my mouth sealed my decision to participate in this 25th edition of the SHF.
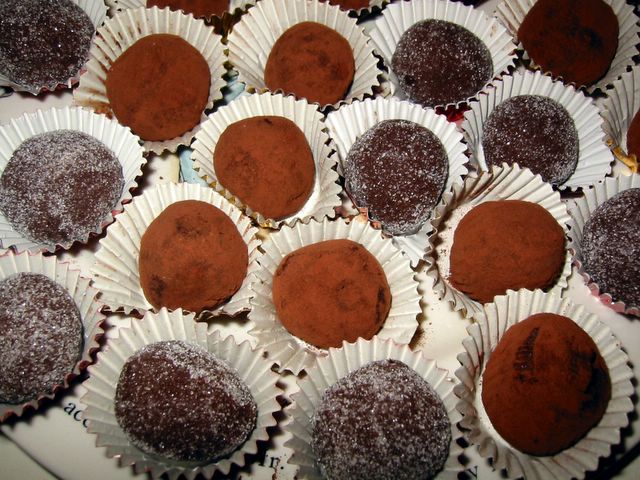
I wanted to create truffles that my kids would want to eat. So bitter chocolate is out while a little bit of sugar is in. This recipe I adapted from Phil Vickery's A Passion for Puddings cookbook was a little bit unusual since it uses condensed milk. I was a bit skeptical if it will be as meltingly luscious as ones made with double creams but it did convincingly deliver. The orange liquor had to be replaced with just normal orange extract for my kids' sake and although I didn't have any orange zest it was orangy enough to our taste. The ultimate taste was whether my kids will eat it. Well, as of this time they have eaten one each and reached for more. They naturally gravitated for ones rolled in vanilla sugar so I'll definitely remember that next time I make more of these moreish cloud of chocolate heaven.
Chocolate & Orange Truffle
200 g dark chocolate (70% cocoa solids)
300 g condensed milk
3 Tbsp double cream (heavy cream)
2 Tbsp orange liqueur or 1 tsp orange extract
finely grated zest of one orange (optional)
cocoa powder or icing sugar or vanilla sugar
- Melt chocolate, double cream, and condensed milk in a heatproof bowl over simmering water in a saucepan.
- Mix in the orange liqueur or orange extract and zest (if using).
- Remove from heat and cool completely to room temperature.
- Cover and chill in the fridge for about 4 hours or overnight.
- Spread cocoa powder or sugar on a wide plate.
- Have a bowl of iced water in your working area.
- Using a teaspoon, scoop a teaspoonful of the chocolate mixture and shape into balls using your hands then roll on the cocoa powder or sugar. Repeat until you have used up all the truffle mixture. Dip your hands from time to time in the iced water to cool it down and prevent the melting of the truffles while you're rolling it.
- Chill in the fridge.