This is a very easy salad to put together and with very few ingredients as well. Often times I have this with fried anything as a foil from the grease and fat. I find it very refreshing also with roasted or barbecued meat dishes.
This is adapted from the NHK channel's Rika's Tokyo Cuisine recipe. We as a family actually enjoy watching NHK's offerings especially when it comes to their food shows. You should see us drooling, ooh-ing and aah-ing at every dish we fancy. Armchair foodies we definitely are. :)

1/4 head [about 250 g] cabbage
1/2 apple
1/4 tsp fine sea salt
1/4 tsp ground black pepper
1 Tbsp lemon juice
lemon zest (optional)
1/4 tsp sugar
2 Tbsp mayonnaise
- Finely shred the cabbage and apple (with a knife or mandolin) and put separately into different bowls.
- Add the salt and pepper into the shredded cabbage and gently work into the cabbage until it softens.
- Add the shredded apple, lemon juice, and lemon jest. Mix well.
- Combine the sugar and mayonnaise. Add to the cabbage and apple mixture and mix well to coat the veggies.
- Serve cold or room temperature.
With the aid of a food processor, this a very easy thing to whip up. Hummus is one of my all-time favourite snack dip. And now that I've got a recipe that I adapted from Angela Nielsen's The Ultimate Recipe Book you can be sure this will be a regular on our table.
As for the recipe, it was good as it is even without the yoghurt (I didn't have one at the time) but it would have been better if I reduced the garlic (too overpowering) and the reserved brine (to make it thicker). So all of these are reflected in the adjusted recipe below. Otherwise, it was simply delicious especially with crudites, tortillas, and pita breads.
Hummus
1 x 400 g tin can of chickpeas
1 garlic clove - peeled and chopped roughly
2 Tbsp tahini
2 Tbsp lemon juice
3 Tbsp extra-virgin olive oil
1/4 tsp ground cumin
1/2 tsp fine sea salt
2 Tbsp plain natural yoghurt (optional)
- Drain chickpeas from can and reserve 1/4 cup of the liquid.
- Transfer the chickpeas and reserved liquid into a food processor or blender and process until smooth. Scrape the sides if needed.
- Add in all the other ingredients and process again until completely smooth. Taste then adjust salt and lemon juice according to personal preference.
I never thought that these cream soups that I so love during winter time is so easy to make. Well, it's even easier when they come out of a tin can but the real thing is so much more flavourful and healthier that making it from scratch can be deemed mandatory.
The only specialized equipment needed is a stick blender or a regular blender or a food processor. This is to puree the soup to a smooth and fine consistency. Although it won't hurt even if don't puree, you'll just have more texture in the soup which for some people is preferable.
The picture of the finished product isn't that great so I'll put that at the bottom. I'll post a better one next time I cook this again. Darina Allen's recipe in the BBC GoodFood website is the recipe I adapted.


450 g chopped leek (you may use just the white part if preferred)
1 small onion - chopped
450 g potatoes - peeled and diced
50 g butter
1 litre [4 cups] chicken stock
250 ml [1 cup] milk*
sea salt and freshly ground pepper
- Remove the tough outer layer of the leeks. Chop and wash thoroughly to remove soil and sand.
- Melt the butter in a heavy-bottomed saucepan.
- Add in the onion and leek and cook on medium heat for about 1 minute.
- Add the diced potatoes; stir, cover and cook on low heat until vegetables are soft (about 5-10 minutes).
- Pour in the stock, bring to boil then turn heat to lowest and simmer until the vegetables are soft.
- Remove from heat and puree everything with a stick blender or in batches with a regular blender or food processor.
- Taste and adjust seasoning with salt and freshly ground black pepper.
- Reheat gently and stir in the milk. Serve hot.
*Note: You can use single/double cream or a combination of milk and creams.
I thought I have blogged this before and was quite surprised not to see it in the index of this blog. The current warm weather has prompted me to remember this keeper of a recipe as a great accompaniment to barbecued meats. It's very easy to assemble. Once you've done some of the simple preps all you do is toss it together. Taste.com.au has the recipe that I adapted this from.
Couscous Salad
200 g couscous
200 ml chicken stock
1 cup diced and seeded cucumber
2 tomatoes - seeded and diced
1 yellow bell pepper - seeded and diced
2 Tbsp chopped red onion
2 Tbsp chopped flat-leaf parsley
1/4 cup extra virgin olive oil
2 Tbsp lemon juice
1 Tbsp hummus (optional)
sea salt
freshly grated black pepper
- Combine the chicken stock and 1 Tbsp of olive oil in a saucepan and bring to just boiling point.
- Immediately pour over the couscous in a heatproof bowl. Cover and let steep for 10 minutes.
- Fluff couscous and season with salt and pepper. Let cool completely.
- Combine the remaining olive oil, lemon juice and hummus in a bowl and set aside.
- Toss and mix all the remaining ingredients with the couscous.
- Add the olive oil dressing and stir well to combine.
 I am massively supporting Susan's (of Food Blogga) blogging event called "Beautiful Bones" to highlight osteoporosis. This is one event that I really feel close to my heart. I do feel strongly mainly because my mother's side of the family have been blighted by osteoporosis and other bone diseases. And if me and my siblings are not careful we would be victims as well later on.
My dear old grandma, Lola Ebia, is in her 95th year. Her spine is bent forward making it difficult for her to move around. Worse off was her late older sister, Lola Ine, who was not only bent almost 90 degrees from the waist up but whose spine was shaped like a big letter S on her back. It did not seem give her that much health problems (or maybe I just didn't hear much about it) but it did present a great difficulty for her physically moving about. Me and my cousins were joking then at what shape her coffin would be when she died.
It did not end in my grandma's generation. My mother and her siblings are now beginning to feel various forms of bone diseases. And it's not confined to the women even our uncle who is very fit and follows a healthy lifestyle succumbed to some problems with his hipbone and had to be operated on when he was only 65. So me and my cousins better beware and heed the signs to take better care of ourselves or we will suffer in later years.
As what Susan mentioned in her blog, there are lots of food sources of calcium ranging from the usual dairy products to vegetables to nuts and lots of others. Bear in mind to temper the consumption of these with fibre since too much fibre restricts the absorbtion of calcium by the body. To strike a balance between consumption of calcium and fibre-rich food would be the optimum goal. As usual moderation is the key.
I have chosen to cook this dish rather than the usual dairy product sources since the soya bean in the bean curd and the green bokchoy are rich in calcium and would do well in balancing our intake of healthier food. Sorry for the limp overcooked bokchoy. Distractions while cooking can be hazardous to the final cooked products.

1 pkg bean curd (4 squares)
2 green onions - sliced into 1/2-inch pieces
6 slices ginger root
5 pieces dried Chinese black mushrooms
1/2 cup sliced bamboo shoots
3 pieces bok choy - cut into quarters lengthwise
1/2 tsp hot chilli paste
1 cup stock
2 Tbsp soy sauce
1 Tbsp oyster sauce
1 tsp sugar
1/2 Tbsp cornstarch
1 Tbsp water
oil for frying
- Soak the mushrooms in hot water for about 20 minutes or until soft. Squeeze out water then slice into 1/2-inch pieces lengthwise.
- Combine stock, soy sauce, oyster sauce and sugar in a container. Stir until sugar is dissolved. Set aside.
- Mix cornstarch and water in another bowl, stir and set aside.
- Cut the bean curd into thin triangles. Deep fry or pan fry until golden brown. Set aside.
- Heat a wok and add 2 Tbsp oil. Stir fry the green onion and ginger until aromatic.
- Add the Chinese mushrooms, chilli paste and bamboo shoots, stir to mix.
- Then add the bok choy and stir fry in high heat for a few seconds.
- Add the oyster sauce mixture and fried bean curd.
- Bring to boil and cook for 3 minutes or until the liquid has reduced to half.
- Add the cornstarch mixture and bring to boil to thicken.
- Dish up and serve immediately.

I've always been intrigued by risotto and as more cookbooks and magazine articles I read lauding its virtues I was actually intimidated. I had to get a very precise recipe to guide risotto newbies like me. Luckily, I just got Angela Nielsen's The Ultimate Recipe Book from where I adapted this recipe.
Lesson learned: use a heavy, wide pan. Mine was heavy but it was a pot not a wide pan. Therein lay my main problems, I found it hard to stir towards the end. Actually I used a cast iron pot so when I finished and turned off the heat it still had lots of residual heat that dried out my risotto. So probably next time I'll just settle for a thick bottomed wide pan.
My primary objective here besides having a go at cooking risotto is to use seasonal ingredients. Asparagus season here in UK is quite short. It starts from late April up to June-early July only. Many regard British asparagus as one of the best in the world. They even have an asparagus festival at the Vale of Evesham late this month which I hope I can attend just to satisfy my curiosity. Peas, one of my fav vegs, are also in season so that gets my nod in here. But not broad beans, I've not been fond of them types, so I omitted that in my risotto.
Well, what do I think of it? I love it! Especially when eaten with the crunchy asparagus and wholesome peas. It's already a complete meal so you can perfectly eat it on its own though I'm thinking of what meats I can serve it with if ever. That said I don't think I can eat more than a big bowlful of it because I find it quite rich. Maybe I should reduce the cheese or mix the stock with some water?
I can't help comparing this with lugaw, that rice comfort food loved by Filipino. It's not far off to be honest I'd like to think risotto is the posh, more upscale sister of lugaw. :) For me, the main difference is in the cooked grains. The risotto's grains retains its shape thereby avoiding it being mushy while lugaw is meant to be mushy and more porridge like. I wonder if I can cook the malagkit rice variety like a risotto and retain its shape. Abangan ang susnod na kabanata! Wait for the next installment.
Risotto Primavera
1 Tbsp olive oil
65 g [1/4 cup] butter
1 garlic clove - minced
3 spring onions - finely chopped
4 shallots - finely chopped
350 g risotto rice (Carnaroli, Arborio, Vialone)
1/2 cup white wine
200 g shelled fresh peas (or frozen ones - thawed)
250 g asparagus
100 g parmesan cheese - finely grated
5 1/2 cups of chicken or vegetable stock
- Snap the woody bases from the asparagus and slice each into 4 diagonal pieces.
- Put the stock in a pot and bring to a simmer. Keep this simmering while cooking the risotto.
- In a thick bottomed wide pan (beside or close to the simmering stock), heat olive oil and 2 Tbsp of the butter until bubbly.
Saute the onions and garlic on medium heat for about 3 minutes until soft.
- Stir in the rice and cook while stirring often for about 2-3 minutes.
- Add the wine and keep stirring until almost all the wine has evaporated.
- Put the timer on for 20 minutes.
- Add 1 big ladleful of stock to the rice and bring to simmer (do not boil; you may have to lower the heat) while stirring constantly until all the liquid has been absorbed.
- Repeat adding ladleful of stock and stirring when the previous amount has been absorbed.
- After 14 minutes (meaning 6 minutes left in your timer), add the peas to the rice.
- At the same time drop the asparagus in the stock. Let the asparagus simmer for 4 minutes while you're stirring and adding stock to the rice. After 4 minutes, remove with a slotted spoon add it to the rice mixture.
- At this point you should taste the rice, it should be soft but still with a bite in the centre. Also add seasonings if you think it needs some.
- The timer should have gone off by now and you should have the desired texture. If not, continue adding stock and stirring until done.
- Take the pan off the heat then add half the parmesan and the rest of the butter plus a little of the stock to keep it moist.
- Cover the pan and let it rest for about 3 minutes.
- Serve with a sprinkling of parmesan on top.
I overspent on carrots last week so I had this big bunch sitting in my fridge's vegetable box waiting to be used. I've never done a carrot soup before so I guess that was the natural direction it was taking. Luckily, there was this reader recipe in the current edition of the BBC Good Food magazine (is it obvious I like that magazine?!) that was precisely what I was looking for. Jenny Martin was gracious enough to share her recipe to all readers and here I am tweaking it a little bit here and there according to my taste. For one thing, I found the pureed carrots on the sweet side. Well, unless I wanted a dessert, a few twist of the salt mill did the job of making it more savoury.
Carrot Soup
1 medium red onion - chopped
1 tsp minced garlic cloves
2 Tbsp olive oil
1 small sprig of fresh thyme or rosemary - use the leaves only
6 large carrots (about 800 g) - peeled and chopped
1 Tbsp sherry or rice wine (optional)
725 ml [2 1/2 cups] stock
fresh chives - snipped (optional)
cheese - grated or crumbled (optional)
salt and pepper to taste
- Gently cook the onion, garlic, and thyme in oil in a pot until the onion is soft and translucent (around 10 minutes). Stir occasionally.
- Add the carrots, cook for about 3 minutes.
- Increase heat and add the wine (if using). Let simmer until almost all of the wine has evaporated.
- Pour in the stock and bring to boil. Lower heat and simmer until carrots are soft - about 30-40 minutes. Add more water or stock if it's becoming too dry.
- Using a blender, food processor or hand-held blender, whizz the soup until completely smooth.
- Return to the pot and heat through. Taste and season with salt and/or pepper.
- Serve in bowls with grated cheese and sprinkled chives on top.
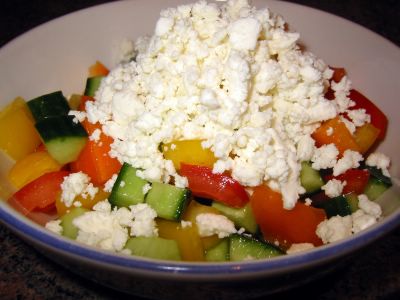 Last time I stayed with my sister in Geneva she served me this salad. We really don't know its name. She got the idea when she was served this at a friend's party who also don't have a name for it. So I just named it after the dominant veg.
I'm not a big fan of raw bell peppers but this veg combination and the cheese complementing it had me sold on the idea. It had definite echoes from a traditional Greek salad but is much simpler and, in my opinion, healthier without the olive oil.
This is perfect paired with meat dishes giving a refreshing respite from the richness and oil of the meat with its crunch and tang. Slight saltiness comes from the feta cheese to save it from being on the edge of being bland. You can easily replace the feta with any crumbly cheese like the Filipino kesong puti (white cheese) or cottage cheese. Of course you have to adjust the seasonings according to the cheese of your choice.
Bell Pepper Salad
1 yellow bell pepper* - deseeded and diced
1 orange bell pepper* - deseeded and diced
1 cucumber
3 medium tomatoes
100 g feta cheese (or any crumbly cheese)
salt and pepper to taste
- Cut the ends of the cucumber. Cut in half lengthwise. Scrape the center of the cucumber and discard. Slice the cucumber into small cubes.
- Slice the tomatoes crosswise and remove the seeds. Cut into small cubes.
- Mix all the vegetables in a serving bowl. Season to taste with salt and/or pepper*.
- Crumble the feta cheese on top. Chill.
- Before serving toss the vegetables with the cheese.
*Note: If you can't find these colours in bell peppers, just choose two of different colours - red and green for example.
Put less salt for salty cheese like feta and more salt for blander cheeses like kesong puti or cottage cheese.
Now that the new year is here, I think a spot of non-meat all-veggie dish is all we need after 2 weeks of non-stop rich meaty food. *sigh* I wish I could wave a magic a wand to sweep away all the extra pounds I put on. So this simple pasta dish - I personally call it ratatouille with pasta - is very much welcome and a good deviation from meat dishes we've been having in the past holiday season. The veggies and the pasta can be prepared in advanced and then mixed and put together just before putting in the oven. This was adapted from the Good Housekeeping magazine of August 1995.
 Pasta & Vegetable Gratin
350 g aubergine - roughly chopped
2 small courgettes - sliced thinly
1 onion - chopped
1 garlic clove - minced
2 Tbsp olive oil
2 tsp paprika
2 tsp tomato paste
400 g can chopped tomatoes
1/4 cup water
1 tsp sugar
salt and pepper to taste
250 g rigatoni or penne pasta
1 Tbsp pesto
150 g [1 1/2 cups] mature cheddar or Gruyere cheese
2-3 Tbsp freshly grated parmesan cheese
- Heat the olive oil in a saucepan. Fry the onion and garlic until soft.
- Add paprika and tomato paste, stir and cook for 1 minute.
- Add the aubergine and cook for 2 minutes.
- Add the tomatoes, sugar and water. Bring to boil then lower heat and simmer under cover for about 15 mins.
- Add the sliced courgette and cook for about 5 mins or until vegetables are done. Season with salt and pepper.
- Cook pasta according to packet instructions, drain and toss with the pesto sauce.
- Toss pasta in the vegetable sauce and transfer to a baking dish.
- Sprinkle cheeses on top.
- Bake at 200°C/fan 180°C/400°F for 20 minutes or until cheese on top in melted and golden brown.

 Here's one recipe that I adapted from Ken Hom's Hot Wok that I use when I have excess spinach from the usual sinigang. The other stir-fry spinach recipe that I blogged here also have garlic although it's not as fried crisp as these. I love the crunch of the garlic in contrast with the soft spinach besides the utter simplicity of the cooking and the ingredients themselves.
Spinach with Fried Garlic
Here's one recipe that I adapted from Ken Hom's Hot Wok that I use when I have excess spinach from the usual sinigang. The other stir-fry spinach recipe that I blogged here also have garlic although it's not as fried crisp as these. I love the crunch of the garlic in contrast with the soft spinach besides the utter simplicity of the cooking and the ingredients themselves.
Spinach with Fried Garlic
750 g fresh spinach - washed and drained well
1 1/2 Tbsp oil
2 Tbsp thinly sliced garlic
1 tsp sea salt
pinch of sugar
- Heat oil gently in a wok. Add in the salt and garlic. Fry on low heat until garlic is golden and crisp.
- Remove with a slotted spoon and drain on paper towels.
- Heat the oil again this time on high heat until it is smoking.
- Tip in the spinach and stir-fry for about 2 minutes.
- Add a pinch of sugar. Stir-fry for a further 3-4 minutes or until spinach is wilted.
- Remove and dish up. Scatter fried garlic on top. Serve immediately.

The ingredients I used here is based on what I can source in my area. So fresh coconut milk is out as with saba banana. That's one thing I miss from Pinas. The plantain, in my opinion, still can't compete with the taste and texture of the saba. But I can't find it anywhere here so to the plantain I must stick. One thing about plantain, when it's very ripe it will literally turn almost black. I was wondering before why grocers continue to display 'rotten' pieces of these. Until a Filipina friend kindly informed me that it still edible in that state. In fact, most prefer it black-ripe for a softer and sweeter banana.
I noticed as well that the sweet potatoes (kamote) here is softer or rather cooks more easily than the ones back home. And lastly, I think I prefer to use the glutinous rice flour rather than soaking the malagkit overnight then grinding it then straining it in a cheese cloth. *sigh* The ready-made flour just makes ife so much easier. By the way, there's a lot of coconut soup in this one since I love it soupy rather than chock-full of halo with hardly any soup.
 Ginataang Halo-Halo
(Mixed Fruits In Sweet Coconut Milk)
*For the bilo-bilo (glutinous rice balls):
1 cup malagkit (glutinous) rice flour
scant 1/2 cup water
3 x 400 ml cans of coconut milk
3 x 400 ml cans of water (use the can of the coconut milk)
3/4 cup sugar
1/3 cup tiny sago (tapioca) pearls
500 g kamote (sweet potato) - peeled and cut into serving size pieces
350 g gabi (taro/eddo) - peeled and cut into serving size pieces
2 pcs ripe plantain bananas - peeled and cut into serving size pieces
250 g fresh or canned langka (jackfruit) - drained and cut into 1/2-inch thick pieces
coconut cream (optional)
- Mix the malagkit rice flour and water. Add in more water or flour to make into a dough-like consistency.
- Get a small piece off it and, with your hands, roll into a ball about 1/2-inch in diameter. Repeat until you have used up all of the dough. Set aside.
- In a big pot, tip in all the coconut milk and water. Bring to boil - watch out this mixture usually boils over.
- Add the sago pearls. Turn down heat and continue to simmer uncovered until there are no more opaque white bit in the middle of the sago pearls (about 20 minutes).
- Add in the sugar and stir to dissolve. Taste to see if the sweetness is to your liking. If not, add more sugar.
- Tip in the bilo-bilo (glutinous rice balls) in the pot. Bring to boil again until all the bilo-bilo has floated on the surface.
- Add the gabi, simmer for 3 minutes.
- Add the kamote and banana and simmer for another 4 minutes or until the gabi and kamote are almost cooked.
- Add the langka and cook for another 3-4 minutes.
- Serve hot in a bowl with 1-2 Tbsp of coconut cream on top.
 I found another beancurd recipe to use up a box that was soon to expire. This one has a very tasty and slightly spicy batter. And I suspect this is very similar to the fried beancurd we used to have in a Chinese restaurant in the basement of the old Makati Cinema Square in Pasong Tamo Ave. down in Makati. That one had a very nice sauce which complements it well. I guess I'll have to concoct that next to complete the similarity. The book The Food of China yielded this nice dish.
Fried Savoury Beancurds
I found another beancurd recipe to use up a box that was soon to expire. This one has a very tasty and slightly spicy batter. And I suspect this is very similar to the fried beancurd we used to have in a Chinese restaurant in the basement of the old Makati Cinema Square in Pasong Tamo Ave. down in Makati. That one had a very nice sauce which complements it well. I guess I'll have to concoct that next to complete the similarity. The book The Food of China yielded this nice dish.
Fried Savoury Beancurds
500 g beancurds
100 g minced pork (optional)
1 cup plain flour
1 egg - beaten
1/2 tsp salt
1/2 tsp sugar
2 tsp chicken stock powder
1 Tbsp chilli sauce
water to mix
oil for deep frying
freshly ground black pepper
shredded green onions or chopped herbs (for garnish)
- Combine flour, egg, salt, sugar, chicken powder, chilli sauce, pork and enough water to make a batter with the consistency of double (heavy) cream.
- Cut the beancurd into pieces of 1/2 inch thick, about 2 inches long, and 1 inch wide.
- Heat oil in a wok or saucepan until slightly smoking.
- Dip the beancurds in the batter then slip them one by one and in batches in the oil. Deep fry for about 3-4 minutes or until golden brown.
- Garnish with black pepper and herbs.
 It's that time again when I'm cleaning up my kitchen cupboards and found packets of half-used ingredients about to expire in the coming days or weeks. So the current mode is find recipes for these ingredients instead of the other way around. As expected from a nut lover like me, there are several unopened bags of pecans expiring this month. And first thing I thought of is this great recipe that I found from Epicurious, which I discovered by way of a waldorf salad recipe in the same website. I ended up keeping the moreish 'budbud' or garnish instead of the salad.
This is great munched with cold alcoholic drinks or whichever drink you fancy. I have to warn you hide it where no other member of the family can find it or there won't be anything left to serve. :) Now where is my cold beer? Hand me over that Corona will 'ya?
Happy New Year !!
Sweet Spicy Pecans
vegetable oil
3 Tbsp golden syrup or light corn syrup
1 1/2 Tbsp sugar
3/4 tsp ground sea salt
1/4 tsp freshly ground black pepper
1/8 tsp cayenne pepper
1 1/2 cups pecan pieces
- Preheat oven to 325°F/160°C/fan 140°C/gas mark 3.
- Lightly oil a baking sheet.
- Mix syrup, sugar, and spices in a bowl.
- Add pecans into it and stir to combine well.
- Transfer to the prepared baking sheet.
- Place large piece of foil on work surface. Lightly oil it.
- Bake pecans in oven for 5 minutes. Stir pecans to coat with melted spice mixture.
- Continue baking pecans until golden and bubbling for about 8 - 10 minutes.
- Remove from oven and transfer to prepared foil on the work surface.
- Using 2 forks, immediately separate nuts while hot. It will be hard to do this once it starts to cool down so make sure to work quickly while doing so.
- Cool completely.

Tofu, also known as soy bean curd or tokwa, is made by curdling soy bean milk. Curdling is aided by calcium sulfate - a naturally occuring mineral. After curdling, the mixture is then pressed to form tofu. So essentially, tofu is soy bean cheese.
Here in the west, there are two types of tofu - the firm one (this comes in blocks) and the silken one (called taho in Phils.). Although when we were in Hong Kong, they have an even firmer type of tofu which are in rounded pieces similar to buffalo mozarella except the former is flatter and squarish in shape. The extra firm and firm ones are good for general cooking. The silken one has a very soft, smooth and creamy texture and is used a lot on desserts.
Also in Hong Kong, there are hawkers who fry and sell preserved tofu right on the street. The problem is they f*&%$ng stink big time! Oh, I swear you could smell it from a mile back! This is very prevalent in the area of Battery Path going to St. Paul's church - uggh! However a lot of people I know (Chinese, Gweilos, even Pinoys) insist that they taste great. Must be the durian syndrome in them.
Peking-style Fried Bean Curd
3 pieces of 2 1/2- inch square bean curd (tofu)
1/2 cup flour
1 egg - beaten
1 Tbsp green onion - chopped
1 Tbsp ginger root - chopped
*Sauce:
1 tsp cooking wine
1/2 tsp salt
1 tsp sesame oil
1/2 cup stock (or 1/2 stock cube dissolved in 1/2 cup hot water)
- Combine ingredients for the sauce in a small bowl and set aside.
- Heat a little oil in a non-stick frying pan.
- Cut the bean curd into 1/2-inch thick slices. Coat with flour and then dip into the egg.
- Fry bean curds over medium heat for 1 minute each side or until golden brown.
- Wipe clean the frying pan and sprinkle half of the green onions and ginger in the pan.
- Arrange the fried bean curds on top then pierce the bean curds with a fork to allow liquid to seep through.
- Sprinkle the rest of the green onion and ginger on top of the bean curds and pour in the sauce. Turn on heat and bring to boil.
- Turn down the heat to low and cook uncovered until almost all the liquid is absorbed by the bean curd.


