 This month's edition of Lasang Pinoy is hosted by the lovely Ting of Worldclass Cuiscene with a theme of 'pulutan'. When you hear 'pulutan' you should think along the same vein as the Spanish tapas. It's usually a dish that is specifically eaten with alcoholic drinks. Because of the close similarity, the concept might have come from the Spanish. (Please don't hold me hostage with that last statement, I'm just speculating from the obvious.) Due to the nature of its purpose, it's usually very spicy or at least very tasty to encourage you to drink more.
When the theme was announced it stupefied me since I haven't cooked pulutan to anyone. The one dish I wanted to try was sisig but pork cheek and/or ears are not normally what you see lying around the supermarket shelves here. The only other one I know is spicy adobong mani (garlic fried peanuts) which I think is so simplistic. Well Lasang Pinoy, in my opinion, deserves better than that. So what other recourse I had than call for help from the mga manginginom (drunken masters) I know. Good thing they came up trumps with this Kapampangan (Ilokano?) dish of bagis which was sooo tasty and so easy to do even a half-inebriated guy can whip this up in no time at all. A big thanks is in order to my BIL Derek and his friend Al Dayao (who gave the original recipe) for sharing this with us. Tagay na !
 Bagis
Bagis
500 g minced beef
2-3 Tbsp lemon juice (from about 1 whole lemon)
1 1/2 cups chopped onions (about 2 medium)
1 tsp Tabasco sauce (or to taste)*
1 1/2 tsp sea salt
freshly milled black pepper
- Marinate the minced beef in lemon juice for 24 hours or overnight.
- Combine the marinated beef (including the marinade) and the rest of the ingredients in a pan and cook in medium heat. As it cooks, the beef will render its juice and fat so you do not need to put any water or oil.
- Once the mixture starts bubbling away, turn down heat and simmer until all the liquid has evaporated and the beef starts sizzling from its own fat. Dish up and serve with some stiff drinks. :p
*Note: You may use fresh chopped chillis or dried chilli flakes in place of the Tabasco.
 I found this in the October 2005 issue of Olive magazine. With a lot of leftover chorizo that was going to expire soon, this fitted perfectly well with what I required. Besides using up all my chorizos, this stew is quite appropriate in the current near-freezing weather sending in comfort with its rich, slightly spicy, if somewhat salty taste. You know what, this has shades of Fabada except instead of morcilla you have the chorizo. I bet this would be great as well if indeed you use morcilla. It's easy enough to cook which after you've banged up all the ingredients you just stick it in the oven and wait. Make sure to hold the seasonings first until you've tasted it since the amalgam of bacon and chorizo can be salty at times.
Chorizo and Pork Belly with Haricot Beans
I found this in the October 2005 issue of Olive magazine. With a lot of leftover chorizo that was going to expire soon, this fitted perfectly well with what I required. Besides using up all my chorizos, this stew is quite appropriate in the current near-freezing weather sending in comfort with its rich, slightly spicy, if somewhat salty taste. You know what, this has shades of Fabada except instead of morcilla you have the chorizo. I bet this would be great as well if indeed you use morcilla. It's easy enough to cook which after you've banged up all the ingredients you just stick it in the oven and wait. Make sure to hold the seasonings first until you've tasted it since the amalgam of bacon and chorizo can be salty at times.
Chorizo and Pork Belly with Haricot Beans
750 g pork belly - skin removed, cut into large chunks
130 g pancetta or streaky bacon - diced
1 large onion - chopped
1/2 Tbsp minced garlic
1 tsp hot smoked paprika
200 g chorizo - chopped
1 x 400 g can of chopped tomatoes
2/3 cup red wine
1 x 400 g can of haricot or cannellini beans - drained and rinsed
about 1/3 cup chopped fresh coriander
olive oil
salt and pepper
- Preheat oven to 160°C/fan 140°C/300°F/gas mark 3.
- Heat about 1 Tbsp olive oil in an oven proof casserole pot. Brown the pork in it at high heat. Do this in batches. Set aside.
- Reduce the heat to medium and add 1 Tbsp more olive oil in the pot and then add the pancetta. Cook for about 2-3 minutes until golden brown.
- Add in the onion and garlic and cook until softened.
- Stir in the chorizo and paprika. Cook for a minute or so.
- Put back the pork in the pot and tip in the chopped tomatoes.
- Pour in the red wine and enough water just to cover it.
- Season with pepper and cook in the oven for 2 hours.
- Remove the cover and stir in the haricot beans and return to the oven. Cook uncovered for 20-30 minutes.
- Remove from the oven and taste the sauce. If need be, season with salt.
- Stir in the coriander and serve with crusty breads or hot plain rice.
 What a great idea to have a 'Sugar Low Friday' for the 15th edition of SHF. This time it's hosted by that lovely food blogger Sam in SFO whom I met a few months ago. As she said, after all the excesses most of us had during the Christmas holidays it's about time to balance off some of these rich food with something low in fat, low in sugar.
Actually my first attempt in this genre was with some cinnamon apple sauce mixed with yoghurt and whipped egg whites. It was really very low fat with no sugar and so healthy but ... bleccchh! It was so sour and had that strong taste of the egg whites that I didn't bother to let my other family members taste it. Down it went to the rubbish bin.
As the deadline came looming, I turned to my trusty Delia Smith cookbook (How To Cook Book 3) to give me one dessert that I know will surely work. For me, she is that reliable ... and she sure was! A bonus in this recipe is that it doesn't have any flour, perfect for people with wheat allergies. I used Fruisana in place of the 'granulated sweetener'. It's actualy fructose which is an all-natural fruit sugar extracted sweetener that's at least 30% sweeter than ordinary sugar. So it doesn't have that unpleasant aftertaste like that in artificial sweeteners.
The cakes itself don't taste much really 'coz there's not much sugar in it. But combined with the creaminess of the creme fraiche filling and the natural sweetness of the rum-soaked prunes, it was gorgeous. Very very nice indeed! Definite thumbs up for this one. :)
 Squidgy Chocolate Cakes with Prunes
10 g [2 Tbsp + 1 tsp] cocoa powder
3 large eggs - separated
1 1/2 Tbsp granulated sweetener
oil for greasing
*For the filling:
12 ready-to-eat prunes
3 Tbsp marsala or rum or brandy
3 Tbsp low fat fromage frais or creme fraiche
2 tsp granulated sweetener (or to taste)
1 tsp chocolate or vanilla extract
- Put the marsala and prunes in a small saucepan. Heat the sauce pan and bring it up just to simmering point. Remove from heat and leave to cool. You may put this in a covered glass or plastic container and leave to soak for a few hours or overnight in the fridge.
- Preheat oven to 180°C/fan 160°C/350°F/gas mark 4. Lightly grease 4 ramekins - about 1.5 inches deep with a base of 3 inches.
- Beat the egg yolks in a bowl with the sweetener for about 1 minute.
- Sift the cocoa on the egg yolk mixture and mix well to blend.
- Beat the egg whites in another bowl until soft peak stage.
- Using a metal spoon, mix in about 1 Tbsp of the beaten egg whites to the cocoa batter to lighten it. Then gently fold in the rest of the egg whites.
- Pour and divide into the 4 ramekins.
- Bake for 13-15 minutes or until the top is crusty but still wobbly.
- Remove from oven and leave to cool. As soon as it's cool enough to handle, turn out from the ramekins by running a knife along the edges then prying it loose. Leave it to further cool on a wire rack.
- While the cake is cooling, mix the creme fraiche, sweetener, chocolate extract, and about 1-2 tsp of the rum marinade of the prunes (careful not to add too much or it will become runny).
- Reserve 4 of the prunes, chop the rest of it, then mix these to the creme fraiche mixture.
- Split the 4 cakes horizontally like a bun. Divide the creme fraiche filling among the lower half of the 4 cakes. Cover with the top half and then top with the reserved a prune in each.
Tagged with:
SHF # 15 +
Low Sugar
 For several years now I've been trying to 'perfect' this popular Italian pasta sauce. Also called 'Spag Bol' or Spaghetti Bolognese (when served with that shape of pasta), I read in several books that Italians themselves wouldn't dream of serving this with spaghetti. They apparently use tagliatelle and after tasting this with a fresh version of that pasta, I could say I share their sentiment completely. This sauce can also be found in between lasagne sheets. Well, I've already got the Pinoy version of this plus even my son can come up with a bottled version (just brown some minced beef and pour in the bottled spaghetti sauce). But I fervently wanted to recreate the great taste of the meat sauce that we often get from Italian restaurants. This led me to looking it up in almost all the cookbooks and food magazines I come across. When I chanced upon the great collection of cookbooks in our local library, I was able to research on the authentic versions and derive a lot from it.
The word 'ragu' refers to slow cooked meat with little sauce. As with most traditional dishes there are a lot of variations even in Italy, not just from town to town but even probably from household to household. Some have all beef, have combinations of beef and pork, some use veal. Most use finely minced meat while others have diced ones. Versions also vary on whether or not to put vegetables, tomatoes, and milk or cream. The one thing that's universal in the more authentic recipes I found is the very slow and long cooking time, the use of wine (red or white), and spices. This version, which eventually met with the approval of my family, is one I culled from several cookbooks and the last one in particular from Anthony Worrall-Thompson who suggested Worcestershire sauce and anchovy sauce. It did the trick of adding a certain top note of yumminess to it. For one, my family loves its sauce very tomatoey therefore the chopped tomatoes and tomato puree are in. I also followed Delia Smith's and AWT's suggestion of browning the beef separately - it resulted in a more flavourful meat than if I did the browning right there in the stewing pot. I opted to use veggies in it because it imparts a slight sweetness, while the wine gives it body. Anyway, enough of my ramblings do try this and believe me just the aroma filling your kitchen would entice your housemates in.
Ragu alla Bolognese
1 kg minced beef (or half beef, half pork)
1 1/2 Tbsp olive oil
1 Tbsp minced garlic
2 medium onions - finely chopped
125 g pancetta or streaky bacon - finely diced
1/2 cup finely chopped carrots
1/2 cup finely chopped celery
1 Tbsp chopped fresh or 1 tsp dried thyme*
1 tsp dried oregano*
1 1/2 Tbsp chopped fresh or 1 tsp dried basil*
1/4 tsp nutmeg
1 1/2 Tbsp Worcestershire sauce
1 Tbsp anchovy sauce [optional]
1 bay leaf
1 cup white wine
2 x 400 g can of chopped tomatoes*
1/4 cup double concentrate tomato puree (tomato paste)
2 tsp sea salt (or to taste)
freshly milled black pepper
1/2 cup beef stock or water
butter or olive oil
125 g chicken liver - trimmed, washed and cut into 3/4-inch pieces
3 Tbsp single cream (light cream) [optional]
- In a pan (preferably non-stick), drizzle some olive oil and heat it up. Brown the minced beef in batches. Set aside.
- Wipe the pan and heat up some more olive oil or butter. Cook the chicken liver until well cooked and crumbly - about 5 minutes. Transfer to a bowl, then using a fork mash it up. If need be, finely chop some of the bits of liver that refuse to get mashed.
- In a big stewing pot, heat the 1 1/2 Tbsp olive oil and gently fry the bacon until it changes colour.
- Turn heat to low and add the garlic. Cook for 1 minute.
- Stir in the onion and cook gently for about 4-5 minutes or until translucent.
- Turn up the heat to medium and add the carrots and celery. Cook for about 3 minutes or until soft while stirring occassionally.
- Add the spices - basil, thyme, oregano. Stir and cook for about 1 minute or until aromatic.
- Tip in the browned minced beef and wine. Simmer until almost all the liquid has evaporated. Stir occassionally.
- Add the chopped tomatoes, concentrated tomato puree, bay leaf, nutmeg, Worcestershire sauce, anchovy sauce, chicken liver, salt, pepper, and stock.
- Bring to boil then bring down heat to lowest setting and simmer for *at least* 2-3 hours.
- If you have more fresh basil lying around, chop about 2 Tbsp of it and stir in the sauce.
- Add the cream and stir. Cook for another 1-2 minutes. Serve with freshly cooked al dente pasta such as spaghetti or tagliatelli.
*Notes:- In place of the basil, thyme, and oregano, you may use 1 Tbsp of Italian mixed herb.
- You may use 500 g passata in place of the chopped tomatoes and reduce the tomato paste to 1 Tbsp only.
 I chanced upon an entry in the IMBB portal of a monthly virtual recipe club (VRC) initiated and hosted by Alysha of The Savory Notebook. The current theme is wholegrain quick breads and muffins. And I thought - wa-hey! I've got one already! I got this from the Great American Food cookbook by Leslie Allen which in turn was adapted from a recipe from the Morning Glory Cafe on Nantucket Island, USA. Well I don't know if this classifies as whole grain but it sure got lots of fiber in it and it's not sweet - perfect for breakfast. If you want this as a dessert or sweet snack type of muffin, you'll have to increase the sugars or crown it with some icing such as a cream cheese one.
Now why did I dream of making this? As you know, my cupboards were inventoried early this year for soon-to-expire items then I had lots of surplus carrots in the fridge which convinced me to try this. I didn't regret that decision. It's healthy enough to be hated by my kids ;). So I'm hogging them all for my lonesome self every morning (husband not fond of cakes or muffins).
I'm delighted with this post because besides that this is more on the healthy side in relation to my regular baking recipes, I'm actually submitting this almost a week from the deadline. Mrs. Always Late is way ahead on time at this instance. :)
Morning Glory Muffins
75 g [1/2 cup] raisins or sultanas
2 Tbsp rum
250 g carrots - peeled
1 apple - peeled and cored
110 g [1/2 cup] firmly packed dark brown sugar
55 g [1/4 cup] caster sugar (superfine)
140 g [1 cup] self-raising wholemeal flour
150 g [1 cup] self-raising flour
2 tsp ground cinnamon
2 tsp bicarbonate of soda (baking soda)
1/2 tsp salt
40 g [1/2 cup] sweetened dessicated coconut
55 g [1/2 cup] chopped pecans
3 large eggs - beaten
3/4 cup vegetable oil
1 tsp vanilla extract
- Preheat oven to 375°F/190°C/fan 170°C/gas mark 5.
- Grease or line with paper cases 3-inch diameter muffin pans.
- Boil the sultanas in the rum in a small saucepan. Once it boils, remove from heat and let cool.
- Shred the carrots and apple in a food processor or grate in a hand grater.
- Combine the eggs, vanilla, and oil in a small bowl. Whisk lightly. Set aside.
- Mix the sugars, flour, bicarbonate of soda, cinnamon, and salt in a large bowl.
- Add the raisins (with the rum) and toss.
- Stir in the carrots, apple, coconut and pecans.
- Add in the egg mixture to the flour mixture and stir until just combined.
- Spoon the mixture into the prepared muffin pan and bake for 20 minutes.
- Let it cool briefly then serve warm. These actually taste better the next day.
 Here's a recipe where you can use up your extra toge or beansprouts. I seem to always buy too much of it whenever I need some for stir fries and noodle dishes. So this is handy if you don't want to just throw them in the bin. The chicken gives it the protein you need to balance out the veggie plus if you've been cooking a lot of leche flans or creme caramel, this is one way to use up the egg whites though at just half a piece it probably won't dent your surplus that much. The recipe is adapted from Huang Su-Huei's Chinese Cuisine cookbook.
Stir-fried Beansprouts with Chicken
Here's a recipe where you can use up your extra toge or beansprouts. I seem to always buy too much of it whenever I need some for stir fries and noodle dishes. So this is handy if you don't want to just throw them in the bin. The chicken gives it the protein you need to balance out the veggie plus if you've been cooking a lot of leche flans or creme caramel, this is one way to use up the egg whites though at just half a piece it probably won't dent your surplus that much. The recipe is adapted from Huang Su-Huei's Chinese Cuisine cookbook.
Stir-fried Beansprouts with Chicken
250 g boneless chicken meat - shredded or jullienned
250 g bean sprouts
1/4 cup oil
*Marinade:
1/4 tsp salt
1/2 Tbsp cooking wine
1/2 egg white - slightly beaten
3/4 Tbsp cornstarch
*Sauce:
1 tsp cornstarch
1 tsp cooking wine
3/4 tsp salt
3/4 tsp sugar
1 1/2 Tbsp water
black pepper
dash of sesame oil
- In a bowl, mix the marinade: stir the salt in the cooking wine until dissolved.
- Add in the chicken, mix well. Mix in the egg white, mix well. Then add the cornstarch, mix well again. Set aside for about 20-30 minutes.
- Mix all the ingredients for the sauce in another bowl. Set aside.
Heat the wok and pour in the oil.
- Mix additional 1 Tbsp oil into the marinated chicken to make them separate easily during cooking.
- Once the oil in the wok is smoking, tip in the chicken and stir fry for about 3-4 minutes or until cooked. Remove from the wok and drain on paper towels.
- Remove the oil from the wok but retain about 2 Tbsp in it. Reheat wok.
- Stir fry the bean sprouts for a few minutes until slightly wilted.
- Add in the chicken and stir fry for 30 seconds.
- Turn up heat to high and mix in the sauce. Stir for a few seconds or until the sauce has thickened. Dish up and serve.
 This is another attempt at finding variety in cooking our beloved salmon. We can only eat so much Sinigang na Salmon or Grilled Salmons that I had to find an alternative way of serving it. Besides that salmon is one of our favourite fish, it's in season right now and abundant this time of the year therefore quite reasonable in price. I found this recipe, which I adapted from Delia Smith's How To Cook Book Two, very nice and quite tasty. I've tried it with both Pecorino and Parmesan cheese and they both did well in the medley. Cooked it also with and without the breadcrumbs. I favoured it with breadcrumbs because it made the crust very crunchy. But my husband preferred it without since he often mistake the some of the crunchy crust as fish bones and ended up not eating it. So whether you put breadcrumbs or not it's still very well recommended.
Pesto & Cheese Crusted Salmon
This is another attempt at finding variety in cooking our beloved salmon. We can only eat so much Sinigang na Salmon or Grilled Salmons that I had to find an alternative way of serving it. Besides that salmon is one of our favourite fish, it's in season right now and abundant this time of the year therefore quite reasonable in price. I found this recipe, which I adapted from Delia Smith's How To Cook Book Two, very nice and quite tasty. I've tried it with both Pecorino and Parmesan cheese and they both did well in the medley. Cooked it also with and without the breadcrumbs. I favoured it with breadcrumbs because it made the crust very crunchy. But my husband preferred it without since he often mistake the some of the crunchy crust as fish bones and ended up not eating it. So whether you put breadcrumbs or not it's still very well recommended.
Pesto & Cheese Crusted Salmon
350 g salmon fillets
2 Tbsp pesto sauce
1 1/2 Tbsp grated pecorino or parmesan cheese
2 Tbsp fresh breadcrumbs (optional)
squeeze of lemon juice
salt and freshly milled black pepper
- Preheat oven to 230°C/fan 210°C/450°F/gas mark 8. Line a shallow baking tray with foil and lightly grease with oil.
- Place the salmon fillets on the baking tray, skin side down.
- Squeeze some lemon juice in each one of them and season with salt and black pepper.
- Combine the pesto sauce and one-third of the breadcrumbs to form a paste and spread over the fillets.
- Mix half of the cheese and the rest of the breadcrumbs. Spread this over the pesto.
- Then sprinkle the rest of the cheese on top.
- Bake in the middle shelf of the oven for 10 minutes. Dish up and serve.
 Time to come back to one of my favourite food - seafood! I especially love them cooked simply. There's a toss up between grilled, steamed or stir fried on my preferred cooking method for it. But since the prawns I have are frozen, I thought grilling and steaming would not be appropriate so out came this recipe which I adapted from Huang Su-Huei's Chinese Cuisine cookbook. It was very yummy that I was able to finish it all by myself!
Stir-fried Shrimps With Vegetables
Time to come back to one of my favourite food - seafood! I especially love them cooked simply. There's a toss up between grilled, steamed or stir fried on my preferred cooking method for it. But since the prawns I have are frozen, I thought grilling and steaming would not be appropriate so out came this recipe which I adapted from Huang Su-Huei's Chinese Cuisine cookbook. It was very yummy that I was able to finish it all by myself!
Stir-fried Shrimps With Vegetables
250 g raw shrimps or prawns - peeled and deveined
1/4 tsp salt
1 tsp cooking wine
1/2 egg white - slightly beaten
3/4 Tbsp cornstarch
1/3 cup oil
2 Tbsp water
1/2 cup diced carrots
1/2 cup onion - roughly chopped
1/4 cup diced button mushrooms
1/4 cup green peas
*Sauce:
2 Tbsp water
1/3 tsp salt
1 tsp cornstarch
dash of sesame oil
freshly ground black pepper
- Mix the sauce first - in a bowl, combine all the sauce ingredients, stirring to dissolve the salt and cornstarch. Set aside.
- In another bowl, dissolve the salt in the cooking wine. Mix this with the shrimps.
- Add in the egg whites, mix well.
- Then the cornstarch, mix well again. Set aside and marinate for about 15 minutes.
- Add 1 Tbsp oil to the shrimp mixture and mix well (to make it separate easily).
- Heat wok and the oil in medium heat.
- Fry the shrimps in the wok until just cooked and changes colour (about 3 minutes). Remove and drain on absorbent paper towels.
- Remove the oil from wok but retain 2 Tbsp in it. Heat the wok again.
- Stir fry the onion until fragrant.
- Mix in the carrots, mushrooms, and green peas. Stir fry for a few seconds.
- Add the water and cook in medium heat until the liquid has completely evaporated and the vegetables are cooked. If it dries up too easily, add more water but only a little at a time.
- Turn up heat to high and add the fried shrimps. Stir fry for a few seconds.
- Add the sauce mixture and stir fry quickly to mix. Remove from wok onto a platter and serve.
 This is part of my kitchen cupboard clean-up recipes. I had some chopped apricots and pecans expiring soon so it was good that I found this in one of our favourite cookbooks - The Genuine American Cookie and Muffin Book by Peter Shaffer. It's quite good with the cookie being more cakey if a little bit undercooked.
Apricot Raisin Pecan Cookies
This is part of my kitchen cupboard clean-up recipes. I had some chopped apricots and pecans expiring soon so it was good that I found this in one of our favourite cookbooks - The Genuine American Cookie and Muffin Book by Peter Shaffer. It's quite good with the cookie being more cakey if a little bit undercooked.
Apricot Raisin Pecan Cookies
200 g [scant 1 1/4 cups] dried apricots - chopped
140 g [1 cup] raisins or sultanas
1 cup water
490 g [scant 3 2/3 cups] plain flour
1 tsp bicarbonate of soda
1 tsp baking powder
1/2 tsp ground cinnamon
1/2 tsp ground nutmeg
1 tsp salt
100 g [3/4 cup] pecans - chopped
250 g [scant 1 1/3 cups] soft demerara sugar
225 g [scant 1 cup] butter - softened
2 large eggs
1 tsp vanilla extract
- Preheat oven to 180°C/fan 160°C/350°F/gas mark 4.
- Put apricots, raisins, and water in a saucepan. Cover and bring to boil. Bring down heat to low and simmer for 3-4 minutes. Remove from heat and cool. Do not drain.
- Combine the flour, bicarbonate of soda, baking powder, cinnamon, nutmeg, salt, and pecans in a bowl. Mix well.
- In a large bowl, beat the butter, sugar, and vanilla until light and fluffy.
- Add eggs one at a time and continue beating until well blended.
- Using a wooden spoon, stir in the raisin and apricot mixture. Mix well.
- Gradually fold in the dry ingredients into the butter mixture. Stir just enough to combine. Do not overmix.
- Using a tablespoon, drop dough by rounded portions (about 1.5 - 2 inches in size) onto baking sheets about 2 inches apart.
- Bake for 12 to 15 minutes for a soft centre.
- Allow cookies to stand for 1 to 2 minutes before removing from baking sheet and transferring to a wire rack to cool completely.


The Christmas season 2005 for me was like a whirlwind that grew into a tornado, swept me off and deposited me helplessly at the state I'm in now. I should have clicked my heels before to regain my sanity but then I needed red shoes for that. ;) What I wanted to say was it so busy and hectic for me what with the numerous Christmas parties at work, with friends, and with relatives. Add more of the usual shopping madness and Christmas card postings plus the added worry of being made redundant - but that's another story.
I'm beating around the bush! Just trying to excuse myself for being late with my entry and for completely forgetting to take pictures of our decors. And have you heard? My supposed traditional rellenong manok (stuffed chicken) morphed into a beef roast. Of all the years I've been living here in UK, the ones that run out everytime before Christmas are the turkeys. Why oh why could I not find any whole chicken two days before C-day? I searched high and low in all butchers that abound and the supermarkets littering our high street but no freakin' chicken!! In my exasperation, I picked up the last remaining slab of prime rib of beef on the counter and proceeded to harass Stel on the phone on how to roast the darn thing. Kind and ever helpful, she put me thru the paces even though she was frantically preparing for their own Christmas family do. Despite my initial bad impression with our main course, it turned out beautifully - delicious actually! So simply cooked with all the traditional sides and a great gravy that my family wanted me to do it again at the earliest possible time. The lovely Stel of Babyrambutan provided the easy peasy recipe. Thanks dear!
This 5th edition of Lasang Pinoy is hosted by Mike of Lafang. Oh yeah, I forgot to tell you how we spend our Christmas - in the days before we usually go round some friends' houses to give out our gifts. We try to attend a Christmas eve mass but there are years like this one that was just so so busy. Usually we have either a sumptous Christmas lunch or dinner but this year, ostensibly to let me have a relaxing Christmas day, we had our celebratory meal on Christmas eve dinner. Morning after that were spent ripping out gift boxes and saying our thank yous to everyone and phoning all the friends and relatives to wish them a happy Christmas. I wish my children can experience the magic of Christmas right in the Philippines but since they can't I'm sure we captured the spirit by being together and cherishing our company with our little meals and whatever gifts we can come up with. :)
 Roast Ribs of Beef
one whole slab of prime ribs or forerib of beef (on the bone)
sea salt
- Preheat oven to 240°C/fan 220°C/475°F.
- Place beef on a roast pan and rub all over with the sea salt. If meat has some fat on one side/edge, try to position it so that the fat is at the top so that the fat rendered will drip down on the meat and keep it moist.
- Bake in oven for about 15 minutes.
- Lower heat to 180°C/fan 160°C/350°F and bake with the additional cooking time depending on the weight of the beef. The general rule of thumb would be 20 minutes per pound of meat for rare, 25 minutes for medium rare, and 30 minutes for well done. You may baste the meat from time to time with its own dripping.
- Remove from pan (do not discard drippings) and transfer to a serving platter cover with foil and let rest for up to 30 minutes before slicing and serving.
Beef Gravy
beef fat and drippings
2 heaping Tbsp flour
2-3 cups stock (approximate)
salt and freshly milled black pepper
- Remove the beef fat from the roasting pan but retain about 2 Tbsp.
- Put the roasting tin on the cooker hob and heat up the fat.
- Once moderately hot, sprinkle the flour on it. Blend in the flour well (preferably with a wire whisk)with the fat.
- Add the stock gradually while continually stirring making sure to scrape the bottom for all the roasting bits left in the pan.
- Bring to boil. Add more stock or water if it's too thick.
- Taste the gravy; add salt and/or pepper if necessary. Serve hot.
Now this one, I was quite amazed how homemade roast potatoes would taste so invariably superior to store bought ones - frozen or otherwise. It was simply superb my kids were raving about it. I adapted this from the November 2005 edition of the BBC Good Food magazine which they dubbed as 'The Ultimate Roast Potatoes'.
 Roast Potatoes
1.5 kg floury potatoes (preferably Maris Piper) - peeled and evenly quartered
2 tsp flour or cornflour (cornstarch)
1/3 cup oil (goose fat, olive oil, vegetable oil, etc.)
sea salt
- Preheat oven to 200°C/fan 180°C/400°F.
- Put potatoes in a saucepan. Add salt (about 1 tsp) and enough water to cover it. Bring to boil. Once it boils, lower heat to medium-low and start timing it for 2 minutes.
- Pour oil in a clean roasting pan and place it in the oven.
- Drain water completely from the saucepan. Put the cover on then shake the pan back and forth. This is to rough up the outside of the potatoes to give it that crispy outer covering.
- Sprinkle the flour on the potatoes and shake it some more.
- Carefully put the potatoes in the hot fat in the roasting pan. Spread in a single layer making sure they have plenty of room. Turn or baste them to make sure they are coated with oil all over.
- Roast for 20 minutes then take them out of the oven and turn the potatoes over.
- Return to the oven for another 15 minutes and turn them over again.
- Roast a further 10-20 minutes or however it takes to make them golden and crisp.
- Sprinkle sea salt over, put in serving platter and serve right away.
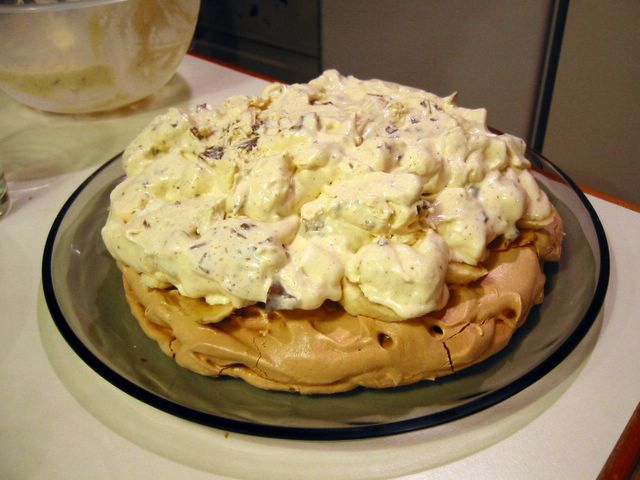
Okay are you ready to see a monster? I made a leche flan a few days before and I thought I would use up the extra egg whites by making this longed for dessert that I saw in the Good Housekeeping magazine eons ago. I didn't bargain for it to be this humongous. Even when I was beating it up, my puny little handheld mixer was drowning from too much meringue that I thought it was gonna die on me. But still I plodded on and out came this huge ... thing ... which would be perfect as a some 'shock and awe' type of dessert in dinner parties. Not for small family dinners because no matter how delectable it is (which this certainly was) there's just too much of it to be consumed in 1, 2, even 3 sittings. Though I did love the nuggets of marshmallows and chocolates in the ice cream (shades of rocky road!) then combined with the freshness of the banana then the crunch of the meringue with almonds. Hmmmm ...
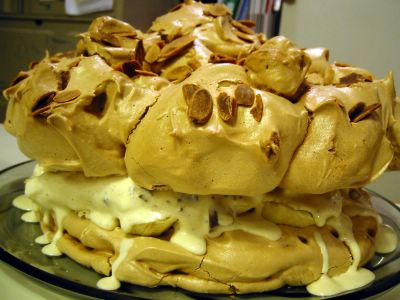 Marshmallow Meringue Cake
225 g [scant 1 cup] caster sugar (superfine)
125 g light brown sugar
6 large egg whites
1 tsp cornflour
1/2 tsp vinegar
50 g flaked almonds - toasted (optional)
150 g small white marshmallows
1 liter good quality vanilla ice cream
150 g dark chocolate - chopped
4 bananas - sliced
chocolate savings and icing sugar to dust
- The meringue must be done at least a day before serving. Trace two 23cm (9 inch) circles on two baking parchment paper set on two baking sheets.
- Sift the caster sugar and brown sugars together in a bowl. Set aside.
- Preheat oven at 120°C/fan 100°C/250°F.
- In a large bowl, whisk the egg whites until they're stiff and dry.
- Whisk in the sugars, one tablespoon at a time, until mixture is glossy and very stiff (about 5 minutes).
- Then whisk in the cornflour and vinegar.
- Spoon half the meringue on one of the baking parchment papers in a garland shape.
- Spread the other half in the other parchment paper evenly to cover it completely.
- Sprinkle both with the toasted almond flakes.
- Bake for 2-2.5 hours. Turn off oven and leave the meringues inside to cool for at least 30 minutes (or you may leave it there overnight).
- A few hours before serving, soften the ice cream by transferring it to the fridge for about 30 minutes.
- Once soft, put in a bowl and fold in the marshmallows and chopped chocolates.
- Put back in the freeze for about 30 minutes to firm it up.
- To assemble, place the meringue circle on a large serving plate. Arrange the sliced bananas on top in a single layer. Spoon the ice cream mixture over the bananas. Then place the garland meringue on top. Decorate with chocolate shavings and dust with some icing sugar. Serve.
Note: To freeze ahead: complete the whole recipe without decorating with chocolate shavings and icing sugar; wrap it and freeze. To serve, take from the freezer and unwrap. Place in the fridge for 1-2 hours, then leave at room temperature for 30 minutes. Decorate and serve.


Lasang Pinoy 5
 As a direct consequence of my making leche flan, I made this rich alcohol-laced cake to use up the egg whites. It's a real treat for chocolate lovers what with its full-bodied chocolate flavour spiked by the brandy and made moist in the middle by the prunes (plus to help you with your recommended daily allowance of fiber). I found this recipe from my favourite - BBC Good Food Magazine's 101 Cakes & Bakes of which I intend to bake every recipe there. Just give me an excuse and I'll do it. ;)
Chocolate Prune Cake
As a direct consequence of my making leche flan, I made this rich alcohol-laced cake to use up the egg whites. It's a real treat for chocolate lovers what with its full-bodied chocolate flavour spiked by the brandy and made moist in the middle by the prunes (plus to help you with your recommended daily allowance of fiber). I found this recipe from my favourite - BBC Good Food Magazine's 101 Cakes & Bakes of which I intend to bake every recipe there. Just give me an excuse and I'll do it. ;)
Chocolate Prune Cake
1/4 cup brandy
250 g no-soak prunes - halved
25 g [3 1/2 Tbsp] cocoa powder
100 g dark chocolate (at least 70% cocoa solids)
175 g [3/4 cup + 2 Tbsp] golden caster sugar
50 g butter
100 ml [1/3 cup + 4 tsp] hot water
4 large egg whites
85 g [heaping 2/3 cup] plain flour
1 tsp ground cinnamon
lightly whipped cream or vanilla ice cream or creme fraiche to serve (optional)
- Soak prunes in brandy for 30 minutes.
- Preheat oven to 190°C/fan 170°C/375°F/gas mark 5.
- Butter a 23 cm/9 inch loose-bottomed round cake pan.
- Mix well the flour and cinnamon in a small bowl.
- In a heavy-bottomed saucepan, put the hot water, butter, cocoa, chocolate, and 1/2 cup of the sugar. heat gently until smooth. Remove from heat and cool slightly.
- Whisk the egg whites until soft peaks then gradually whisk in the remaining sugar.
- Sift the flour mixture over the beaten egg whites and gently fold in with a metal spoon until almost combined.
- Add the chocolate mixture and fold in until well combined.
- Pour the mixture into the prepared pan and arrange prunes on top.
- Bake for about 30 minutes or until just firm.
- Serve with whipped cream, ice cream, or creme fraiche.
 It's that time again when I'm cleaning up my kitchen cupboards and found packets of half-used ingredients about to expire in the coming days or weeks. So the current mode is find recipes for these ingredients instead of the other way around. As expected from a nut lover like me, there are several unopened bags of pecans expiring this month. And first thing I thought of is this great recipe that I found from Epicurious, which I discovered by way of a waldorf salad recipe in the same website. I ended up keeping the moreish 'budbud' or garnish instead of the salad.
This is great munched with cold alcoholic drinks or whichever drink you fancy. I have to warn you hide it where no other member of the family can find it or there won't be anything left to serve. :) Now where is my cold beer? Hand me over that Corona will 'ya?
Happy New Year !!
Sweet Spicy Pecans
vegetable oil
3 Tbsp golden syrup or light corn syrup
1 1/2 Tbsp sugar
3/4 tsp ground sea salt
1/4 tsp freshly ground black pepper
1/8 tsp cayenne pepper
1 1/2 cups pecan pieces
- Preheat oven to 325°F/160°C/fan 140°C/gas mark 3.
- Lightly oil a baking sheet.
- Mix syrup, sugar, and spices in a bowl.
- Add pecans into it and stir to combine well.
- Transfer to the prepared baking sheet.
- Place large piece of foil on work surface. Lightly oil it.
- Bake pecans in oven for 5 minutes. Stir pecans to coat with melted spice mixture.
- Continue baking pecans until golden and bubbling for about 8 - 10 minutes.
- Remove from oven and transfer to prepared foil on the work surface.
- Using 2 forks, immediately separate nuts while hot. It will be hard to do this once it starts to cool down so make sure to work quickly while doing so.
- Cool completely.
 This month's edition of Lasang Pinoy is hosted by the lovely Ting of Worldclass Cuiscene with a theme of 'pulutan'. When you hear 'pulutan' you should think along the same vein as the Spanish tapas. It's usually a dish that is specifically eaten with alcoholic drinks. Because of the close similarity, the concept might have come from the Spanish. (Please don't hold me hostage with that last statement, I'm just speculating from the obvious.) Due to the nature of its purpose, it's usually very spicy or at least very tasty to encourage you to drink more.