Showing posts with label celebrations. Show all posts

Friday, 21 November 2014

Rainbow Cake

Rainbow Cake

Last week was my youngest daughter's and my birthday. As by tradition, we had to have a cake and what a cake we made! I was supposed to do this as an entry to the Daring Baker's challenge for July 2014 but I ran out of time. So I was making it up for that by baking this for our birthday.

It was indeed a challenge for me. Seriously, I thought it's one of those experiments that would end up in the rubbish bin. I decided to adapt the recipe of Kerry's fabulous rainbow cake from her blog Kerry Cooks since it is based in a Victoria sponge which I know would guarantee deliciousness. And here was where the first of near misses happened - I said I 'adapted' the recipe which means I used an 8-inch cake pan versus her 6-inch ones. Well, the batter were quite thin when I spread it in the pan and naively I though they would rise evenly. Ha! It rose in the middle and tapered to nothingness towards the edges. They look like small hills complete with bulging boulders on the sides!

Rainbow Cake

The the icing would cover all that up, says moi. But then when I reached for the icing sugar in my pantry there was hardly any in the bag. Drat! Okay, I had to think quickly otherwise my youngest would be really disappointed. What I had in abundance was eggs, sugar, and butter so my light bulb idea was to adapt Corinne's Swiss Meringue Buttercream frosting. Gosh I was nervous because it was the very first time I did that. Nevertheless, glorious billowy white buttercream emerged. This one was delicious and not too sweet - definitely my kind of frosting.

The frosting came out all right but as I was slathering it between layers I realised I hardly have enough to cover it well! Oh darn, it must be mercury retrograde since nothing's going right. I had to use every bit of the icing and as precisely as I could to spread on all the cracks and crannies. Thank goodness there was just enough to cover the whole cake.

Those were not my only firsts in this exploit. The lettering on the cake was a first as well. Looking at it now, I guess there's no other alternative for me but to improve. Despite all my trials, the best part was cutting the cake. It was an unexpected delight to see that it had all come together in all its colourful glory. Really fab! Best of all, the cake with the meringue icing combination tasted great - that was according to my daughter. Mission accomplished!


Rainbow Cake


Rainbow Cake

*Batter: (x2)

250 g  self raising flour
250 g  butter - softened
250 g  granulated sugar
4 eggs
2 tsp vanilla
1/4 cup milk

gel paste colourings (red, orange, yellow, green, blue, and purple)

Note: Mix two batches of this batter and divide each of them into 3 thereby creating 6 layers.
  1. Preheat oven to 180°C/fan 160°C/350°F. Grease three 8-inch round pans.
  2. Cream butter and sugar in a bowl with an electric mixer until light and fluffy.
  3. Add in vanilla and eggs one at a time; mixing well after each addition.
  4. Add flour and then milk into the butter mixture just enough to mix it in.
  5. Divide equally into three smaller bowls and tint each one with a different colour. Mix the gel colour well in the batter.
  6. Spread batter evenly in the three prepared baking pans.
  7. Bake for about 20 minutes or until a toothpick inserted in the middle comes out clean.
  8. Cool 5 minutes in pan and then remove. Cool completely on a wire rack.
  9. [Optional] Wrap the cooled cake layers in cling film and chill in the fridge for several hours. It is easier to assemble it if the cake layers are chilled or even frozen.


*Swiss Meringue Buttercream Icing:

5 egg whites
1 cup granulated sugar
250 g  unsalted butter - softened but not melting
1 tsp vanilla
pinch of fine salt
  1. In a bowl set on a simmering saucepan of water (bottom not touching the water), whisk egg whites and sugar until the sugar is dissolved. You can test this by feeling a little of the mixture between your fingers. If you can't feel any grittiness then it is done.
  2. Remove the bowl from the saucepan and whip the egg white mixture with an electric mixer and beat until stiff peaks stage.
  3. While still beating, add the softened butter a spoonful at a time.
  4. Once all the butter has been incorporated, add the vanilla and salt.
  5. Mix on high speed until the icing is light and fluffy.

*To assemble:
  • On a cake board or plate, put a thin layer of icing in between cake layers while stacking it on top of each other.
  • Put icing on top and all along the sides of the cake. Decorate as you please.

Monday, 15 November 2010

Victoria Sponge Sandwich Cake with Tate & Lyle


My eldest daughter J9 had her birthday a few weeks ago. This time I asked her pointedly on what birthday cake she likes that she will eat. I did not want to repeat previous years when I buy or bake something and was eaten by all lonesome me. Sigh, they're too fussy these kids. Who are their parents?

Anyways, she said she wanted a Victoria Sponge Sandwich cake which we have been baking regularly this year and always gets eaten within a day. It's a favourite not only because of its nice buttery flavour but it's so easy to make. Before I used to have this notion that sponge cakes are technically challenging for your average baker. Well, not this sponge. Although I haven't tried it yet, I bet you can do a one-bowl mixing of all the ingredients. It's that simple.

This particular cake is also known as Victoria Sponge or Victoria Sandwich. Both of which pertains to a sponge cake with fillings in between layers.


I had some help in the guise of one of my favourite brands in the sugar department. One of Tate & Lyle's marketing people sent me some samples for my own baking use. To be honest I really don't need any introduction to it since I use Tate & Lyle regularly but any free samples is most welcome! As with the march of social networking websites that seems to be making blogs less popular, they have their own Facebook site that you have a peek at - We Love Baking.

Victoria Sponge


Victoria Sponge Sandwich Cake

250 g  [1 cup] butter - at room temperature
250 g  caster sugar (superfine)
250 g  plain flour
2 tsp baking powder
4 eggs
3-4 Tbsp whole full-fat milk
  1. Preheat oven to 180°C/fan 160°C/350°F. Butter two 20 cm round cake pan or a 9 x 5-inch loaf pan and line its bottoms with greaseproof paper.
  2. Mix the flour and baking powder until well combined. Set aside.
  3. Beat the butter and caster sugar together until light and fluffy (about 5 minutes).
  4. Add the eggs one at a time, followed by the flour mixture. Mix until well incorporated.
  5. Add enough milk to the batter so that it falls off easily from a spoon.
  6. Divide the mixture between the two prepared pans.
  7. Bake for 20-25 minutes for the round pans or 50-55 minutes for the loaf pan or until a skewer poked in the middle comes out clean.
  8. Turn out on a rack and cool completely.
  9. Either level the top of one of the cake layer and spread the fillings on it or spread it on the bottom without leveling the top.
  10. Put the second cake layer on top and dust a little icing sugar over it.
  11. You have a choice of fillings below or spread whatever you like on it which in my daughter's case means - Nutella !
Note: You may use self-rising flour instead of plain flour, just make sure to omit the baking powder.


*Traditional Filling:
100 g  butter - softened to room temperature
125 g  icing sugar
1 cup strawberry jam
  • Beat the butter with the icing sugar.
  • Spread this first then put the strawberry jam on top of it.

*Filling 2:
1 cup double cream
fresh strawberries
strawberry jam
  • Whip the double cream to stiff peaks.
  • Assemble the fresh strawberries on the first cake layer then spoon a little jam on it.
  • Spread the whipped double cream on it.

Victoria Sponge

Victoria Sponge

Victoria Sponge with Nutella

Thursday, 22 December 2005

London Food Bloggers' Christmas Party

London Food Bloggers' Xmas Party
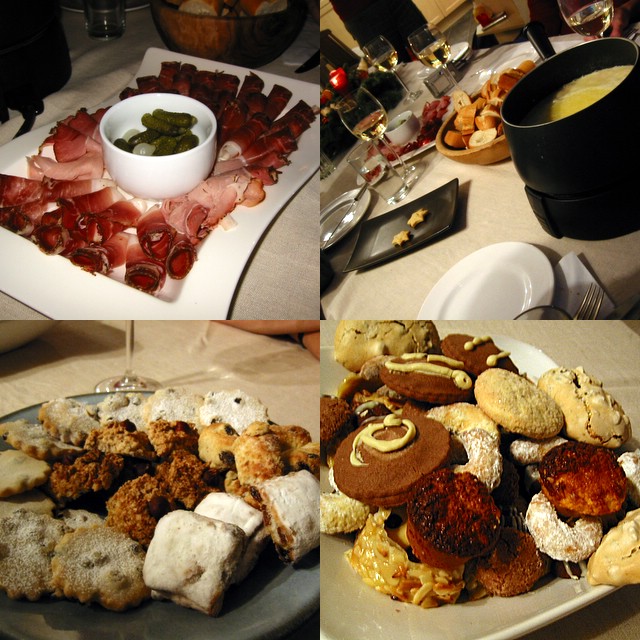
Last Saturday a group of food bloggers from across England gathered in Johanna's lovely house in Twickenham to have a Christmas do and swap delectable cookies. It was an all-girls' affair which included (besides Johanna) Zabeena, Joanna, Jenni, Melissa and her friend Wompe, Jeanne, Martina (Johanna's caterer friend) and me of course.

We first had delicious bratwurst with sauerkraut (which I forgot to take a picture of). The sauerkraut is probably the first I tasted that I liked. Often, the ones I had before were either too sour or too spicy for me. But this one that Johanna said she got from Waitrose was just right. Then she got out platters of sliced Austrian ham which we had in a cheese fondue with chunks of crusty bread. Very nice!

The assembled array of cookies brought by everyone were then scrutinized and heartily eaten with mulled wine or spiced tea. Predictably, they were all yummy! My cookies were not worth mentioning since I am not satisfied with the first two. Well actually, I had a mini disaster when I tried making pilipit (a traditional Filipino twisted crunchy cookie) when it came out of the deep fryer as doughy (like a donut but tougher) and not crunchy or brittle at all. Could it be the baking powder in the recipe? So I had to chuck that in the bin. *sigh*

Okay so on to my next disaster ... err ... I mean next cookie. I attempted to make Sanikulas and got a recipe thru the kindness of Karen. The dough looked okay, so I made them into small balls and since I don’t have a cookie mould, I pressed it flat with the tines of a fork. It was easier said than done because the dough became quite rubbery. But I pressed on and when I tasted the first batch it was distinctly bland. I didn't think there was enough sugar in it. So I rolled the next batch in sugar before pressing them. Needless to say, the resulting Sanikulas were bleechh ... edible but not something I would be proud of. I should have named it Sanikulas via Santacelia due to the number of changes I made to the original recipe.

The other one I made was the chocolate marzipan cookie. In the recipe, it had measurements both in weight and volume. I decided to follow the volume which was a mistake since there appeared to be too much butter so the dough was too sticky. To correct it, I had to add more and more flour which in turn diluted the chocolate flavour. Then the topping should have been drizzled white chocolate but the one I used was more for eating rather than for cooking/baking so it was not runny enough causing a lumpy looking topping. With these disasters, it's a good thing I made some coconut macaroons whose recipe I am absolutely confident about. I guess the lesson here is not to prepare recipes for the first time when serving it to other people, just stick to tried and tested ones to avoid unnecessary stress.

Going back to the EB, we also had fun swapping cookies just before we left. And Johanna gave us a taste of her homemade choco-mocha liquor - it was scrumptious! I gotta have Johanna's recipe even if I have to beg. ;) Admittedly, I had a nice time that day not only were the food and drinks wonderful but the company and conversation were lively. A very big thank you to Johanna and her family for their generosity and graciousness in hosting this event.

Merry Christmas to one and all !!