Did you know that there are a number of Is My Blog Burning? food blogging events underway? Click on the link to the blog and see which event you can participate in. Right now the events for November are:
Sugar High Fridays - 12th November (alright it's a bit late now but still doable). Hosted by the Domestic Goddess .
Does My Blog Look Good In This? - 15th November hosted by Ronald.
IMBB #10 - 21st November also hosted by the Domestic Goddess.
Do join and participate and 'meet' other food bloggers and of course have lots of culinary fun. We cooking enthusiasts sometimes need some challenges to discover other culinary delights that we would not otherwise stray into and what better way to force us :-) than to participate in these events! Come on and have a go ...
Friday, 12 November 2004
Monday, 8 November 2004
Chicken With Apulid
Apulid is water chestnut in English. I have a big can of apulid to finish and this is the first recipe that I did. I've moaned about this in here where you can also find lots of info on apulids, tips on how to store them plus links to a number of recipes using it. Thanks to ManangKu for that.
This dish has quite a nice crunch from the apulid with a piquant taste from the vinegar and a little bit of spiciness from the chilli sauce. It is quite easy to make and any type of chicken boneless meat can be used. Although I'm partial to the boneless thigh part because I find it tastier than the picho (breast). This recipe is from the Chinese Cuisine cookbook by Huang Su-Huei. I've only used up a quarter of the can so expect more apulid recipes in later posts.

Spicy Chicken with Water Chestnuts
500 g chicken meat
1/3 cup oil for frying
1 cup apulid (water chestnuts) - roughly chopped
*Marinade:
2 tsp cooking wine
1 1/2 Tbsp cornstarch
1 1/2 Tbsp soy sauce
*Spicy mixture:
1 1/2 Tbsp chopped green onion
1 1/2 Tbsp chopped ginger root
1 1/2 Tbsp chopped garlic clove
2 tsp hot chilli paste
*Mix sauce:
2 tsp cooking wine
1 1/2 Tbsp soy sauce
2 Tbsp water
1 Tbsp sugar
1 1/2 tsp cornstarch
1 1/2 tsp white vinegar
dash of sesame oil
dash of Szechuan peppercorn powder (optional)
- Cut the chicken meat into 1-inch cubes. Add marinade and mix; marinate for 20 minutes. Before stir-frying, add 1 Tbsp. oil and mix so that the meat will separate easily during frying.
- Heat wok then add oil. Stir fry the chicken until cooked; remove and drain.
- Remove the oil from wok. Reheat the wok then add 2 Tbsp. oil. Add spicy mixture; stir-fry until fragrant.
- Add water chestnuts and stir-fry to mix.
- Add chicken meat and mix sauce. Turn heat to high; quickly stir-fry to mix. Remove and serve.
Thursday, 4 November 2004
Wednesday, 3 November 2004
Sotanghon Soup

Hot on the heels of Ting-aling's post, here is another version of the dish. This is very nice to have on a cold windy autumn night. Besides warming me, it reminds me of the time I was slurping it up in Kaka Luming's corner store.
Sotanghon is the Filipino name for the bean thread noodles (aka cellophane noodles) which is made from mung beans. It is thin, like vermicelli, almost transparent, smoother and more slippery than most other noodles. Used not only in soups but also in lumpia (spring rolls) and pancit (chowmein-like dish).
The key thing in this recipe is the garlic - lots and lots of it. It says 1/2 head of garlic which is around 2 tablespoonfuls. Do not skimp on it because it imparts a somewhat lemony flavour (curious isn't it?) and great aroma. Besides garlic is good for you, it lowers cholesterol, minimises high blood, even acts as an antibiotic. Just make sure you brush your teeth afterwards. :-) Also, I know there are variations with carrots, celery and other vegs but I like mine as simple as this.
Sotanghon Soup
6-7 cups chicken stock
2 Tbsp oil
1/2 head of garlic - minced
1/2 medium onion - sliced
1 cup chopped or flaked cooked chicken meat
1 Tbsp patis (fish sauce)
4 dried Chinese black mushrooms (shiitake)
200 g sotanghon (bean thread) noodles
chopped green onions
- Soak the dried mushrooms in hot water for about 20 minutes. Remove and squeeze out excess water. Cut and discard stems, slice caps into fourths.
- Heat oil in a pot. Saute garlic and onion in low to medium heat. Make sure the garlic is not burned.
- Add chicken meat, mushrooms and patis. Cover and simmer for 3 minutes.
- Add chicken stock and bring to boil.
- Drop the sotanghon noodles in the soup and simmer for about 3 minutes or until noodles are tender and cooked. You may at an early stage cut the noodles with scissors to shorten lengths and make it more manageable to handle.
- Garnish with chopped green onions. Serve hot with combined lemon juice and patis on the side.
Tuesday, 2 November 2004
I Can't Believe There's No Butter !
Nigella Lawson's latest cookbook is under fire (or is it in hotwater?) in a London Times online article.
Oh shock shock horror horror! Nigella forgot to put butter in her list of ingredients! Let's phone Westminister and complain about this stupefying omission. NOT. I didn't know cookbook misprints can cause such coverage. ::Groan:: What's the matter? Nothing more serious left to report on the news? I would expect this in the food section but not at the front of an online newspaper. Well at least it gave me something to blog about. :-) A printer's mistake does not deserve a "front page" treatment, in my opinion. Although the celebrity status accorded to these chefs can get really out of hand, but for a foodie like me it has its positive side. It raises people's awareness and educates everyone in being more discerning on the food we prepare and eat. That is a good thing. It usually leads to better nutrition and hopefully better health for the readers and viewers.
Hmm, maybe I could try to do that Nigella cake without butter let's see how it turns out.
Monday, 1 November 2004
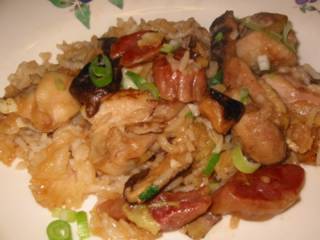
Chicken and Chinese Sausage Rice Pot
This post is for Claudine of >Delectation. I was drooling at pictures of her Clay Pot Chicken that I told her I'll soon do my winterly chicken rice pot. Purple Girl couldn't wait so she did hers right away. (techie hint: I need trackback facility here!) I went to our local Chinese grocery for my provisions but they ran out of clay pots! There must be a syndicate of food bloggers in Croydon conspiring to cook clay pot chicken all in one weekend ! The only one lying there has a lot more chips than Mike Tyson. :Sigh: I think I'll pass. So I went back to my good 'ol reliable cast iron pot. It may not have the aroma of a clay pot but keeps the heat in just as good. I actually have several recipes of this but decided to stick to this trusted stove top version first then later I'll make the foray to a steamed version.
The basics of this are: cook the rice in a pot, when water begins to dry out put the meats on top. That simple, but you do have to do the timing right additionally the quality and freshness of your ingredients is greatly apparent in the finished product. So keep that in mind in getting your ingredients. The cooking of the meats (chicken and sausage) plus whatever veg you include is done gently by the steam rising from the cooking rice underneath. It can be done either by putting the pot on a stove top or by cooking in a ceramic bowl in a steamer. You can order this dish as a dimsum in most Chinese restaurant but usually the dimsum version is small and enough only for one person. There is no reason why you cannot make this in a big pot enough for a family.

I remember well where I tasted my best chicken rice pot. I was working in the offices of a big construction company in Mongkok, Hong Kong. My colleagues dragged me to a nearby hole-in-a-wall eatery for lunch. I couldn't remember the name due to the sign all in Chinese characters. The dingy small restaurant served nothing but rice pots - of all different kinds/toppings - but except for drinks - serves nothing else. I was wondering how they could survive in such a very limited menu and I could imagine they have slow days as well since rice pots are not very popular in the summer. Anyway, I naturally had to turn to my colleagues to translate for me that I wanted a very safe chicken with mushrooms. I had to do this because whenever I open my mouth to talk in Cantonese I'm thinking I can earn a living being a stand-up comedian - they all laugh at me all the time! Ai-yah! Cantonese intonations are sheer torture!! Hah, but I can swear in the dialect like any of them, usually I'm more fearless because I don't know what the hell I'm talking about - hahaha! My gawd, I'm digressing so much. As I was saying, after ordering we had to wait for about 25 minutes before we get our nourishment. I was puzzled why the long wait, this is not a Michelin starred venue, why do we have to wait that long? It turned out they only put the crocks in their steamer after you've ordered so that everything is ultra fresh.
When I had a taste of their creation I became a believer (cue - Monkees song). It was sublime! The aroma it brought forth was just fabulous - the steam from the rice, the shiitake mushroom, the chicken was so fresh it was a bit sweetish. The simplicity of it was magnificent - the subtle cooking that brings out the best flavour of the ingredients - really mahvelous dahlings! And not in a small way, the soy based sauce they poured greatly enhanced the aroma and taste. I read somewhere that Chinese chefs are very secretive about this pouring sauce so much so that they never entrust the mixing of it to their assistant chefs. Certainly in that resto there must be a demand, for a saw a great many, actually crates, of these pouring sauce in their own brand name. I didn't realise the influence of that sauce to the dish so I did not buy one. But from then on I was hooked and went about trying to reproduce it at home.

The Chinese sausage I used is only about 4 1/2 inches long that's why I used four. If it was the regular variety (which is about 7 inches long) I would normally use 2 links. You can use the regular variety or the liver sausage type. These types of sausages are always available in Chinese groceries. They were air dried to take out most of the moisture hence they have a shrivelled appearance (like a blogger getting too much radiation glow from a PC monitor, now who could that be? ... Hmmm). :LOL:
The best compliment I got this evening was from my husband who, once I opened the lid and this great aroma permeated our kitchen, said it transported him back to a street in the Happy Valley-Wan Chai area where he was a regular customer of streetside turo-turo (eateries) there. He said "Ahh, smells like Hong Kong." while he tucked in eagerly. Kain na! (Let's eat!)
Chicken and Chinese Sausage Rice Pot
500 g chicken - cut into cite sized pieces
2 cups rice
4 Chinese dry black mushrooms
4 links Chinese sausages - cut into 1/2-inch diagonal pieces
1 medium onion - sliced
2 green onions - cut into 1-inch pieces
1 Tbsp minced green onions
1 Tbsp oil
*Marinade:
1 Tbsp light soy sauce
1/2 Tbsp cooking wine
1/2 tsp sesame oil
1/2 tsp cornstarch
1/2 tsp minced garlic
1/2 tsp minced ginger
*Sauce:
2 Tbsp light soy sauce
1 Tbsp rice wine (or cooking wine)
1/2 tsp sugar
drops of sesame oil
The basics of this are: cook the rice in a pot, when water begins to dry out put the meats on top. That simple, but you do have to do the timing right additionally the quality and freshness of your ingredients is greatly apparent in the finished product. So keep that in mind in getting your ingredients. The cooking of the meats (chicken and sausage) plus whatever veg you include is done gently by the steam rising from the cooking rice underneath. It can be done either by putting the pot on a stove top or by cooking in a ceramic bowl in a steamer. You can order this dish as a dimsum in most Chinese restaurant but usually the dimsum version is small and enough only for one person. There is no reason why you cannot make this in a big pot enough for a family.

I remember well where I tasted my best chicken rice pot. I was working in the offices of a big construction company in Mongkok, Hong Kong. My colleagues dragged me to a nearby hole-in-a-wall eatery for lunch. I couldn't remember the name due to the sign all in Chinese characters. The dingy small restaurant served nothing but rice pots - of all different kinds/toppings - but except for drinks - serves nothing else. I was wondering how they could survive in such a very limited menu and I could imagine they have slow days as well since rice pots are not very popular in the summer. Anyway, I naturally had to turn to my colleagues to translate for me that I wanted a very safe chicken with mushrooms. I had to do this because whenever I open my mouth to talk in Cantonese I'm thinking I can earn a living being a stand-up comedian - they all laugh at me all the time! Ai-yah! Cantonese intonations are sheer torture!! Hah, but I can swear in the dialect like any of them, usually I'm more fearless because I don't know what the hell I'm talking about - hahaha! My gawd, I'm digressing so much. As I was saying, after ordering we had to wait for about 25 minutes before we get our nourishment. I was puzzled why the long wait, this is not a Michelin starred venue, why do we have to wait that long? It turned out they only put the crocks in their steamer after you've ordered so that everything is ultra fresh.

When I had a taste of their creation I became a believer (cue - Monkees song). It was sublime! The aroma it brought forth was just fabulous - the steam from the rice, the shiitake mushroom, the chicken was so fresh it was a bit sweetish. The simplicity of it was magnificent - the subtle cooking that brings out the best flavour of the ingredients - really mahvelous dahlings! And not in a small way, the soy based sauce they poured greatly enhanced the aroma and taste. I read somewhere that Chinese chefs are very secretive about this pouring sauce so much so that they never entrust the mixing of it to their assistant chefs. Certainly in that resto there must be a demand, for a saw a great many, actually crates, of these pouring sauce in their own brand name. I didn't realise the influence of that sauce to the dish so I did not buy one. But from then on I was hooked and went about trying to reproduce it at home.

The Chinese sausage I used is only about 4 1/2 inches long that's why I used four. If it was the regular variety (which is about 7 inches long) I would normally use 2 links. You can use the regular variety or the liver sausage type. These types of sausages are always available in Chinese groceries. They were air dried to take out most of the moisture hence they have a shrivelled appearance (like a blogger getting too much radiation glow from a PC monitor, now who could that be? ... Hmmm). :LOL:
The best compliment I got this evening was from my husband who, once I opened the lid and this great aroma permeated our kitchen, said it transported him back to a street in the Happy Valley-Wan Chai area where he was a regular customer of streetside turo-turo (eateries) there. He said "Ahh, smells like Hong Kong." while he tucked in eagerly. Kain na! (Let's eat!)
Chicken and Chinese Sausage Rice Pot
500 g chicken - cut into cite sized pieces
2 cups rice
4 Chinese dry black mushrooms
4 links Chinese sausages - cut into 1/2-inch diagonal pieces
1 medium onion - sliced
2 green onions - cut into 1-inch pieces
1 Tbsp minced green onions
1 Tbsp oil
*Marinade:
1 Tbsp light soy sauce
1/2 Tbsp cooking wine
1/2 tsp sesame oil
1/2 tsp cornstarch
1/2 tsp minced garlic
1/2 tsp minced ginger
*Sauce:
2 Tbsp light soy sauce
1 Tbsp rice wine (or cooking wine)
1/2 tsp sugar
drops of sesame oil
- Mix all ingredients for the marinade in a bowl. Add chicken, mix well. Set aside and marinate for at least 30 minutes.
- Soak mushrooms in hot water for 10 minutes. Remove then squeeze out excess water. Cut out and discard stems and slice caps into four sections.
- Put rice in a clay pot (or any medium sized pot preferably a thick one that will hold heat well) and rinse several times to remove excess starch and avoid cooked rice from being malata (gummy). Level off the rice and add enough water to reach up to the first joint of your middle finger. This is about 2cm (3/4 inch) from the rice to the water level.
- Cover and cook on high until it boils. When it reaches boiling point reduce heat to low.
- While the rice is not yet boiling, heat oil in a wok and stir fry the onion, green onion, chicken, sausage, and mushrooms for 3 minutes.
- Once you see that the rice is levelling off and the water is just beginning to dry out, add the stir fried meats on top of the rice. Cover and DO NOT lift the lid for about 25 minutes.
- Meanwhile, mix all ingredients for the sauce in a small saucepan and heat to near boiling.
- When the 25 minutes is over, serve the rice pot right away. Pour the heated sauce on top and sprinkle the minced green onion.
Sunday, 31 October 2004
Lechon Paksiw

This is probably the shortest recipe I have posted here. Simple and so easy to make. Great for meals accompanied by salad or a vegetable dish. Lechon means a roast, while paksiw is a Filipino cooking method of stewing meat in vinegar. This dish is more or less a way of recycling pork lechon using the roasted meat and its accompanying liver sauce. Although for me this is the only thing I wait for in a pork lechon. I'm not really fond of the roast itself.
When we moved to HongKong, I looked for a substitute for the Filipino pork lechon and found a worthy one in the regular Chinese roasted pork. I have to adjust the soy sauce of course because the Chinese version is much saltier than the home variety. So in case you're using the regular lechon, double the soy sauce measurements. I used the Mang Tomas brand of regular liver sauce. They have the spicier version as well which you can use to give it a little kick.
Lechon Paksiw
500 g Chinese roast pork - cut into roughly 1-inch cubes
2/3 cup lechon liver sauce
1/3 cup vinegar
1/2 - 1 Tbsp dark soy sauce
1 Tbsp firmly packed brown sugar
2 tsp minced garlic
1/2 tsp peppercorns
2 bay leaves
1/2 cup water
- Mix all ingredients in a saucepan (preferably non-metal).
- Bring to a boil. Turn down heat to low and simmer for about 40 minutes or until meat is very tender.
Monday, 25 October 2004
Died-And-Went-To-Heaven Chocolate Cake
Around 1996, when the internet was in its infancy, few people were going online, there weren't any web-based forums and all you have are either the techie's bulletin boards (BBs) or the Usenet. I discovered the latter and it was like a hallelujiah moment for me, like an alladin's cave was opened. I saw hundreds, no maybe more than a thousand discussion groups that talk about, chat, argue on things and topics ranging from gardening to national cultures. It was a virtual circus and it was so wonderful to discover it and be among people online. I plunged right in and subscribed to several discussion groups of which my favourites were rec.food.cooking (RFC), rec.food.recipes (RFR), and soc.culture.filipino (SCF). But of course hands down, the group that I read the most is the RFC. It attracted a lot of die hard foodies, chefs, talented cooks, or just the plain curious. I gained a lot of cooking tips, recipes, where to find the best restaurants in which cities, etc. The people you can find there are a great mix and it's always entertaining to read the exchange of ideas, recipes and insults (flaming) that were brewed by this diverse combinations. I will always recall with fondness the 'characters' that I've 'met' there and in the process acquired a number of great recipes from these generous cooks and foodies. So here's to you RFC - cheers!
You may have a hint now where this is going, this recipe is from an RFCer - Barb Schaller. She has a number of interestingly titled recipes in the unofficial RFC website of signature dishes. This one is quite easy to make, besides the buttermilk, all the other ingredients can be easily perused wherever you are in the world. And you don't have to do it in a Bundt or tube pan; any pan would do, you just have to adjust the baking times for these. The cake is a bit on the fudgy side and not very sweet which suits me quite well. Finally, this was done by my son as a birthday gift for his sister who had her birthday last Sunday 24th October. Of course his mum did all the mopping up afterwards - heh - bummer!

Died-and-Went-to-Heaven Chocolate Cake
1 3/4 cups all purpose flour
1 cup granulated sugar
3/4 cup Dutch-process cocoa powder
1 1/2 tsp bicarbonate of soda (baking soda)
1 1/2 tsp baking powder
1 tsp salt
1 1/4 cup buttermilk
1 cup packed light brown sugar
2 large eggs - lightly beaten
1/4 cup vegetable oil
2 tsp vanilla
1 cup hot strong black coffee
*Icing:
1 cup icing sugar (confectioner's sugar)
1/2 tsp vanilla extract
1-2 Tbsp buttermilk or plain milk
*For the icing: Mix buttermilk with the icing sugar enough to make a thick but pourable icing. Set cake on a serving plate and drizzle the icing on top.
*Note: If you don't have any buttermilk, you can make some: for every cup of buttermilk, put in 1 Tbsp vinegar or lemon juice in a non-metal container then add milk to make 1 cup; do not stir, let stand and curdle for about 5 minutes.
Music While Baking: R.E.S.P.E.C.T. - Aretha Franklin
What I'd Say - Ray Charles
Beautiful - Christina Aguilera
You may have a hint now where this is going, this recipe is from an RFCer - Barb Schaller. She has a number of interestingly titled recipes in the unofficial RFC website of signature dishes. This one is quite easy to make, besides the buttermilk, all the other ingredients can be easily perused wherever you are in the world. And you don't have to do it in a Bundt or tube pan; any pan would do, you just have to adjust the baking times for these. The cake is a bit on the fudgy side and not very sweet which suits me quite well. Finally, this was done by my son as a birthday gift for his sister who had her birthday last Sunday 24th October. Of course his mum did all the mopping up afterwards - heh - bummer!

Died-and-Went-to-Heaven Chocolate Cake
1 3/4 cups all purpose flour
1 cup granulated sugar
3/4 cup Dutch-process cocoa powder
1 1/2 tsp bicarbonate of soda (baking soda)
1 1/2 tsp baking powder
1 tsp salt
1 1/4 cup buttermilk
1 cup packed light brown sugar
2 large eggs - lightly beaten
1/4 cup vegetable oil
2 tsp vanilla
1 cup hot strong black coffee
*Icing:
1 cup icing sugar (confectioner's sugar)
1/2 tsp vanilla extract
1-2 Tbsp buttermilk or plain milk
- Preheat oven to 350F. Lightly oil a 12-cup Bundt pan (or tube pan) or coat it with non-stick cooking spray. Dust the pan with flour, invert and shake out the excess.
- In a large mixing bowl, whisk together flour, granulated sugar, cocoa powder, soda, baking powder, and salt.
- Add buttermilk, brown sugar, eggs, oil and vanilla; beat with electric mixer on medium speed for 2 minutes.
- Whisk in hot coffee until completely incorporated. (The batter will be quite thin.)
- Pour batter into prepared pan. Bake for 40-45 minutes or until a cake tester inserted into centre comes out clean.
- Cool the cake in the pan on a rack for 10 minutes; remove from pan and let cool completely.
*For the icing: Mix buttermilk with the icing sugar enough to make a thick but pourable icing. Set cake on a serving plate and drizzle the icing on top.
*Note: If you don't have any buttermilk, you can make some: for every cup of buttermilk, put in 1 Tbsp vinegar or lemon juice in a non-metal container then add milk to make 1 cup; do not stir, let stand and curdle for about 5 minutes.
Music While Baking: R.E.S.P.E.C.T. - Aretha Franklin
What I'd Say - Ray Charles
Beautiful - Christina Aguilera
Meat Stretcher

picadillo
When my mother wanted to 'extend' the whatever meat we had for a meal, she would buy a little minced/ground pork and cook this dish. Making sure that there are a lot of potatoes, peas and carrots in it. This is the version of picadillo that I know from childhood. The standard picadillo in the Philippines is usually made of beef. I think my mother used pork because first, she doesn't eat beef; second, pork is cheaper than beef and cooking and stretching this dish is all about economics.
Now that I closely looked at it I realised it is a variation of the Afritada recipe of hers. It's just that all the vegetables are cubed. Nevertheless, me and my family do enjoy this especially if fresh tomatoes are used.
Picadillo
500 g minced pork
2 Tbsp oil
2-3 cloves garlic - minced or mashed
1 large onion - chopped finely (about 2/3 cups)
3 large tomatoes - chopped finely (about 1 1/3 cups)
1/2 tsp sea salt
2 Tbsp soy sauce
2 Tbsp double concentrate tomato puree (tomato paste)
1 1/2 cup water
1 red bell pepper - de-seeded and cubed
2 medium sized potatoes - cubed
1/2 cup frozen peas
1 carrot - cubed (about 1 cup)
- Heat oil in a pan. Saute garlic and onion for about 2 minutes or until onion becomes translucent.
- Add tomatoes and salt and saute for a further 2 minutes or until the tomatoes are half cooked.
- Add soy sauce, mix a little then add the minced pork.
- Cover and simmer for about 5 minutes mixing it every once in a while.
- Add water and tomato puree. Bring to a boil.
- Add bell pepper and bring heat down to a simmer.
- Simmer for about 30 minutes or until meat is done/tender.
- Add potatoes and carrots and simmer for 3 minutes.
- Add peas and simmer for another 3 minutes or until all the vegetables are cooked. Serve.
Music While Cooking: Once In a Lifetime - Talking Heads
The Sweetest Thing - U2
Hey Ya - Outkast
Friday, 22 October 2004
Banana Cake
This recipe is adapted from the same magazine and article as my previously posted Apple Cake. It is by Fern Raleigh of Windom, Kansas and won the top prize in the Kansas State Fair. Very easy to make and if you choose you can do the mixing all by hand. Although using an electric mixer will give you better results. It originally says to bake it in a loaf pan but I used muffin pans and reduced the baking time and it's still good. Like the apple cake, this is supposed to be a "bread". Again I took the liberty of calling it a cake since the end product is quite sweet. As usual I reduced the sugar by a lot - it was supposed to be 1 1/2 cups! At 1 cup it still is sweet. The nuts for me is optional, I have often done this without it and it does not seem to affect the result much. Please see the note below the recipe for the substitute for buttermilk. My children behaved a little better this time around. Before, once the muffins come out of the oven they start eating it and soon I am left with more than a dozen muffins with no tops!
300 g [2 cups] sifted flour
1 tsp baking soda
1/2 tsp baking powder
1/2 tsp salt
1 cup sugar
125 g [1/2 cup] unsalted butter - softened at room temperature
1 1/2 tsp vanilla
2 eggs - slightly beaten
1 cup mashed very ripe bananas
1/4 cup buttermilk
1/2 cup chopped walnuts or pecans (optional)
*Note: If you don't have any buttermilk, you can make some: for every cup of buttermilk, put in 1 Tbsp vinegar or lemon juice in a non-metal container then add milk to make 1 cup; do not stir, let stand and curdle for about 15 minutes.

banana cupcakes
300 g [2 cups] sifted flour
1 tsp baking soda
1/2 tsp baking powder
1/2 tsp salt
1 cup sugar
125 g [1/2 cup] unsalted butter - softened at room temperature
1 1/2 tsp vanilla
2 eggs - slightly beaten
1 cup mashed very ripe bananas
1/4 cup buttermilk
1/2 cup chopped walnuts or pecans (optional)
- Preheat oven to 180C/fan 160C/350F/gas mark 4. Grease a 9 x 5 x 3-inch loaf pan with butter or shortening (or put paper liners in a 12-cup muffin pan).
- Sift together flour, baking soda, baking powder and salt in a container.
- Beat together sugar, butter and vanilla at moderate mixer speed for about 5 minutes until light and fluffy.
- With mixer running, beat in eggs, then bananas.
- By hand, stir in flour mixture alternately with buttermilk, mixing after each addition only enough to moisten dry ingredients. (Add dry ingredients in thirds, buttermilk in two additions.)
- Stir in walnuts. Spoon batter into prepared pan, spreading well to corners.
- Bake in preheated oven for 55-60 minutes (25-30 minutes for muffins) or until loaf is richly browned, begins to pull away from the sides of pan and is springy to the touch.
- Cool bread in wire rack for 10 minutes. Loosen loaf around edge with a small thin metal spatula. Invert; turn right side up. Cool completely.
*Note: If you don't have any buttermilk, you can make some: for every cup of buttermilk, put in 1 Tbsp vinegar or lemon juice in a non-metal container then add milk to make 1 cup; do not stir, let stand and curdle for about 15 minutes.
Tuesday, 19 October 2004
Let Me Roll It, Let Me Roll It To 'Ya
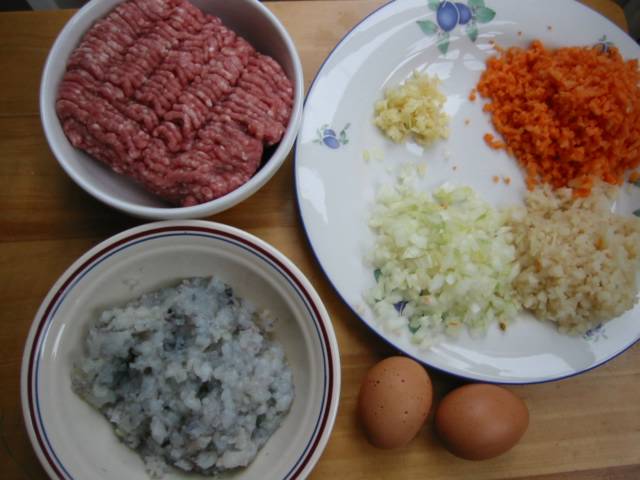
This post is for Yvonne in Switzerland. She was asking for a recipe of our Lumpiang Shanghai (Pork Spring Roll). The 'How to wrap a Spring Roll' section is for my children who might otherwise forget on how to do it. In my haste in doing this I forgot to take a picture of the final fried product. Oh well, I guess I will upload that later. So apologies if this is post is picture heavy; but let's roll on ...
(Pork Spring Roll)
500 g minced pork
250 g minced shrimps or prawns
1/2 cup finely chopped apulid (water chestnuts)
1/2 cup finely chopped carrots
1/3 cup finely chopped onion
2 cloves garlic - mashed and finely minced
2 eggs - beaten
2 Tbsp light soy sauce
1 tsp rock salt
1 tsp sugar
freshly ground black pepper
lumpia (spring roll) wrappers
oil for frying
*Note: If shrimps and water chestnuts are not available you can omit these then adjust recipe by reducing the garlic and egg to just one each and halving the measurements for salt, sugar, soy sauce, and pepper.
How To Wrap Spring Rolls
(The Proper Way)
First, you need spring roll wrappers of about about 5 x 5 inch square. If it's not available, buy the large one (about 10 x 10 inch square) and then cut them to size.
Secondly, make the flour 'glue' that you need to secure the spring roll wrapper. Mix 2 Tbsp flour with 2 Tbsp water; combine it thoroughly to make a very thick paste.
 Step 1: Take a wrapper and position it so that one of the corners is pointing towards you.
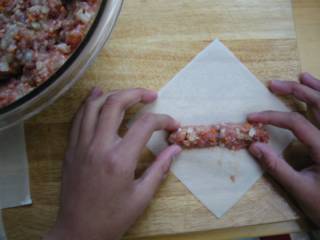 Step 2: Put around 2 teaspoonfuls of the pork mixture and shape them like a log horizontally at the lower half of the wrapper.
 Step 3: Take the edge pointing towards you over the pork mixture. Press the wrapper over the mixture, making sure it is snugly wrapped.
 Step 4: Fold the left and right edges of the wrapper over to the centre forming something like an envelope.
 Step 5: Roll the wrapped pork mixture like a log in a direction away from you. Make sure to roll it tightly or else it might break open when you fry it.
 Step 6: Put some flour 'glue' at the remaining edge and roll it all the way through.
 Your spring rolls should look like these.
How To Wrap Spring Rolls II
(The Lazy Way)
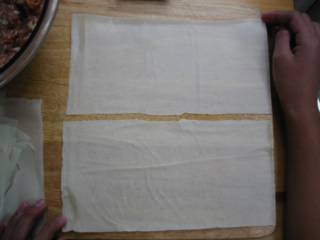 Step 1: Take a sheet of a large spring roll wrapper (about 10 x 10 inches square) and cut it in half.
 Step 2: Get one of the halves and put about 3 tablespoonfuls of pork mixture and form it into a log at the lower end of the wrapper.
 Step 3: Roll the meat mixture in the wrapper in the direction away from you making sure that it is rolled tightly. Spread some flour 'glue' all along the far end of the wrapper.
 Step 4: Roll the mixture in wrapper all the way through securing with the flour 'glue'.
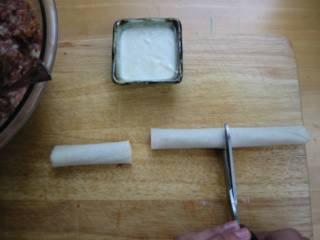 Step 5: Cut the finished log with a knife or scissors at about 3 inches long in each section.
ingredients
(Pork Spring Roll)
500 g minced pork
250 g minced shrimps or prawns
1/2 cup finely chopped apulid (water chestnuts)
1/2 cup finely chopped carrots
1/3 cup finely chopped onion
2 cloves garlic - mashed and finely minced
2 eggs - beaten
2 Tbsp light soy sauce
1 tsp rock salt
1 tsp sugar
freshly ground black pepper
lumpia (spring roll) wrappers
oil for frying
- Mix beaten eggs with the salt, sugar, soy sauce, pepper, and garlic. Making sure that the salt and sugar are dissolved in the liquid.
- Mix in all the other ingredients thoroughly.
- Wrap tightly in spring roll wrappers (for the 'how to' see below or click here for the proper way of wrapping and here for the lazy way).
- Deep fry in hot oil for about 4 minutes or until the wrapper is golden brown and crunchy and the pork filling is cooked.
- Serve with sweet and sour sauce or Thai sweet chili sauce.
*Note: If shrimps and water chestnuts are not available you can omit these then adjust recipe by reducing the garlic and egg to just one each and halving the measurements for salt, sugar, soy sauce, and pepper.

fried lumpiang shanghai
How To Wrap Spring Rolls
(The Proper Way)
First, you need spring roll wrappers of about about 5 x 5 inch square. If it's not available, buy the large one (about 10 x 10 inch square) and then cut them to size.
Secondly, make the flour 'glue' that you need to secure the spring roll wrapper. Mix 2 Tbsp flour with 2 Tbsp water; combine it thoroughly to make a very thick paste.

spring roll wrappers
 Step 1: Take a wrapper and position it so that one of the corners is pointing towards you.
 Step 2: Put around 2 teaspoonfuls of the pork mixture and shape them like a log horizontally at the lower half of the wrapper.
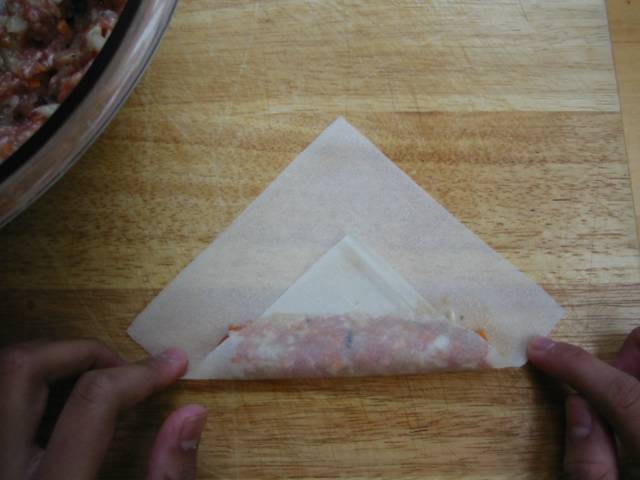 Step 3: Take the edge pointing towards you over the pork mixture. Press the wrapper over the mixture, making sure it is snugly wrapped.
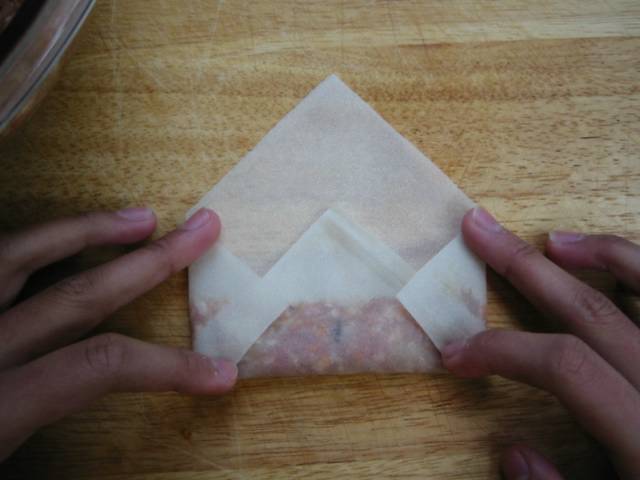 Step 4: Fold the left and right edges of the wrapper over to the centre forming something like an envelope.
 Step 5: Roll the wrapped pork mixture like a log in a direction away from you. Make sure to roll it tightly or else it might break open when you fry it.
 Step 6: Put some flour 'glue' at the remaining edge and roll it all the way through.
 Your spring rolls should look like these.
How To Wrap Spring Rolls II
(The Lazy Way)
 Step 1: Take a sheet of a large spring roll wrapper (about 10 x 10 inches square) and cut it in half.
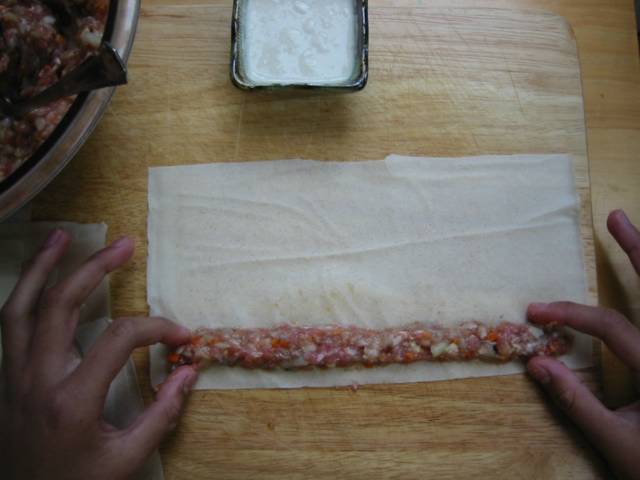 Step 2: Get one of the halves and put about 3 tablespoonfuls of pork mixture and form it into a log at the lower end of the wrapper.
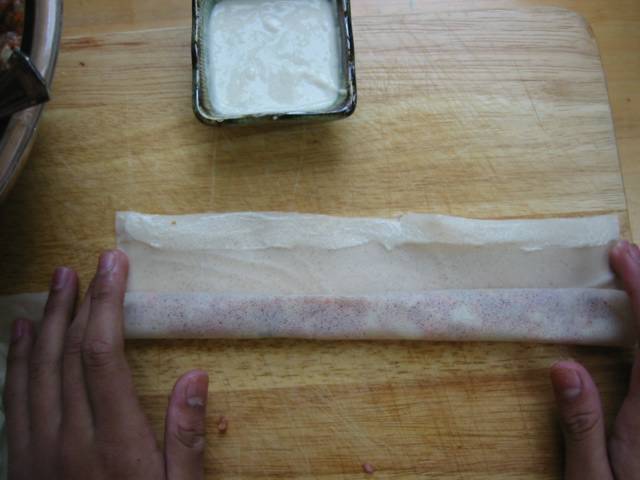 Step 3: Roll the meat mixture in the wrapper in the direction away from you making sure that it is rolled tightly. Spread some flour 'glue' all along the far end of the wrapper.
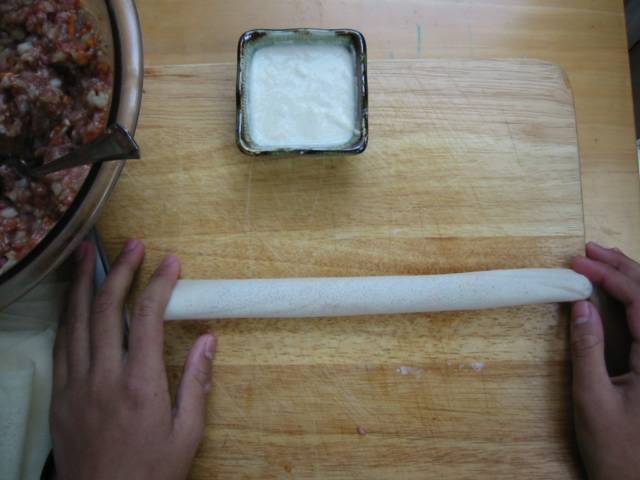 Step 4: Roll the mixture in wrapper all the way through securing with the flour 'glue'.
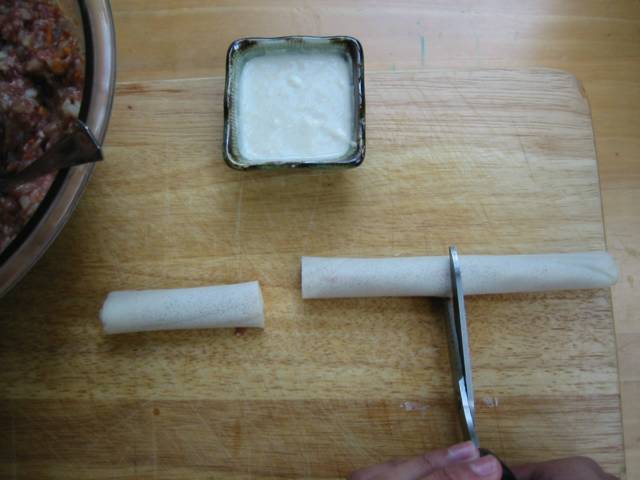 Step 5: Cut the finished log with a knife or scissors at about 3 inches long in each section.
Saturday, 16 October 2004
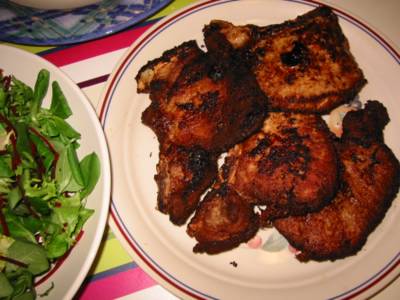
Binugbog na Pork Chop
The title reads - "Beaten Up Pork Chop". I'm not very fond of pork chops because I find the meat quite dry. But once in a while we have this something like once every 6 months. This is one recipe I find to be quite de-stressing as it involves tenderising the meat by pounding on it. You can use a meat mallet like this:

If you can't find one, just use a wine bottle (wrap in plastic if it still has paper labels) or use the back of your big knife like a cleaver and bang away. Don't take out your frustration on it too much, make sure the chops are still intact. Since it is pulped it does not have to be marinated for a long time. The only problem I found is that it kinda burn easily because of the sugar in the marinade. Otherwise it is straight forward to do and quite good to have with rice, salad, soup or Ginisang Munggo (Sauteed Mung Beans) much like Purple Girl's dinner. This is adapted from the Chinese Cooking for Beginners by Huang Su-Huei.
Fried Pork Chops
6 pork chops (about 500 g)
2 Tbsp water
1 Tbsp soy sauce
1/2 Tbsp cooking wine
1/2 tsp salt
1 tsp sugar
1 tsp white vinegar
2 garlic cloves - minced
1 egg yolk
1 Tbsp cornstarch

If you can't find one, just use a wine bottle (wrap in plastic if it still has paper labels) or use the back of your big knife like a cleaver and bang away. Don't take out your frustration on it too much, make sure the chops are still intact. Since it is pulped it does not have to be marinated for a long time. The only problem I found is that it kinda burn easily because of the sugar in the marinade. Otherwise it is straight forward to do and quite good to have with rice, salad, soup or Ginisang Munggo (Sauteed Mung Beans) much like Purple Girl's dinner. This is adapted from the Chinese Cooking for Beginners by Huang Su-Huei.

Fried Pork Chops
6 pork chops (about 500 g)
2 Tbsp water
1 Tbsp soy sauce
1/2 Tbsp cooking wine
1/2 tsp salt
1 tsp sugar
1 tsp white vinegar
2 garlic cloves - minced
1 egg yolk
1 Tbsp cornstarch
- Tenderise the pork chops with a meat mallet or the back of a big knife like a cleaver.
- Except for the pork chops, combine all ingredients in a container.
- Add in the pork chops and marinate for at least 1 hour.
- Pan fry or deep fry the pork chops for 5 minutes or until they are golden brown and thoroughly cooked. Dish up and serve.
Wednesday, 13 October 2004
A Chicken's Destiny Is Tinola

My son and I came home to the Phils. a few years ago. It was his first time there. We were sleeping when he was periodically woken up by the crowing of the rooster very early in the morning. He became very annoyed and asked, "Why does that rooster keep on crowing?". I said, "Well, that's his purpose in life to crow every morning or be in a tinola." He he! What a round about way to allude to this recipe.
This is chicken in a clear soup. Very satisfying and one of my comfort food with special value when I'm ill. For me the dominant flavour (besides the chicken) should be the ginger, then the patis (fish sauce) and then the chili tops adds a piquant flavour as a finish. It is also important to let the chicken to simmer in patis before adding the rice water to make it tasty. I almost always use rice water since it markedly improve the taste of the soup as against using plain water. So as much as you can use rice water.
As I said, this is more or less a clear soup so the quality of the meat will be very noticeable. Hence, use the freshest and most wholesome chicken meat you can get preferably organic. My lola (grandma) would use freshly slaughtered dumalaga (single, unmarried, no eggs or chicks yet) chicken. It always was a treat to eat (since we only have it when a chick had grown big enough), slurping the hot soup with enthusiasm. The only distressing thing was when she tried teaching me to slaughter a chicken. I can dress an already dead chicken but not slay a live one. She taught me well on scaling, cleaning, and preparing fish, squids, shell fish, crabs, etc. mercifully she did not force me on poultry butchering after my first try. But such is the reality of life in the rural area, if you cannot slaughter it then you do not eat it. It's a wonder I did not turn vegetarian.
Tinolang Manok
(Chicken Stew)
1 kg chicken - cut into serving pieces
1 1/2 Tbsp oil
1 Tbsp garlic - minced
1 medium onion - sliced
1 square inch fresh ginger - peeled and julienned
2-3 Tbsp patis (fish sauce)
5 cups rice water* or plain water
1 chayote (sayote)
a bunch of chilli tops (talbos ng sili)
- Peel chayote with a potato peeler and cut in half along the groove in the middle. Take out the white pith and seed in the middle using a spoon. Cut each half lengthwise and cut again crosswise (or diagonally) in about 3/4 inch intervals. Set aside.
- Heat oil in a heavy-bottomed pot. Saute garlic and onion until onion is translucent.
- Add in ginger and cook for about 3 minutes or until aromatic.
- Add the patis and chicken. Stir well. Cover and cook on medium-low heat for about 5 minutes letting the chicken abosorb the patis. Stir occasionally.
- Pour in rice water and bring to boil. Bring down heat to simmer and cook for about 30 minutes.
- [optional] Skim off excess fat floating on top.
- Add chayote, bring up to boil again and cook for 5 minutes or until chayote is done.
- Put in chilli tops and cook for about 1 minute. Serve while hot.
*Note: Rice water is the water drained and saved from washing rice before cooking. So you should really cook rice before doing this dish.
Monday, 11 October 2004
Beef Stir-fry

It's one of those days, I've got some ingredients and am just too lazy to think on what to cook with it. So I have some Chinese cabbage, some beef and came to a stir fry recipe in the Chinese Cooking for Beginners by Huang Su-Huei. The preparation for the meat made me miss the butchers in Hong Kong where if you tell them to cut the beef for stir frying then they slice it oh so very thinly, almost paper thin actually. And because they're so thin, it only takes you a few minutes to cook them. Really nice. In this recipe, I suggest you use the 'premium' oyster sauce since they do taste a lot better than the regular ones.
I guess I cannot really recreate a Chinese restaurant-quality stir fry since you need a really hot stove for that. I don't know if you've seen the ones in their kitchens. It has a pedal at the bottom that as you press on it, spews out a blast of flame which actually sounds like a jet engine. You need great heat like that to quickly cook the outside and seal the juices inside of the food. It also imparts that smoky, a-tiny-bit-burnt smell and taste - I forgot how they call it in Chinese. For now, I have to make do with the 'high' setting of my electric stove.
Beef in Oyster Sauce with Vegetables
500 g beef tenderloin or flank steak - sliced very thinly
1 Tbsp cooking wine or sherry
1 Tbsp water
1 1/2 Tbsp soy sauce
1 1/2 Tbsp cornstarch
1/4 cup oil
500 g nappa cabbage (aka Chinese cabbage, pechay Baguio) or broccoli - cut into bite-sized pieces
2 green onions - cut into 1-inch pieces
9 slices of peeled fresh ginger root
*Sauce:
3 Tbsp oyster sauce
2 Tbsp soy sauce
1 Tbsp cooking wine or sherry
4 Tbsp water
2 Tsp cornstarch
1 tsp sugar
dash of freshly ground black pepper
dash of sesame oil
- Mix cooking wine, soy sauce, cornstarch, and water. Add in sliced beef. Marinate for at least 1 hour.
- Precook vegetable. For nappa cabbage: heat wok and add 3 Tbsp oil; stir fry cabbage with 1/4 tsp salt until it becomes limp. For broccoli: steam for 2-3 minutes or until done. Remove to a serving dish. Set aside.
- Add 1 Tbsp oil to the marinated beef, mix well. Heat the wok and add the 1/3 cup oil. Stir fry beef until almost cooked. Remove from oil and set aside.
- Reheat wok and add 1 Tbsp oil; stir fry the green onions and ginger until fragrant.
- Add beef and sauce mixture. Turn heat to high and stir quickly to mix. Remove and place on top of the vegetable. Serve.
Ang Walang Kamatayang Almondigas

The title reads in English - 'The Eternal Almondigas'. Eternal because if my son can get away with it he would eat it everyday. Now that he learned to cook this I think I have to really rein in on him. The dish is essentially meatballs with noodles on a clear soup. There are a lot of variations of this in the Phils. Some put leafy vegetable in the soup, some add more ingredients in the meatballs. But this is the most basic I have seen around and probably the easiest to do. The noodles is what we call miswa in Phils. which is very fine, hair-thin noodles made of flour. If you can't find this you can substitute with Chinese or Japanese flour noodles. Just buy the thinnest one you can get. Finally, this is delicious eaten with a toyo (soy sauce) and lemon dip.
Almondigas
(Meatballs with Soup)
500 g minced pork
1 egg - beaten
2 Tbsp chopped green onions
1 Tbsp soy sauce (or 1 tsp. salt)
1 Tbsp patis (fish sauce)
freshly ground pepper
3 Tbsp flour
1 Tbsp oil
4 cloves garlic - minced or mashed
1 small onion - sliced
6 cups meat stock (or water)
2 bunches of miswa (very thin flour noodles)
- Mix beaten eggs, pepper and soy sauce. Add pork and chopped onions. To bind, add flour and mix well.
- Form the pork mixture into 1-inch balls and set aside.
- In a pot, heat oil and saute garlic and onion. Cook until onion is translucent.
- Add in patis. Pour in the stock and bring to boil.
- Add meatballs to the soup. Bring to boil again.
- Lower heat and simmer for about 30 minutes.
- Add miswa and cook for about 2 minutes. Serve with lemon and soy sauce or patis (fish sauce).
Friday, 8 October 2004
Peking-style Fried Bean Curd

A work colleague of mine requested that I post vegetarian dishes and here is one. As usual this is courtesy of my esteemed Chinese Cuisine cookbook by Huang Su-Huei. This is my kind of recipe - very simple, very easy to do and very few ingredients. It originally called for the tofu to be fried in a wok but I always do it in a non-stick pan and just drizzle a little oil. It works perfectly.
Tofu, also known as soy bean curd or tokwa, is made by curdling soy bean milk. Curdling is aided by calcium sulfate - a naturally occuring mineral. After curdling, the mixture is then pressed to form tofu. So essentially, tofu is soy bean cheese.
Here in the west, there are two types of tofu - the firm one (this comes in blocks) and the silken one (called taho in Phils.). Although when we were in Hong Kong, they have an even firmer type of tofu which are in rounded pieces similar to buffalo mozarella except the former is flatter and squarish in shape. The extra firm and firm ones are good for general cooking. The silken one has a very soft, smooth and creamy texture and is used a lot on desserts.
Also in Hong Kong, there are hawkers who fry and sell preserved tofu right on the street. The problem is they f*&%$ng stink big time! Oh, I swear you could smell it from a mile back! This is very prevalent in the area of Battery Path going to St. Paul's church - uggh! However a lot of people I know (Chinese, Gweilos, even Pinoys) insist that they taste great. Must be the durian syndrome in them.
Peking-style Fried Bean Curd
3 pieces of 2 1/2- inch square bean curd (tofu)
1/2 cup flour
1 egg - beaten
1 Tbsp green onion - chopped
1 Tbsp ginger root - chopped
*Sauce:
1 tsp cooking wine
1/2 tsp salt
1 tsp sesame oil
1/2 cup stock (or 1/2 stock cube dissolved in 1/2 cup hot water)
- Combine ingredients for the sauce in a small bowl and set aside.
- Heat a little oil in a non-stick frying pan.
- Cut the bean curd into 1/2-inch thick slices. Coat with flour and then dip into the egg.
- Fry bean curds over medium heat for 1 minute each side or until golden brown.
- Wipe clean the frying pan and sprinkle half of the green onions and ginger in the pan.
- Arrange the fried bean curds on top then pierce the bean curds with a fork to allow liquid to seep through.
- Sprinkle the rest of the green onion and ginger on top of the bean curds and pour in the sauce. Turn on heat and bring to boil.
- Turn down the heat to low and cook uncovered until almost all the liquid is absorbed by the bean curd.
Thursday, 7 October 2004
Award Winning Apple Cake

I am such a sucker for "award-winning recipes" in magazines. Once I see that heading in a publication then I grab it as if somebody's out to beat me to it. I try most of the recipes and so far about 90% came up trumps. This one is from the magazine ... ah ... I can't remember coz I cutout just the recipe itself. I'm sure it's a US edition. It must be either Good Housekeeping or Red Letter or Family Circle - take your pick. It is touted as a "top winner at the Central Washington State Fair last year". What year it was I ain't got a clue - probably 1994. Great baker who made this is named Myrna Myhowich. So Myrna, wherever you are thanks for this recipe.
I'm thinking it was originally named a 'bread' maybe because it is baked in a loaf pan? The finished product is quite sweet so I took the liberty of changing the name to a 'cake'. I also reduced the sugar by 1/4 cup, increased the vanilla, and I normally do not put topping or walnuts and it still comes out good. Don't worry if the batter is quite hard to stir - it really is like that. This is definitely a family favourite often requested by my children. Problem is, once it comes out of the oven they are on it like vultures! ::LOL::
Yakima Valley Apple-Cinnamon Cake
2 cups plain flour
1 tsp baking powder
1 tsp bicarbonate of soda (baking soda)
1/2 tsp ground cinnamon
1/2 tsp ground nutmeg
1/2 tsp fine salt
3/4 cup sugar
1/2 cup [125 g] butter - at room temperature
2 eggs - slightly beaten
1 1/2 tsp vanilla
1/2 tsp grated unwaxed lemon or orange rind (optional)
2 large Golden Delicious apples - cored, peeled, & chopped (about 2 cups)
1/2 cup chopped walnuts (optional)
*Topping:
1 Tbsp sugar
1/4 tsp ground cinnamon
1/8 tsp ground nutmeg
- Preheat oven to 180C/fan 160C/350F. Grease bottom (not sides) of a 9 x 5 x 3-inch loaf pan.
- Sift together flour, baking powder, bicarbonate of soda, cinnamon, nutmeg and salt into a bowl. Set aside.
- For the topping: combine sugar, cinnamon, and nutmeg in a small bowl. Set aside.
- Beat together sugar, butter, eggs, vanilla, and lemon rind in a large bowl for 1 1/2 minutes until light and fluffy.
- By hand, stir in flour mixture, being careful not to overmix.
- Stir in apple and nuts (if using). Spoon batter into prepared pan. (Optional) Sprinkle topping evenly over top of batter.
- Bake in preheated oven for 50 minutes or until loaf is browned, begins to pull away from the sides of the pan and a skewer poked in the middle comes out clean.
- Cool cake in pan on a wire rack 10 minutes. Loosen loaf around edge with a metal spatula and invert; turn right side up. Cool completely.
Tuesday, 5 October 2004
Nanay's Mechado

My mother never liked beef it stemmed from her childhood experience of being served 'beef' when it fact it was kalabaw (water buffalo) meat. It was wartime and meat was in very short supply. They have to make do with whatever they have. They were actually lucky to have kalabaw meat although I think the poor beast died that's why they have to slaughter it. Somehow it tasted so ma-anggo (very beefy) for her that she never ate any ever again in her life. The banned clique included venison, mutton, and lamb. But she was also determined that her children should not be visited by this prejudice on certain red meats so she periodically fed us beef. One of the more frequent dishes she served was mechado. Although she never tasted it as she cooked, it was nevertheless good. This is her recipe although the lemon slice, I got that from Nora Daza, is just to give a little acid kick. Do not attempt to put a slice from a waxed lemon or to cook it for a long time or you will have a somewhat bitter aftertaste in the dish.
Mechado
1 kg stewing beef - cut into serving size pieces
3 Tbsp oil
4 cloves garlic - minced/mashed
1 onion - chopped
2 Tbsp soy sauce
1/2 tsp peppercorn
500 g passata (tomato sauce) [about 2 cups]
2 bay leaves
1 tsp salt
1 cup water
2 potatoes - quartered and sliced 1/2 inch thick
1 carrot - cut into 1/2 inch round
1 slice unwaxed lemon
- Heat oil in a heavy-based saucepan or pot. Brown beef briefly in oil and set aside.
- In the same pan saute garlic and onion for 5 minutes or until onion is translucent.
- Add in browned beef, tomato sauce, water, laurel leaf, soy sauce, peppercorn, salt, and lemon slice.
- Bring to boil and simmer for 3 minutes. Remove lemon slice.
- Simmer and cook for about 1 hour 15 minutes or until beef is tender.
- Add in potatoes and carrots. Cook for a further 10 minutes or until potatoes and carrots are cooked. Serve.
Friday, 1 October 2004
Crema de Fruta

I don't know it this is really a Filipino-Spanish dessert or if it is imported from somewhere. All I know is I saw these in Filipino homes in the cities or suburbs not in the provinces so I'm sure this is not traditional. Anyhow this is well loved by our Brit friends because it is so close to their English trifle dessert. This recipe is just a layering of sponge cake followed by custard (creme patisserie) then fruits and then topped by gelatin. I cheated on this by way of having ready made sponge cake (trifle sponge actually) for the base. I have this phobia of making sponge cakes ever since I attempted one back in Pinas and it turned in the consistency of a hockey puck !
For the fruits, I use canned peaches and pineapples and some glace cherries. If you want to use fruit cocktails it's fine as well just make sure to drain it well. I have not tried using fresh fruits on this. The gelatin can be made plain by replacing the fruit juice with water.
Crema de Fruta
sponge cake
canned fruit cocktail or peaches, pineapples, and other fruits - well drained
*Custard Filling:
3/4 cup sugar
4 Tbsp plain flour
2 3/4 cup single cream (evaporated milk or half double cream half milk)
5 egg yolks
3/4 cups water
- Combine all ingredients in a heavy based saucepan.
- Stir constantly while bringing it gently to boil until it thickens.
- Remove from heat and cool.
* Gelatin:
1 1/2 cups pineapple juice
2 envelopes unflavoured gelatin
1 cup water
6 Tbsp sugar
2 Tbsp lemon juice
- Blend all ingredients in a saucepan and cook for about 15 minutes or until the gelatin is well dissolved.
- Remove from heat and cool.
*To assemble:
- Cut the sponge cake to fit the serving pan.
- Put in the sponge cake as the first layer.
- Spread the custard filling on top of the sponge cake, making sure to level and even it out all over the pan.
- Arrange the canned fruits on the custard.
- Pour in the gelatin on top; if possible, completely submerging the fruits.
- Chill in the fridge until the gelatin is set.
Tuesday, 28 September 2004
Braised Brisket of Beef

For years I used to dream of recreating this beef dish. This is the one we put as a topping on our Beef Mami (Beef Noodle Soup). It can be served as well on a bed of noodles without soup. It is also known as Beef Flank in Chinese restaurants. While living in Hong Kong, we would often speculate on the ingredients used whenever we have one from a restaurant or a hawker. It remained a dream until I stared long enough on one of the sections of the Chopsticks Recipes series cookbook (titled Quick Meals authored by Cecilia Au-Yeung). Suddenly I realised it was the one I've been searching for! I test cooked it and indeed it was the one! Eureka!
A tip on the recipe, try to buy bean paste/sauce where all the beans are pureed well. The one available to me has lots of whole beans in it and it's hard to mash before cooking since the beans are still quite firm. It's hard to do it after/during cooking as well because the pesky little beans are hard to catch and really so much trouble. So get the bean paste that's well mashed up.
Try to keep the ginger in one or several big lumps so it's easier to fish them out of the sauce for serving. I'm actually tempted to put all the spices in a tied up muslin bag to save me from straining the sauce. Maybe I'll do just that one of these days.
Braised Brisket of Beef
500 g stewing cuts of beef (brisket, chuck, shin, etc.) - cut into chunks
2 pcs star anise
1 square inch fresh ginger - peeled and mashed/sliced
1 square inch dried tangerine (or orange) peel [optional]
2 Tbsp cooking oil
5 cups boiling water (approximate)
1 tsp garlic - minced
2 tsp rice wine or dry sherry
1/4 cup ground bean paste/sauce
*Seasoning:
1 Tbsp rice wine or dry sherry
1/4 tsp salt
2 Tbsp sugar
1 Tbsp dark soy sauce
a pinch of pepper
*Gravy Mix:
1 tsp cornflour
1 Tbsp water
1 tsp sesame oil
- (Optional) Soak tangerine peel in warm water until soft.
- Wash and place brisket in a pressure cooker. Pour enough water to cover the brisket. Cover and pressure cook for 15 minutes.
- Remove beef and stock/sauce from the pressure cooker. Separate the beef from the stock and set aside.
- Heat the oil in medium heat in the pressure cooker pot and sauté the minced garlic, ginger, and ground bean paste until aromatic.
- Add the beef and stir fry for 2 minutes. Sprinkle wine. Stir fry for a few seconds.
- Strain the beef sauce (beef stock where the beef was cooked) into the pot. Add star anises, and tangerine peel (if using). Cover pressure cooker and bring to boil. Lower heat and simmer for 15 minutes.
- By this time the beef should be tender. Turn off heat and remove the lid once the pressure cooker has cooled down sufficiently.
- Stir in the seasoning and simmer for a further 5 minutes.
- Add gravy mix. Simmer for 2 minutes or until thick.
*Notes:
- Sometimes I do not pre-boil the beef. So I skip procedure nos. 2, 3, & 7 and soften the meat by simmering for a long time with the seasoning in a regular pot or through a crockpot/slow cooker.
- We mainly use the above recipe for beef mami. Just cook some egg noodles and put some chicken broth/stock, add the beef brisket and its sauce, then sprinkle some chopped green onions on top.
Subscribe to:
Posts (Atom)