Here is another of our family's (and a lot other Filipino familys') favourite holiday food. We almost never make it at any other time of the year except during the New Year holidays. Not even on Christmas; only in the New Year. I never knew why but it must be one of those traditions that was kept on just because that's what we always had.
This is a perfect example of the predilection of the Pinoy palate to crave for the salty-sweet-tangy sour flavour combination. That and together with the richness of the mayonnaise and pasta makes it so irresistible to me as a snack. Actually, you'll be hard-pressed to classify this as savoury or sweet. Because they're really both!
By the way, the Philippines practically only have spaghetti and elbow macaroni in the pasta aisles of its supermarkets. Whereas here, I cannot find decent sized and shaped elbow macaroni. I have to either go to Italian delis or trek to Waitrose where, fortunately, I found this Chiferri Rigate pasta.
Macaroni Salad
500 g elbow macaroni pasta
2 1/2 cups shredded cooked chicken meat
1/3 cup pickle relish
1/3 cup finely minced celery
1 1/2 cups canned pineapple chunks in syrup - well drained
1 cup raisins
1/2 cup finely minced cooked carrots
1/3 cup finely minced onion (optional)
1/3 cup grated cheddar cheese (optional)
3 cups mayonnaise
Salt and freshly ground black pepper to taste
- Combine all in a bowl and mix well. Chill in the fridge for a few hours before serving.
My pictures are a bit lame but don't let that detract you from the fluffiness and delectable taste of this mashed potato-based bread. I already did a similar one before so I was not a complete newbie when I tried this. The bread machine was deployed for the kneading and initial proofing so it certainly was a breeze to do. As you can see, I was so satisfied with the result. Just look how fluffy they are!
The King Arthur Flour website is where I got the recipe I adapted. They have loads of interesting recipes there that I'd like to try someday.

2 1/4 tsp [1 package] active dry yeast
3/4 cup slightly warm water or potato water*
2 eggs
1 cup unseasoned mashed potato
4 1/4 cups plain flour
1/3 cup sugar
1 1/2 tsp fine sea salt
6 Tbsp butter - room temperature
*Bread Machine Method:
- Put all the ingredients in the bread machine according to the instructions of the bread machine manufacturer. Set the machine for the dough program and press start.
- Allow the machine to complete its cycle. For most bread machine the rising of the dough is included in the cycle. If not, allow the dough to remain in the machine to rise for for 1 hour or until double in bulk.
*Manual Method:
- Dissolve 1 tsp of the sugar in the water. Add the yeast and stir to slightly dissolve. Set aside for 10-15 minutes. By this time, it should foam up to indicate that the yeast is active. If not, discard mixture and start again with a new batch of yeast.
- Combine all the dry ingredients in a bowl. Add the rest of the ingredients and mix until the dough starts to leave the side of the bowl.
- Turn out the dough onto a lightly greased or floured surface and knead for 6 to 8 minutes or until it's smooth and satiny.
- Place the dough in a lightly greased bowl. Turn it to coat all around with grease. Cover with lightly greased plastic wrap and let rise for about 90 minutes or until double in bulk.
*To Shape Rolls:
- Punch down dough, turn out onto a floured surface and knead for a few turns until smooth again.
- For standalone rolls: divide dough into 16 equal pieces and shape into balls. Place in lightly greased baking sheets leaving about 2 inches of space between them.
- For pull-apart rolls: divide dough into 15 equal pieces (I used weighing scale for this). Place in a greased 9 x 13-inch baking pan into 3 rows of 5 balls each. Space them evenly.
- Cover with lightly greased plastic wrap and let them rise for about 2 hours. The pull-apart rolls should be touching each other.
*Baking:
- Bake in a pre-heated 180°C/fan 160°C/350°F oven for about 20 to 25 minutes or until golden.
- Remove from oven and carefully remove from the baking pan.
- [Optional] Brush with melted butter.
- Serve warm or at room temperature.

Oeufs à la neige or Snow Eggs is a favourite of my husband. Whenever we were in France and it's on the menu he often orders it. My cooking/baking to do list had this for a long time. At last this challenge from the Daring Cooks finally forced me to confront this intimidating recipe.
And challenged indeed I was. I halved the recipe since this was an experiment I didn't want to waste too much if anything goes wrong. The meringue was easy enough to do with the help of my hand mixer. But the poaching was something else. I had to emphasize in the recipe that the poaching liquid should be barely simmering. Mine seemed like it was quite hot because the meringues were getting overcooked into shriveled white things. So the poaching time was done very quickly more like 30-45 seconds instead of 2 minutes per side. Also, when you shape the meringues, make sure to use *big* spoons not like the dessert spoons I used. Because they do shrink in size a little after poaching.
Then the caramelised almond slivers came into play. Well I did it all right (although it was a little on the dark caramel side) and set it out in the dining table to cool. By the time I was to sprinkle it on the snow eggs almost all of it was gone! The husband and kids discovered them! Oh well, there was just enough bits I scraped to put as topping.
What of the dessert? How did it go? I was quite eggy, as my daughter said. Well that is a given! For me and the husband, it was very nice although the custard was a bit too sweet for me. I made the adjustments in the recipe below. Other than that I heartily recommend it. Next time I would make the presentation better such as put it in nicer bowls and opt for caramel syrup as well.
The main recipe was adapted from The Encyclopedia of Classic French Pastries by Susan Whatley and the almond praline fron Rachel Khoo's recipe of Floating Island.

(Snow Eggs)
*For the praline:
1/2 cup granulated sugar
2 Tbsp water
1/2 cup slivered almonds
- Line a baking tray with baking paper.
- Put sugar and water in a heavy bottomed saucepan and bring to a boil.
- Add the slivered almonds to the boiling syrup and keep stirring continuously.
- The sugar will being melting again and will take on a golden colour.
- Once it turns golden, pour out onto the prepared baking tray and quickly spread as thinly as possible (they set fast). Leave to cool completely.
*For the meringue:
3 large egg whites
5 Tbsp granulated sugar
pinch of salt
1 3/4 cup whole milk
- Put the egg whites in a mixing bowl with the pinch of salt. Beat with an electric hand or stand mixer on medium speed until soft peaks form.
- Increase the speed to high and add the sugar gradually while beating until all the sugar has been added.
- Beat until stiff peaks form (you should be able to hold the bowl of beaten egg whites upside down without any spilling out).
- While you are beating the egg whites, bring the milk on saucepan to a gentle simmer. Lower heat futher until there are only little bubbles at the edges.
- Using 2 big dinner spoons, form the meringue into oval shapes. Carefully drop the oval meringues into the simmering milk and poach for about 1-2 minutes each side or until puffed up and set.
- Remove from the milk with a slotted spoon and place on a sheet of tea towels or paper towels. Cool and store in the fridge tightly covered until needed.
*For the creme anglaise:
3 egg yolks
1/4 cup sugar
1/4 tsp vanilla
pinch of salt
remaining milk from poaching the meringue
- Combine the egg yolks, vanilla and sugar in a heat-resistant bowl with a whisk. Gently pour a little at a time of the still warm poaching milk on to the mixture while constantly stirring.
- Return the egg-milk mixture to the poaching saucepan and cook at low heat while constantly stirring. There should be about a little less than 2 cups of the mixture. If not, top up with more milk up to roughly that amount.
- Cook gently (do not stop stirring) until the mixture thickens to the consistency of a single cream. It should coat the back of a spoon.
- Strain the sauce and cool in the fridge covered until thoroughly chilled.
*For the caramel sauce (optional):
1/2 cup granulated sugar
2 Tbsp water
- Prepare a bowl full of tap water (preferably in a sink). The bowl should be bigger than the saucepan to be used for cooking. Set aside.
- Put the sugar and water in a heavy bottomed saucepan. Bring to boil.
- Continue boiling until it becomes golden coloured. Lower heat and cook until it is of the shade of golden colour desired. Immediately put the bottom of the pan into the bowl full of tap water to stop the caramel from cooking further.
- Use the caramel immediately
*To assemble:
- Put about 1/3 - 1/2 cup of creme anglaise in a small serving cup or bowl. Place two or three meringues on top and decorate with almond praline and/or caramel sauce.

This festive dessert I could imagine more in summer feasts because it's quite refreshing in the palate despite the richness of the white binding jelly. Although, this would not go amiss as a foil to all the richness of Christmas season food.
I thought I could get away with using her exact recipe but I couldn't find any thickened cream (Nestle) that is quite common in the Philippines. Good thing I read the voluminous comments of that blog to find that I can use regular double cream (heavy cream) but had to increase the gelatine in the binder. With the first make under my belt, I could see that two jelly moulds could be used in this recipe because I didn't use up all the coloured jellies. So I'll do that next time.
As you can see, I made a mistake in unmoulding the whole thing. It won't come out readily so I immersed the bottom in a bowl full of warm water for, I thought, a few seconds. But it seems I dipped it too long. The top melted and wasn't the ridged smooth gelatine I was expecting. But, nevermind, the taste more than made up for the botched unmoulding. Corinne was right in claiming that it is delicious - it was so yummy. And when I cut it to reveal the inside - wow! To see those colourful jellies floating in white was really really satisfying.
Happy New Year everyone !!
Cathedral Windows
*For coloured jellies:
5 different flavoured and coloured unset jellies*
1 cup boiling water (x5)
1 cup cold tap water (x5)
1 Tbsp sugar (x5)
1 Tbsp unflavoured gelatine powder (x5)
*For binder jelly:
3 Tbsp unflavoured gelatine powder
2 cups apple juice
4 egg yolks
3/4 cup granulated sugar
1 Tbsp lemon juice
1 cup evaporated milk
1 cup double cream (heavy cream)
For the coloured jellies:- Mix the coloured jelly with 1 cup of boiling water, 1 Tbsp sugar, and 1 Tbsp unflavoured jelly powder.
- Stir from time to time until everything is dissolved.
- Add in 1 cup of cold tap water.
- Pour into a moulding container (plastic, glass, or ceramic; preferably rectangular or square) and chill in the fridge overnight.
- Repeat steps 1 to 4 for the rest of the coloured jellies.
For the binder jelly:- Heat the apple juice until very hot but not boiling.
- Add the unflavoured gelatine, remove from heat and stir until completely dissolved.
- In another saucepan, combine the egg yolks, sugar, and lemon juice.
- Cook over low heat while stirring until the mixture is thickened.
- Pour in the apple mixture and remove from fire. Stir to mix.
- Add the evaporated milk and double cream to the mixture and stir to mix.
To assemble:- Before cooking the binder jelly, cut up the different coloured jellies into about 3/4 - 1 inch cubes. Put in a heat resistant bowl.
- Wash the final presentation jelly mould with water. Drain water from the inside but do not wipe dry. This is to make the unmoulding of the jelly easier.
- Make the binder jelly and while it is still liquid (it sets quickly!) pour it over and combine with the cut-up jellies.
- Carefully pour in the jelly mould. Cover and chill in the fridge overnight or until completely set.
*Notes: - I used the locally available Hartley's jelly in lime, lemon, orange, blackcurrant, and strawberry flavours.
- I actually combined the coloured jellies and binder in the jelly mould itself. I just carefully mixed them with a spoon and distributed the coloured jellies evenly.
- I didn't have one of those nice Tupperware jelly moulds so I just used my regular bundt pan that I use for baking and it wasn't too bad.
The work 'scrumptious' can aptly describe this cake. It is really that good. Funny enough, like most of my experimental recipes, I stumbled across this one because I have a white chocolate bar that's about to expire and a bunch of overripe bananas nearer to the side of rotten. Thanks to member toms112 of the BBC GoodFood website who provided this delicious loaf cake. I will always go back to this recipe whenever a banana cake is requested - promise!
Banana White Chocolate Chip Cake
125 g [1/2 cup] butter
150 g [2/3 cup] caster sugar (superfine)
1 large egg
1 tsp vanilla extract
3 very ripe bananas - mashed
190 g self-raising flour
1/4 cup milk
100 g white chocolate chips
- Grease a 9 x 5-inch loaf pan. Pre-heat oven to 170°C/fan 150°C.
- If the butter is softened to room temperature, beat in a bowl with the caster sugar using an electric mixer until fluffy and light.
OR
Melt the butter with the sugar over medium heat. Remove from heat and cool slightly. Transfer to a mixing bowl.
- Add in the egg and vanilla, mix well.
- Add the mashed banana and mix well.
- Fold in the flour alternately with the milk using a wooden spoon. Mix just enough to incorporate the flour.
- Add the white chocolate chips and fold to mix.
- Pour batter into the prepared cake tin. Bake for 50-55 minutes or until a skewer poked in the middle comes out clean.
Here's one recipe that I've been doing on and off in different versions for years. And it's only now that I'm documenting it. Actually, the Daring Cooks urged me to do this for the November/December challenge. It was originally the theme all the way back on May 2012. I haven't rejoined yet at the time so I have my excuses.
Beef Bourguignon or Beef Burgundy is like most stews but the main distinction is that it has a lot of red wine while the British variety has beers in different forms (ales, bitters, porters, etc). They're all very good especially during winter when you need something hot and hearty for supper.
For this recipe I made the mistake of reducing the mushrooms. As expected they shrank in size so there wasn't as much as I would like to have. The mushrooms are great to soak up all that robust taste of the sauce so don't skimp on it. Finally, serving this with boiled or steamed potatoes, bread or even rice is great for a hearty meal.
Beef Bourguignon
(Beef Burgundy)
2-3 Tbsp olive oil
200 g streaky bacon - chopped
1.5 kg stewing beef - cut into 1 1/2-inch cubes
1 onion - chopped
1 big carrot - chopped into big chunks
1 tsp sea salt
1/2 tsp freshly ground black pepper
1/4 cup flour
1 1/2 cups beef stock
720 ml (1 big bottle) red wine (Burgundy, Bordeaux, Pinot Noir, etc.)
2 cloves garlic - minced
2 Tbsp double concentrate tomato puree (tomato paste)
1/2 tsp thyme leaves
1 bay leaf
3 Tbsp butter
300 g small onions - peeled and kept whole
500 g small button mushrooms
- In a heavy bottomed casserole pot, heat olive oil and fry bacon until brown and crispy. Remove with a slotted spoon and set aside.
- In the same casserole, brown the beef pieces in batches until brown all around. Add more olive oil if needed. Remove and set aside.
- Add in the chopped onion and cook in medium-low heat for 2 minutes.
- Add the carrots and saute for another 2 minutes.
- Return the bacon and beef in the casserole. Sprinkle with the salt, pepper, and flour and toss for a minute.
- Stir in the wine, tomato puree, garlic, thyme, bay leaf, and just enough stock to cover the beef. Bring to boil while scraping the browned bits at the bottom.
- Lower heat and simmer for 1.5 hours or until beef is tender.
OR
Put in an oven pre-heated at 150°C/fan 130°C/300°F and bake for 3-3.5 hours or until beef is tender.
OR
Cook in a slow cooker for 3-4 hours on low or 2 hours on high. (Consult your slow cooker manual for best result.)
- While it is stewing, melt 1 Tbsp of the butter in a frying pan and saute the peeled small onions until golden brown. Set aside.
- Melt 2 Tbsp of the butter in the same frying pan and saute the mushrooms until brown. Set aside.
- Add the sauteed onions and mushrooms about 3/4 of the way of the cooking time. Continue cooking until done.
Note: Like any stew, this is best served the day after cooking.

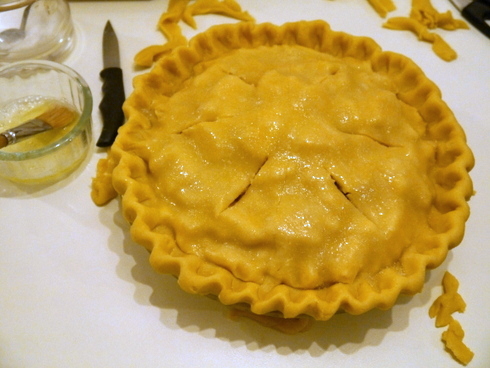
More apples would have to be added. I wanted one of those really high apple pies I see in American magazines which would also mean longer baking times. I just hope I don't end up with burnt crust and barely cooked apples inside.
This is a much modified version of the original from The Ultimate Recipe Book by Angela Nilsen. The original recipe is also in the BBC GoodFood website.
*Pastry:
225 g butter - softened but not almost melted
50 g caster sugar
1 large egg - beaten
350 g plain flour
*Filling:
1.2 kg apples
100 g caster sugar
3 Tbsp light muscovado or brown sugar (packed)
1 1/2 tsp cinnamon
3 Tbsp plain flour
*Egg wash:
1 small egg - beaten
1 Tbsp milk
1 Tbsp sugar (for sprinkling)
*For the pastry:
- Cream butter with sugar for about a minute.
- Add egg and beat until well mixed.
- Add flour and mix well. Knead for a few turns just enough to keep it together.
- Separate about 1/3 of the dough. Shape both into balls, cover with clingfilm or put in a plastic bag.
- Put in the fridge to firm up for about 1 hour.
*For the filling:
- Peel and core the apples. Slice into 1/4-inch pieces.
- Combine the sugars, cinnamon, and flour.
- Add the flour mixture into the sliced apples and mix well.
*To assemble:
- Preheat oven to 190°C/fan 170°C/375°F.
- Roll out the smaller (1/3 part) of the dough into an 11-inch circle about 1/8-inch thick.
- Lay and centre the rolled-out pastry on a 9-inch pie plate making sure that the overhanging pastry is evenly distributed.
- Tip all of the apple mixture onto the pastry-lined pie plate. Make sure it mounds in the centre.
- Roll out the remaining dough into a circle about 13-inch in diameter and 1/8-inch thick.
- Carefully lay on top of the apple mixture and cut the overhanging pastry to about 1/2 to 1-inch.
- Crimp pastry at the edge of the pie plate.
- Put about four slits on the pastry to let the steam out during baking.
- Mix the egg and milk for the egg wash. Brush generously all over the pie.
- Sprinkle about 1 Tbsp sugar on top.
- Bake for about 55 minutes to 1 hour or until a skewer poked in one of the slits pushes through smoothly in the apple filling (this means the apples are cooked). If the crust is turning too brown cover loosely with foil.
- Remove from oven and let cool for at least 30 minutes.
Note: Although the crust is delicious, I am still experimenting on the best way to prepare it since I find the original recipe is too soft to handle. So far I have tried cutting the flour into a chilled butter (like most traditional recipes) - it was a success. Next time I will try in the original way (softened butter) but with only 1 egg and maybe more flour.
My kids took after my husband, they so love noodle soups especially the ones with egg noodles. So whenever we go to a Chinese restaurant my kids would almost always order noodle soups. It's one way to test if the restaurant is any good. My son would get the braised beef while the girls would more often than not order the soya chicken noodle soup.
This delicious soya chicken dish (sometimes called soy chicken) it involves braising a whole chicken in soy sauce and spices and then hanged to dry and crisp up. You can usually see this hanging with roast ducks and crispy roast pork in Chinese restaurants serving roast meats. It is great with noodles (both the stir-fried and soupy varieties) or simply with steamed rice.
Here is an attempt to re-create soya chicken at home to reduce our visits to noodle restaurants. I did not bother to use a whole chicken and dispensed with the air-drying thing. It is delicious nonetheless.
Soya Chicken
1 cup dark soy sauce
1 cup light soy sauce
1/2 cup Chinese rice wine or dry sherry
1/2 cup packed brown sugar or 1/2 cup Chinese rock sugar
1 tsp fennel seeds
3 whole star anise
1 tsp Szechuan peppercorn - roasted
1 inch fresh ginger - peeled and lightly smashed
1 cinnamon stick
500 g chicken legs
- Combine all ingredients except the chicken in a pot. Bring to boil in medium heat.
- Add in the chicken and bring back to boil.
- Lower heat and simmer for 30 minutes. Turn or braise chicken with the sauce from time to time.
- Turn off heat, cover pot (if not yet covered) and let sit for 1 hour.
- Remove chicken from sauce. Cut up into serving pieces and serve with steamed rice or noodles in soup.
Note: The sauce can be re-used. Just re-boil it, strain the spices and discard, cool the sauce completely and then store in a glass or plastic container in the fridge.
The November Daring Baker’s challenge took us for a ride! Luisa from Rise of the Sourdough Preacher challenged us to make Paris-Brest, a beautiful pastry celebrating the Paris-Brest bicycle race.
This has been in my baking to do list for a very long time so I was glad this challenge came up in the Daring Bakers. It's supposed to represent a bicycle wheel to commemorate the Paris to Brest bicycle race. Well my pastry certainly isn't very round. It's more like oval. But I did have problems in the baking of the choux pastry. After watching it rise wonderfully in the oven it deflated when I took it out. Maybe the oven temperature was too low, maybe the baking time was too short, or I took it out too soon. But it doesn't matter, instead of slicing each of it horizontally for the filling, I just put it on top of the other and I think it's as good as any. :)

*For the Choux Pastry:
1/3 cup water
1/3 cup + 2 tsp [100ml] whole milk
1/3 tsp salt
1 tsp caster sugar
1/3 cup [85 g] butter
100 g [3/4 cup] plain flour
3 medium eggs - slightly beaten
slivered almonds
extra egg for brushing on top
- Preheat oven to 180°C/fan 160°C/350°F.
- In a saucepan, combine milk, water, butter, sugar, and salt. Bring to a gentle boil on medium heat while stirring with a wooden spoon.
- Add the flour in one go and stir vigorously. Bring the heat to low and stir continously until the mixture come together into a firm, smooth dough. It must be dry and should come away from the bottom of the saucepan easily.
- Remove from heat and cool slightly.
- Using an electric mixer, add the eggs one at a time beating well after each addition. The dough will be smooth like a very thick cream.
- Line a baking sheet with baking paper. Draw 4 1/2-inch circles on the underside of the baking paper to help in piping the circles.
- Use a pastry bag with a 3/8-inch (10 mm) nozzle to pipe the pastry. Pipe the pastry dough into two concentric circles tracing the guide you drew previously. Pipe a third circle on top.
- Brush all over with the extra beaten egg and sprinkle the slivered almonds.
- Bake for 25 minutes. Let cool inside the oven with the door slightly ajar.
*Note to self: Next time try baking with high heat initially and/or increase baking time.
*For the Praline:
60 g [1/3 cup] whole almonds
60 g [1/3 cup] whole hazelnuts
80 g caster sugar
1 Tbsp water
- Gently caramelise the caster sugar in a non-stick pan over medium heat.
- Add water and bring to boil.
- Add the nuts and stir to coat the nuts with the syrup. At this point the sugar will crystallize again. Continue stirring until the sugar caramelize again.
- Immediately transfer the nuts onto a baking sheet grease with oil. Cool completely.
- Break up into smaller pieces and grind in a food processor until you have a thick paste.
*For the Creme Mouselline:
1 cup whole milk
1 vanilla pod or 1/2 tsp vanilla extract
2 egg yolks
1/4 cup caster sugar
3 Tbsp plain flour
85 g [1/3 cup] unsalted butter - softened
80 g praline
- In a heatproof bowl whisk the egg yolks and flour until combined.
- Bring the milk to boil in a saucepan on medium heat.
- Pour half of the hot milk in the egg yolk-flour mixture while whisking vigorously. Once mixture is well combined, pour it back to the saucepan with the rest of the milk and cook on medium heat while stirring continously.
- When mixture is thick and smooth, remove from heat and transfer to another heatproof bowl and cover the cream with cling film touching the cream. This is to prevent a crust to form on top. Let cool completely.
- In a bowl, combine the softened butter with the praline until smooth.
- Add the cooled pastry cream and mix until well combined.
*To assemble:
- Slice the baked pastry horizontally.
- Spread or pipe the creme mouselline on the lower half and then carefully put the top half on.
- [Optional] Dust with some icing sugar on top.

It was indeed a challenge for me. Seriously, I thought it's one of those experiments that would end up in the rubbish bin. I decided to adapt the recipe of Kerry's fabulous rainbow cake from her blog Kerry Cooks since it is based in a Victoria sponge which I know would guarantee deliciousness. And here was where the first of near misses happened - I said I 'adapted' the recipe which means I used an 8-inch cake pan versus her 6-inch ones. Well, the batter were quite thin when I spread it in the pan and naively I though they would rise evenly. Ha! It rose in the middle and tapered to nothingness towards the edges. They look like small hills complete with bulging boulders on the sides!
The the icing would cover all that up, says moi. But then when I reached for the icing sugar in my pantry there was hardly any in the bag. Drat! Okay, I had to think quickly otherwise my youngest would be really disappointed. What I had in abundance was eggs, sugar, and butter so my light bulb idea was to adapt Corinne's Swiss Meringue Buttercream frosting. Gosh I was nervous because it was the very first time I did that. Nevertheless, glorious billowy white buttercream emerged. This one was delicious and not too sweet - definitely my kind of frosting.
The frosting came out all right but as I was slathering it between layers I realised I hardly have enough to cover it well! Oh darn, it must be mercury retrograde since nothing's going right. I had to use every bit of the icing and as precisely as I could to spread on all the cracks and crannies. Thank goodness there was just enough to cover the whole cake.
Those were not my only firsts in this exploit. The lettering on the cake was a first as well. Looking at it now, I guess there's no other alternative for me but to improve. Despite all my trials, the best part was cutting the cake. It was an unexpected delight to see that it had all come together in all its colourful glory. Really fab! Best of all, the cake with the meringue icing combination tasted great - that was according to my daughter. Mission accomplished!

*Batter: (x2)
250 g self raising flour
250 g butter - softened
250 g granulated sugar
4 eggs
2 tsp vanilla
1/4 cup milk
gel paste colourings (red, orange, yellow, green, blue, and purple)
Note: Mix two batches of this batter and divide each of them into 3 thereby creating 6 layers.
- Preheat oven to 180°C/fan 160°C/350°F. Grease three 8-inch round pans.
- Cream butter and sugar in a bowl with an electric mixer until light and fluffy.
- Add in vanilla and eggs one at a time; mixing well after each addition.
- Add flour and then milk into the butter mixture just enough to mix it in.
- Divide equally into three smaller bowls and tint each one with a different colour. Mix the gel colour well in the batter.
- Spread batter evenly in the three prepared baking pans.
- Bake for about 20 minutes or until a toothpick inserted in the middle comes out clean.
- Cool 5 minutes in pan and then remove. Cool completely on a wire rack.
- [Optional] Wrap the cooled cake layers in cling film and chill in the fridge for several hours. It is easier to assemble it if the cake layers are chilled or even frozen.
*Swiss Meringue Buttercream Icing:
5 egg whites
1 cup granulated sugar
250 g unsalted butter - softened but not melting
1 tsp vanilla
pinch of fine salt
- In a bowl set on a simmering saucepan of water (bottom not touching the water), whisk egg whites and sugar until the sugar is dissolved. You can test this by feeling a little of the mixture between your fingers. If you can't feel any grittiness then it is done.
- Remove the bowl from the saucepan and whip the egg white mixture with an electric mixer and beat until stiff peaks stage.
- While still beating, add the softened butter a spoonful at a time.
- Once all the butter has been incorporated, add the vanilla and salt.
- Mix on high speed until the icing is light and fluffy.
*To assemble:
- On a cake board or plate, put a thin layer of icing in between cake layers while stacking it on top of each other.
- Put icing on top and all along the sides of the cake. Decorate as you please.
My oldest and youngest kids love things Japanese. And that includes watching lifestyle shows in NHK World channel - the only one in our cable subscription that caters for anything Japanese. Well nowadays I'm watching them, too, but as expected mainly the food and cooking shows. One of these is the very informative Dining with Chef. They do step-by-step demonstrations of dishes including a lot of tips and tricks from Chef Tatsuo Saito.
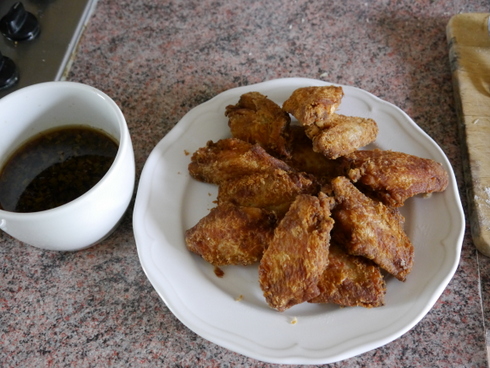
One particular dish I adapted from that show is the fried chicken wings. Wings are my favourite part of a chicken. But to be honest I really only care for the middle section. I'm not particularly fond of the little wing drumettes. So to find this recipe from the Dining with Chef using only the middle section really delighted me. And it's so good especially when paired with the sauce. You should try it with hot steamed rice.
(Japanese Fried Chicken Wings)
12 mid-section chicken wings
1 Tbsp sake or rice wine
1 Tbsp soy sauce
plain flour
oil for deep frying
*For the sauce:
1 Tbsp sesame oil
2 Tbsp chopped green onions
1 Tbsp chopped ginger
1/3 cup dashi or chicken stock
3 Tbsp soy sauce
2 Tbsp rice vinegar
1 Tbsp sugar
- Dry the chicken wings with kitchen towels. Make a cut between the bones on the underside of the chicken wings - do not cut all the way but at the tip separate the wing bones by cutting through the joint. For illustrations go to the Dining with Chef website.
- Combine the sake and soy sauce in a bowl. Mix in the prepared chicken wings and marinate for about 30 minutes.
- Dredge wings in flour and deep fry in oil heated to 180°C/350°F for about 4 minutes or until crispy.
- Serve hot or warm with the sauce.
*Sauce:
- Saute the green onions and ginger in the sesame oil in a pan. Cook until aromatic.
- Add in the rest of the ingredients. Bring to boil then lower heat and simmer for 2-3 minutes or until the sugar is fully dissolved.

 The lovely Zorra of Kochtopf is again hosting the World Bread Day 2014 food blog event. An annual virtual gathering of food bloggers to celebrate anything to do with bread.
For my entry, I'm harking back to the very first bread I ever successfully baked. When I started baking more than two decades ago I got really stressed when baking with yeast (well nowadays I still get a little anxious). I think it's the worry that the dough won't rise that I constantly peek while it is proving. This might have contributed to my first few attempts at bread making to fail. So when I saw the Make-Ahead Potato Bread Rolls in my beloved hardbound Betty Crocker cookbook, I lost no time in trying it. See, in that recipe the rising is not done in a warm place but in the fridge - overnight! How great is that? No more stressing, hand wringing and peeking to see if the dough rose at all. Anyway, the bake was successful but I never got to bake that bread again until now more than 25 years later.
One thing I only remembered now is that the shaping of the dough into balls can be a bit hard. They would not follow easily the shape I want. Maybe I should let it come to room temperature first before shaping? I'll find out next time. There's also one thing I remembered - how delicious it is especially when warmed. My youngest daughter loved it so much she slathered it with strawberry jam - one of the few times I saw her do that. This is a definite keeper of a recipe.
Potato Bread Rolls
1 package [2 1/4 tsp] active dry yeast
1 1/2 cups warm water
2/3 cup sugar
1 cup unseasoned mashed potato
2 eggs
1 1/2 tsp fine sea salt
2/3 cup butter - softened
7 - 7 1/2 cups plain flour
- In a bowl, dissolve the yeast in the warm water together with 2 tsp of the sugar. Set aside. It should foam and bubble after 10 minutes. If it did not, this means the yeast is dead so discard the mixture and start again with a new batch of yeast.
- Add the sugar, potatoes, eggs, butter, salt and 3 cups of the flour. Mix with electric mixer on low speed until smooth.
- Add in enough of the rest of the flour to make the dough easy to handle. Knead on a floured surface for about 5 minutes of until smooth and springy.
- Grease a bowl and place dough in it. Turn dough to grease all over. Cover tightly with cling film and let rise in the fridge for at least 8 hours but not more than 5 days.
- Punch dough gently and knead for a few turns. Divide dough into 2 equal pieces for loaf and 4 equal pieces for rolls.
*For small dinner rolls:
- Shape dough into 1 1/2 inch balls. Arrange on a greased baking sheet 1 inch apart. Cover and let rise in a warm place until double (about 1-2 hours).
- Brush with melted butter or egg wash (beaten egg with 1 Tbsp water or milk).
- Bake in an oven preheated to 200°C/fan 180°C/400°F for 15-20 minutes.
*For clover leaf rolls:
- Grease muffin pans. Shape into 2-inch balls and put in the muffin pans. Using scissors, cut balls into halves and then into fourths.
- Brush with melted butter and let rise in a warm place until double (1-2 hours).
- Bake in an oven preheated to 200°C/fan 180°C/400°F for 15 minutes.

The October Daring Cooks’ Challenge was brought to us by Andrea from 4pure. She introduced us to one of her family favorites which is soon to become one of yours, too. Welcome to the world of Dutch Bitterballen!
Actually before I made these Dutch treats I haven't tried nor heard about bitterballen. But it's not foreign to most people - it is a variant of a deep-fried croquette. I did the cheese bitterballen and was gearing up to make the prawn version but I ran out of time for the deadline. You can head to the Daring Kitchen's website for the recipes of the beef and prawn renditions of this delicious snack.
I froze my bitterballen for deep-frying a week later. They froze rather nicely.
As instructed by Andrea, you have to add 1 minute to the deep-frying time for frozen bitterballen. It was delicious! Although next time I would do the egg dip and breadcrumbs at least twice to make the breaded crust thicker and crunchier. Plus also making the balls smaller - perhaps 3/4-inch in diameter only. I would prefer more starch/crust in the crust-cheese ratio to make it less rich. All these personal changes are reflected in the recipe below.
Everyone in the family loved it including my youngest who was busy speed reading the very recently released book of her favourite novel series.

1/2 cup [125 g] butter
3/4 cup [110 g] plain flour
2 cups [500 ml] full-fat milk
1/2 tsp grated nutmeg
2 egg yolks
1/3 cup [80 ml] single cream (light cream)
2 tsp gelatine
80 g hard cheese (parmesan, grana padano, pecorino, etc.) - grated
80 g soft cheese (brie, camembert, cream cheese, etc.) - sliced into small pieces
80 g matured cheddar - grated
salt and pepper
*For the breading:
plain flour
2 eggs - beaten
dry breadcrumbs
- Melt butter in a heavy-based saucepan.
- Add flour all at once and stir to cook for 3 minutes on medium heat.
- Add milk and bring to boil while stirring continously.
- Bring heat to lowest and simmer for about 10 minutes stirring from time to time.
- While it is simmering, dissolve gelatin with about 2 Tbsp water. Set aside.
- Add nutmeg. Taste sauce and add appropriate amount of salt (about 1/2 tsp) and pepper.
- Stir in the cheese until well mixed in the sauce.
- Add in the dissolved gelatine and stir until well combined.
- Remove from heat and spread out the sauce in a baking dish or plate.
- Cool for about 30-60 minutes then cover and refrigerate for at least 2 hours or overnight.
*Breading:
- After refrigeration, the mixture would have hardened. With a spoon, scoop out enough cheese mixture to form into a 3/4 - 1-inch ball.
- Roll the ball in the plain flour; then dip in the beaten egg; then roll in the breadcrumbs. (The breading may be repeated if you want a thicker crust.) Do the same for the rest of the mixture.
- Rest the breaded balls on a plate in the fridge for about 30 minutes.
- At this point you may freeze the bitterballen if you wish.
*Deep frying:
- Heat at least 3/4-inch of oil in a heavy saucepan to 180°C/350°F.
- Deep fry the bitterballen for 3-4 minutes until golden. (For frozen bitterballen, add 1 more minute in cooking time.)
- Serve warm with mustard or chutney.
The September Daring Bakers’ challenge was brought to us by Lucie from ChezLucie. She challenged us to make a true Czech treat –Kolaches!
Quite an interesting challenge considering I've never tried kolach before. So how was it? Well, as of posting time it is still cooling on a wire rack and I only tried a little portion without the cream filling. It was a bit bland though springy and soft which makes it perfect for some sweet or creamy filling. I was intrigued by the mayonnaise in the recipe but if you think about it mayonnaise is made up of oil, eggs, and vinegar or lemon juice. These ingredients are ubiquitous in cakes and breads so I was not surprised it worked.
A number of tweaks were done in the recipe such as reducing the size of the bread itself, added more baking time, and halved the streusel topping. Otherwise, it is a great recipe as an introduction to the world of kolaches!

*Cake:
250 g [1 3/4 cups] plain flour
7 g active dry yeast
2 Tbsp granulated sugar
5 Tbsp milk - warmed
1/2 cup mayonnaise
1 egg - slightly beaten
1/2 tsp fine sea salt
*Streusel topping:
3 Tbsp plain flour
2 Tbsp caster sugar (superfine)
1/4 tsp ground cinnamon
2 Tbsp butter - chilled
*For finishing:
1 egg - beaten
*Cream filling:
2 cups full-fat milk - divided
1/2 cup granulated sugar
1 tsp vanilla extract
1/2 cup custard powder (vanilla pudding powder)
1/4 cup unsalted butter - room temperature
5 Tbsp double cream - chilled
*For cake:
- In a large bowl, sift flour and make a hole in the middle.
- Pour the yeast, 1 tsp of the sugar, and 1 Tbsp of the warm milk in the hole. Lightly mix the yeast, sugar and milk with a fork and sprinkle the surface with a little flour.
- Cover the bowl with kitchen towel and let rise for 15 minutes.
- Add the rest of the ingredients and knead with dough hook or by hand until you have a smooth dough (about 10 minutes).
- Lift the dough from bowl. Lightly flour the bottom of the bowl and set the dough on it. Cover with clingfilm or towel and let rise for an hour until double its volume.
- Punch dough and knead a little. Form the dough into a ball and place onto a baking sheet lined with greaseproof paper.
- Press the dough with your hands to shape it to a disc about 7 inches (18 cm) in diameter and 3/4-1 inch thick (2-2.5 cm). Cover with clingfilm and let rise for 30 minutes.
- Preheat oven to 325°F/160°C/fan 140°C.
- Brush top of the cake with the beaten egg. Sprinkle the streusel topping generously.
- Bake for 25-30 minutes or until golden brown. Cool completely on a wire rack.
- Cut the cooled cake crosswise and spread the cream onto the bottom half. Cover with the upper half.
*For the streusel:
- Combine the flour, sugar, and cinnamon in a small bowl.
- Cut in the chilled butter in the flour mixture with a pastry cutter until crumbly.
*For the cream:
- Mix 1/2 cup of the milk with the custard powder in a small bowl. Set aside.
- In a saucepan mix the rest of the milk and sugar and bring to a gentle boil.
- Add the custard powder mixture and simmer for 3-5 minutes while stirring constantly.
- Remove from heat, transfer to a bowl of your electric mixer and cool completely while blending at low speed.
- Add diced butter and beat until well mixed in.
- Whip the double cream in a separate bowl into stiff peaks. Fold in the custard mixture into the double cream.
This is more on the periodically running saga of using up ingredients about to expire. We had several bars of excellent Cailler baking white chocolate from my sister in Switzerland. It was expiring at the end of last month so we had to think of a way of using it very quickly! Fortunately, the cookie recipe we found in the Nestle website was really spot on. And it was so easy that my youngest was able to do all by herself. I think we just made a few adjustment on some ingredients and reduced the cooking time. Other than that it was really really good and delicious especially for a first time bake by a 13-year-old.

1 cup [250 g] butter - softened to room temperature
3/4 cup granulated sugar
2/3 cup firmly packed light brown sugar
1 tsp vanilla extract
2 large eggs
2 1/4 cups plain flour
2/3 cup cocoa
1 tsp bicarbonate of soda [baking soda]
1/4 tsp fine salt
2 cups [350 g] white chocolate chips
- Preheat oven to 180°C/fan 160°C/350°F.
- [Optional] Grease and line baking sheets.
- Combine the flour, baking soda, and salt in a small bowl. Set aside.
- Cream butter and both sugars in a bowl with an electric mixer. Beat until light and fluffy - about 5 minutes.
- Add vanilla and the eggs one at a time, mixing well after each addition.
- Mix in the flour mixture in batches into the butter mixture.
- Using a wooden spoon, stir in the white chocolate chips until well combined.
- Form into balls, about 1-inch in diameter, then arrange on the baking sheets making sure to leave enough room between for it to expand.
- Bake for 11-12 minutes.
- Cool on the baking sheets for 5 minutes then remove and cool completely on wire racks.
With the aid of a food processor, this a very easy thing to whip up. Hummus is one of my all-time favourite snack dip. And now that I've got a recipe that I adapted from Angela Nielsen's The Ultimate Recipe Book you can be sure this will be a regular on our table.
As for the recipe, it was good as it is even without the yoghurt (I didn't have one at the time) but it would have been better if I reduced the garlic (too overpowering) and the reserved brine (to make it thicker). So all of these are reflected in the adjusted recipe below. Otherwise, it was simply delicious especially with crudites, tortillas, and pita breads.
Hummus
1 x 400 g tin can of chickpeas
1 garlic clove - peeled and chopped roughly
2 Tbsp tahini
2 Tbsp lemon juice
3 Tbsp extra-virgin olive oil
1/4 tsp ground cumin
1/2 tsp fine sea salt
2 Tbsp plain natural yoghurt (optional)
- Drain chickpeas from can and reserve 1/4 cup of the liquid.
- Transfer the chickpeas and reserved liquid into a food processor or blender and process until smooth. Scrape the sides if needed.
- Add in all the other ingredients and process again until completely smooth. Taste then adjust salt and lemon juice according to personal preference.
Look, a yummy cookie recipe with only 5 ingredients! How's that for simplicity? I was trying to find a cookie recipe that would include M&M chocolates instead of the usual chocolate chips. The allrecipes website turned up with this gem of a recipe that not only is simple to make but is scrumptiously delicious, too. Plus, it does not use eggs so perfect for those with egg allergies. It was a definite thumbs up from the kids. We did change the volume, however, as in cut it in half since we don't really need that much cookies.

250 g butter - softened to room temperature
125 g caster sugar (superfine)
200 g condensed milk (half of a 397 g can)
312 g self-raising flour - sifted
250 g chocolate M&Ms
- Preheat oven to 180°C/fan 160°C/350°F. Grease baking trays.
- Beat together butter, sugar and condensed milk until light and creamy.
- Add flour and mix until well combined.
- Stir in the M&Ms with a wooden spoon and mix well.
- Roll tablespoonfuls of the mixture into balls (about 3/4 inch in diameter).
- Place on prepared trays and flatten slightly with a fork.
- Bake for 11-12 minutes or until lightly golden.
- Cool in the tray for 5 minutes then remove and transfer to wire racks to cool completely.

Actually, the challenge was to do either the kurtoskalacs or the ensaymada. Naturally, I chose ensaymada - the Filipino version that is. This recipe from my sister-in-law (Ate Eva) has been in my to-do list for years! I finally had a good kick in the butt to do it.
The ensaymada of my childhood were very much like the original Spanish version. They were coiled flat and more flaky with lard often used for this purpose. Sometimes there were nuggets of raisins in it that were like little oasis of delight in my juvenile mouth. Yum! Nowadays, the modern Filipino ensaymada are more brioche-like. In fact some of them are so rich they resemble cakes more than a pastry. Nevertheless, they are equally wonderful and great as a midday snack. As with most things in Filipino food, the modern ensaymada combines the buttery sweet taste of the butter-sugar topping with the saltiness of the grated cheese so you get that familiar salty-sweet flavour with the soft pillow-like pastry.
This recipe is indeed a challenge for me. I am not very experienced with pastry so when the dough came out very very sticky after the first rising, it took me a looong time to get it to a manageable state with all the kneading and adding of more flour. In the end it was still sticky but did not cling too much when handled. I think I'll reduce the liquid a lot the next time I bake this. This particular recipe is not the 'special' ensaymada variety they call in the Philippines. That one has *a lot* of eggs and butter which make it more cake-like and quite rich. Ate Eva's is less rich and more bread-like. As a matter of fact, when I tasted the finished product bare without any toppings I thought it was okayish. But when you combine it with slathered soft butter, sugar, and grated cheese on top it was great! Exactly what I intended to make.
As a note to myself, this is the actual recipe from my SIL (with some adjustments in some ingredients and more elaborate procedure steps). And it makes a ton of ensaymada! It roughly makes about 30 medium-sized ensaymada and probably double that for the muffin-sized ones. In which case I believe this can be done with just a third of the recipe if only to keep me from eating ensaymadas for weeks!
The freezer is my friend now.

*Yeast mixture:
3/4 cup lukewarm water
3 tsp dry active yeast
1 tsp sugar
*Dough mixture:
6 1/2 cups strong flour (bread flour)
1 cup sugar
3 Tbsp melted butter
3 egg yolks
2 tsp vanilla
1 1/4 cups whole milk
1/2 cup cooking oil
*Topping:
butter - softened to room temperature
granulated sugar
grated cheddar cheese or edam
- Mix the yeast mixture in a small bowl, cover and set aside. After about 15 minutes it should start to foam. If it didn't that means your yeast is probably old. In that case, throw away the mixture and start again. If you are using instant, rapid-action, or fast-action dry yeast you can skip this step and add the yeast and sugar directly with the flour and the water with the other wet ingredients.
- Combine the flour with the sugar in a large bowl.
- In separate bowl, mix the melted butter, egg yolks, and vanilla.
- Add in the milk. Mix well.
- With a wooden spoon or with a mixer on low speed, stir in the milk mixture and the yeast mixture into the flour mixture. Combine well.
- Add in the cooking oil and mix until well combined.
- Cover and let it rest to rise in a warm area for about 1 hour or until double the size.
- Punch down dough and turn out onto a well-floured surface.
- Knead the dough while adding more flour. In the end it should be soft and sticky but should come away from fingers when kneading.
- Prepare the baking moulds by brushing the bottom and sides with softened butter.
- Divide into portions - 75-80 g for medium-sized ensaymada and 25-30 g for small ones.
- On a greased surface, roll out each portion thin into a rectangle shape and brush generously with softened butter or with your choice of fillings - cheese, chocolate, ham, etc.
- Roll portion from the long side into a thin log (about 1/2-inch or less in diameter).
- Coil the rolled dough into a spiral shape inside the prepared moulds taking care to tuck in the outer end.
- Cover loosely with tea towel and let rest at room temperature for 1-2 hours. They will double in size again.
- Bake in a preheated oven at 180°C/fan 160°C/350°F for about 18-20 minutes for medium-sized ensaymada.
- Cool completely on a wire rack.
- Put toppings - slather softened butter then press top onto a small bowl full of sugar then sprinkle grated cheese on top.


The event takes place in historic Ludlow Castle, which although built during the very early medieval period is probably best known for the fact that Catherine of Aragon lived there with her first husband, the future King Henry VIII’s older brother, Prince Arthur at the turn of the 16th Century. The rich history of its past blends perfectly with the present and makes it an ideal setting for such a great weekend.
Visiting a food festival as lovely as Ludlow can be made all the better if you plan ahead, especially with regard to money! It can be all too easy to pay a visit to an event like this and overspend without really realising it. One of the best ways of managing your money is to make sure you decide on your budget before you go – draw out the requisite amount of cash to take with you and leave your credit or debit cards at home. This makes it easier to plan and to have fun without worrying you’ll have bled your bank account dry.
This year the festival will take place on the 12-14 of September 2014. A few years ago, I was fortunate to attend it for a day. I enjoyed that visit immensely so next month I hope I'll be there again to sample the foodie delights this food festival can offer. It's just a matter of deciding which day to go!


