 I am massively supporting Susan's (of Food Blogga) blogging event called "Beautiful Bones" to highlight osteoporosis. This is one event that I really feel close to my heart. I do feel strongly mainly because my mother's side of the family have been blighted by osteoporosis and other bone diseases. And if me and my siblings are not careful we would be victims as well later on.
My dear old grandma, Lola Ebia, is in her 95th year. Her spine is bent forward making it difficult for her to move around. Worse off was her late older sister, Lola Ine, who was not only bent almost 90 degrees from the waist up but whose spine was shaped like a big letter S on her back. It did not seem give her that much health problems (or maybe I just didn't hear much about it) but it did present a great difficulty for her physically moving about. Me and my cousins were joking then at what shape her coffin would be when she died.
It did not end in my grandma's generation. My mother and her siblings are now beginning to feel various forms of bone diseases. And it's not confined to the women even our uncle who is very fit and follows a healthy lifestyle succumbed to some problems with his hipbone and had to be operated on when he was only 65. So me and my cousins better beware and heed the signs to take better care of ourselves or we will suffer in later years.
As what Susan mentioned in her blog, there are lots of food sources of calcium ranging from the usual dairy products to vegetables to nuts and lots of others. Bear in mind to temper the consumption of these with fibre since too much fibre restricts the absorbtion of calcium by the body. To strike a balance between consumption of calcium and fibre-rich food would be the optimum goal. As usual moderation is the key.
I have chosen to cook this dish rather than the usual dairy product sources since the soya bean in the bean curd and the green bokchoy are rich in calcium and would do well in balancing our intake of healthier food. Sorry for the limp overcooked bokchoy. Distractions while cooking can be hazardous to the final cooked products.

1 pkg bean curd (4 squares)
2 green onions - sliced into 1/2-inch pieces
6 slices ginger root
5 pieces dried Chinese black mushrooms
1/2 cup sliced bamboo shoots
3 pieces bok choy - cut into quarters lengthwise
1/2 tsp hot chilli paste
1 cup stock
2 Tbsp soy sauce
1 Tbsp oyster sauce
1 tsp sugar
1/2 Tbsp cornstarch
1 Tbsp water
oil for frying
- Soak the mushrooms in hot water for about 20 minutes or until soft. Squeeze out water then slice into 1/2-inch pieces lengthwise.
- Combine stock, soy sauce, oyster sauce and sugar in a container. Stir until sugar is dissolved. Set aside.
- Mix cornstarch and water in another bowl, stir and set aside.
- Cut the bean curd into thin triangles. Deep fry or pan fry until golden brown. Set aside.
- Heat a wok and add 2 Tbsp oil. Stir fry the green onion and ginger until aromatic.
- Add the Chinese mushrooms, chilli paste and bamboo shoots, stir to mix.
- Then add the bok choy and stir fry in high heat for a few seconds.
- Add the oyster sauce mixture and fried bean curd.
- Bring to boil and cook for 3 minutes or until the liquid has reduced to half.
- Add the cornstarch mixture and bring to boil to thicken.
- Dish up and serve immediately.
 My First Daring Bakers' Challenge!
I've always wanted to join in the fun of the Daring Bakers. It took me several months to muster up enough courage to send an email to the organizers and start the excitement of waiting for the next challenge's announcement. And guess what my first challenge was - opera cake! My most dreaded and nervousness-inducing pastry creation. I always tried to avoid making this, thinking it was too tedious, too difficult, or just too time and resource demanding. As it turned out, if you do parts of it ahead of time it won't be too daunting a task.
How did I fare? Not bad, though I would not qualify this as a resounding success. Despite my results I learned a lot from doing this and if ever I am brave (or nagged) enough to do this again I have every confidence I can do it well. Thanks very much to the organisers of this month's theme for their detailed instructions and their patience in answering our countless questions and shoring up our flagging confidence. Our organisers decided that the theme should not be the usual chocolate opera cake but with white chocolate and whatever light flavouring and spring-themed decoration you desire.
I didn't find much problems in the making of the joconde (cake) and syrup. They were straightforward and were easy peasy to make. I made them at least 2 days before with the syrup flavoured by lemon juice since I've decided to do a citrus flavoured opera cake.
The buttercream was another matter altogether. Me and my 7-year-old daughter were happily beating the eggs with the hot syrup very slowly dripped into it. It came out light, very fluffy and wonderfully marshmallow-like flavoured. Problem came when we beat in the softened butter. I thought it was softened enough but as I put in the first lot I actually saw it go deflate - pfffft! So the first lesson was make sure the butter is not just soft but room temperature - as in almost at melting point. The buttercream still came together but it was not as fluffy as I expected. And if I were to do this again I would make 1 1/2 of the buttercream to make sure there's enough for it to spread around.
Next was the disappointing white chocolate. I had two lots to do, one for the mousse another for the glaze. Needless to say the Mernier white choc I bought refused to completely melt! And all along I thought a more expensive one would give me an easier to handle ingredient. How wrong I was. I should have stuck to the cheap supermarket-brand baking white choc. Anyways, after my futile attempt to melt it in the double boiler I transferred it in a saucepan where it almost burned. Finally, it melted, removed from the heat and cooled it a bit. But by the time I have beaten the double cream to soft peaks the melted white choc was becoming grainy! So off it went back on the cooker with me stirring like a woman possessed. I cooled it again though this time watching it like a hawk and stirring it from time to time. When it was about room temperature I was finally able to successfully fold it into the whipped cream. The original recipe said to use 7 oz or 200 gm of white choc. I thought it was a bit much too sweet so I only used half required.
The original glaze for me is too sweet as well plus it did not spread too well. Therefore the recipe below is adjusted to double the cream and reduce the white choc a little.
The assembly was the easiest part for me. Although I could have put more syrup in the joconde to make the lemon flavour more prominent.
As I said before, I learned a lot from this exercise and have marked here all my learning points to avoid any future disasters.

Syrup
1/2 cup water
1/3 cup granulated sugar
2 Tbsp lemon juice
- Put all ingredients in a saucepan and bring to a boil.
- Simmer until all the sugar is dissolved.
- Remove from heat and set aside.
(Note: This can be done up to 1 week in advance covered in the fridge.)
Joconde
6 large egg whites
2 Tbsp granulated sugar
2 cups ground blanched almonds
1-1/2 cups icing sugar
6 large eggs
1/2 cup plain flour
3 Tbsp unsalted butter – melted
- Preheat oven to 220°C/fan 200°C/425°F.
- Butter and line 2 swiss roll pan (about 15-inch x 10-inch) with parchment paper.
- Beat egg whites until soft peaks. Add sugar gradually and beat until stiff and glossy.
- In another bowl, beat eggs and icing sugar and ground almond until light and voluminous (about 3 minutes).
- Add flour and mix just enough to combine. Do not overmix.
- Gently fold the meringue into the almond mixture. Fold in the melted butter.
- Divide the batter between the two pans, spread evenly and bake for 6 to 9 minutes or until lightly brown and springy to the touch.
- Remove from oven. Run a knife along the edges to loosen the cake. Cover each with parchment paper, turn it over, unmold the cake and carefully remove the parchment paper lining. Let it cool to room temperature.
(Note: This can be made 1 day in advance and kept wrapped in room temperature.)
Buttercream
1 cup granulated sugar
1/4 cup water
1 large egg
1 large egg yolk
200 g [3/4 cup + 2 Tbsp] unsalted butter – softened to room temperature
1 Tbsp orange extract
- Combine sugar and water in a saucepan and cook over low-medium heat until the sugar dissolves.
- Continue to cook without stirring until the temperature reaches 225°F on a jam or deep-fry thermometer.
- While the syrup is heating, beat the egg and egg yolk at high speed until pale and foamy.
- Once the syrup reaches the required temperature, remove it from the heat, reduce the mixer speed to low and begin to very slowly pouring the syrup down the side of the bowl being very careful not to splatter the syrup onto the path of the whisk.
Some of the syrup might spin onto the sides of the bowl but don’t worry about this and don’t try to mix it in the mixture as it will harden.
- Raise the speed to medium and continue beating until the eggs are thick and satiny and is cool to the touch (about 5 minutes).
- While the egg mixture is beating, place the softened butter in a bowl and mash it with a spatula until you have a soft creamy mass.
- With the mixer on medium speed, add the softened butter in two-tablespoon chunks. When all the butter has been added, mix in the 1 Tbsp orange extract and raise the mixer speed to high and beat until buttercream is thick and shiny.
- Chill the buttercream in the fridge, stirring often until it’s set enough to spread on the cake.
(Note: This can be done in advance packed in an airtight container – 1 month frozen and 4 days refrigerated. To use simply bring buttercream to room temperature and then beat briefly to restore its consistency.)
White Chocolate Mousse
100 g white baking chocolate - chopped
1-1/4 cup double cream
1 tbsp liquer of your choice such as Amaretto, Limoncello, etc. [optional]
- Put 1/4 cup double cream in a saucepan and cook on gentle heat.
- Once bubbles start to appear on the edges, add in the white chocolate.
- Stir to ensure it's smooth and that the chocolate has melted.
- Add the 1 Tbsp liquer and stir. Remove from heat and set aside to cool completely.
- In a bowl, whip the remaining 1 cup double cream until soft peaks form.
- Gently fold the whipped cream into the cooled chocolate to form a mousse. If it’s too thin, refrigerate it until it’s spreadable.
(Note: This can be made ahead on the day and refrigerated until you’re ready to use it.)
Glaze
250 g white baking chocolate
1/2 cup double cream
- Put the double cream in a saucepan and heat gently.
- Once bubbles start to appear on the edges add the white chocolate.
- Stir until melted and smooth. Let cool for about 10 minutes.
(Note: This should be done right after the cake has been assembled and chilled.) Cake Assembly: - Cut and trim each sheet of joconde (cake) so that you have 2 pieces: one 10-inch square and one 10 x 5-inch rectangle.
- Place one square of joconde on a cake stand or parchment lined baking sheet.
- Brush gently with lots of the flavoured syrup. Spread about 2/3 of the buttercream evenly over this layer.
- Top with the two rectangular pieces of joconde, placing them side-by-side to form a square.
- Again, brush these pieces with lots of the flavoured syrup. Spread the remaining buttercream on top. Then place the remaining square of joconde on top of this.
- Use the remaining syrup to moisten it and spread all of the white chocolate mousse on top.
- Refrigerate for at least two hours to let the mousse to firm up.
- Make the glaze and after it has cooled, pour and spread it on top of the chilled cake.
- Refrigerate again to set the glaze. Serve the cake slightly chilled.

 Chris over at Mele Cotte is replaying for the second time his great idea of a blog event to highlight one of the scourge of our age - cancer. To encourage us to cook food that combats this disease.
I don't know if you notice, it seems cancer is spreading to epidemic proportions. Rare it is to find anyone who does not personally know someone who is afflicted with cancer. My husband's family is not stranger to it. An aunt and an uncle in his mother's side died of lung and breast cancers respectively. Then his several aunts and uncles in his father's side also has/had it in various forms. For me, an old high school classmate died of breast cancer at the age of 36 leaving behind 5 young kids whose father had long abandoned the family when he learned of her illness. How heartbreaking is that?
What I can do about it? Not much except maybe support them however I can in prayers, care, and whatever help I can extend. But I think the better way would be to take care of myself and my nearest loved ones in hopefully these would not befall us. One of the obvious thing to do is to eat healthily which this post will help in giving a recipe with several cancer-fighting ingredients.
A blogging friend sent me some of these lovely orecchiette (ear shaped) pasta which she got me from Italy. Thanks Sha! I've never tried these shapes before and quite curious of its texture and quality.
Then I got this recipe in the latest Delicious magazine. Their May edition is an all Italian issue. I had to halve the recipe because there's just too much of it. This recipe I adapted contains broccoli, garlic, and chilli peppers which are touted to be top cancer-combating food. I love the simplicity of this dish which can be had on its own or with other meats.

200 g orecchiette pasta (ear-shaped)
1 big garlic clove - thinly sliced
1 red chilli - deseeded and sliced
3 Tbsp extra-virgin olive oil
2 anchovy fillets (bottled or canned)
250 g broccoli - cut into small florets
- Blanch the broccoli in boiling water for 2 minutes. Drain and set aside.
- Cook the pasta 1 minute less than the pack instructions. Drain and set aside. Reserve some of the pasta water.
- A few minutes before the pasta is done, gently heat 1 Tbsp of olive oil and saute the garlic and chilli. Do not let it burn.
- Add the broccoli and cook for about half a minute. Add another 1 Tbsp olive oil. Stir to mix.
- Add about 1/4 cup of the hot pasta water and the anchovies. Cook in low heat while stirring frequently until the anchovies dissolve.
Season with salt and pepper.
- Add the pasta and stir to combine. Cook for another 2-3 minutes to allow the broccoli to cook some more.
- Add the last 1 Tbsp of olive oil and mix well. Dish up and serve immediately.
I was hoping to enter this in the Hay Hay It's Donna Day #19 blogging event but it's only now that I read the rules carefully. It turned out that you have to follow a certain recipe using either berries or plums. Darn!
Never mind, I've always wanted to do this pear clafoutis recipe adapted from Green & Black's Chocolate Recipes cookbook. And I've never done clafoutis before I thought this would be a good chance to experience one.
If you don't like your clafoutis a little gooey in the middle then this is not the one for you. The extra liquid from the poached pears ensure that the middle part (at least) of the the cake is a bit wet. I absolutely love the moist, smooth texture of the conference pears with the sticky chocolate cake.
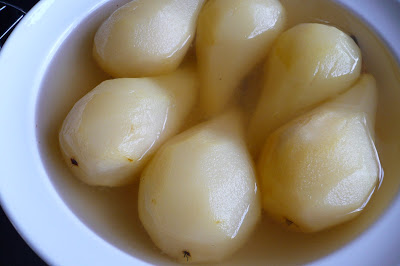
*For the poached pears:
6 pears
750 ml red wine or 3 cups water
110 g [1/2 cup] caster sugar (superfine)
juice of 1 lemon
*For the batter
110 g [3/4 cup] self-raising flour
1/8 tsp fine salt
100 g [1 cup] ground almond
165 g [3/4 cup] caster sugar (superfine)
2 large egs
1 large egg yolk
175 ml [2/3 cup + 1 Tbsp] full cream milk
75 g unsalted or slightly salted butter
100 g dark chocolate (minimum 60% cocoa solids)
- To poach pears:
- Peel pears but leave the stalks on (it's easier to turn pears around).
- Put wine (or water) in a saucepan with the lemon juice and caster sugar. Stir to dissolve sugar. Bring to boil slowly then lower the heat to a simmer.
- Cook/poach the pears the pears in the syrup for 10 minutes. Turn the pears from time to time.
- Take the saucepan off the heat and leave the pears in the liquid to cool for about 2 hours.
- After cooling, drain the pears and slice them in half lengthwise. Using a small teaspoon or melon baller remove the cores carefully. Cut off the stems if you like.
- For the batter:
- Preheat the oven to 200°C/fan 180°C/400°F/gas mark 6.
- Grease a 13 x 9-inch oval baking pan or two 9-inch baking pans.
- Break up the chocolate and melt with the butter in a heatproof bowl over a saucepan of simmering water. Mix well then set aside and cool a little.
- Put the flour, almond, sugar and salt in a bowl and mix well.
- Whisk the eggs, egg yolk, and milk together then add to the flour mixture. Blend until smooth.
- Stir in the melted chocolate mixture until well combined.
- Pour the batter into the prepared pan(s) and arrange the poached pears in the batter placing the thin end facing towards the centre of the pan.
- Bake for 20-25 minutes. The centre of the cake will always be gooey because of the extra liquid in the poached pear so do not be alarmed if a skewer inserted in the middle does not come out clean.
- Serve hot or cold with some cream or creme fraiche.


Canteen is one of the most ideal restaurant for me. I never hid the fact from anyone that when it comes to dining places the environment and ambiance are way down my list of criteria. First and foremost for me is the food (that's what it's all about innit?) secondly is the price - it had to be at least good value for money. So you can just about guess that down to earth places with reasonable prices and great food are my absolute favourites. If the surroundings and cutlery are nice then I would consider that a bonus.
This restaurant is no fancy place but had good settings in a minimalist way. The name was true to its word - it looks like a canteen. Most of the food are standard pub fodder but done in the best way possible. I likened the whole enterprise as like stripping a restaurant naked and exposing and highlighting the fabulous food it offers at prices that would not break the bank - I promise!
I ordered a steak (and ale ?) pie with mash and greens. The mash was the best I've tasted outside of my kitchen. Very buttery, creamy and ultra smooth. And the pie? On the outside the pastry was crisp and the inside was a great thick and flavourful beef stew. Although the filling was quite hot making me regret scoffing a spoonful as soon as I broke into it. I was wondering to myself how they managed to retain the crispiness of the pastry. Maybe they have them ready as baked shells and then fill it, top it then baked to crisp the outside. Hmmm ... food for thought.
Thank god the greens didn't come out cooked to death. It was handled just right making a fine complement to the pie and creamy mash. Oh before I forget, the gravy was delicious enough to bind them all together to give me a very satisfying meal.
Now I couldn't remember exactly the ice cream I had for dessert. I think it was raspberry one with a pistachio biscotti sticking like a tower on the side. But I could distinctly remember that the fruit flavour was vivid in a starring-role style not like some insipid ice cream whose intended flavours barely registered in your tongue. And did I say it was as creamy as a premium Italian gelato?
Well, what else can I say? It's obvious that I enjoyed my food in Canteen and will be definitely be back with a vengeance if I'm in the vicinity. I just hope they keep up the quality of their offerings and hope they won't get diluted once they start branching out. Please Canteen promise me you won't be another Wagamama ...
Canteen
2 Crispin Place
Spitalfields
London E1 6DW
Tel. No.: 0845 686 1122
Look ma, no baking so no oven needed! Gary Rhodes' article in the BBC Good Food magazine provided me with the recipe to adapt for this confection which is really very easy to make!
I know, I know, the picture doesn't look too polished. I brought this to our nephew's baptism reception and there wasn't any plate big enough nor a knife to properly slice it. So a squashed pie plate was produced and everybody just hacked it with plastic forks and spoons. Not a pretty sight but well worth having as it was not too sweet with just the right balance of the white chocolate and cream cheese and with nary a smidgen of sour cream. The topping of course are lovely blueberries that always marries well with cheesecakes.
White Chocolate-Blueberry Cheesecake
*Biscuit Base:
225 g plain Hobnobs* - crushed to fine crumbs
100 g unsalted butter - melted
*Cheesecake:
300 g white chocolate - chopped
200 g cream cheese (or Philadelphia cheese) - at room temperature
25 g [5 tsp] caster sugar
2 cups double cream
*Topping:
350 g blueberries
100 g icing sugar (confectioner's)
2 Tbsp water
- Line bottom and sides of a 23cm/9-inch round springform pan with greaseproof paper.
- Mix crumbs and butter. Press into the bottom of the prepared pan. Chill in the fridge.
- While the the crust is chilling, melt white chocolate very gently in a heatproof bowl set over simmering water in a saucepan. Remove from heat and cool a little until warm.
- Beat cream cheese and sugar until smooth.
- Stir in melted chocolate. Mix well.
- Whip double cream to very soft peaks then gently fold into the white chocolate mixture.
- Pour into the prepared pan. Spread and smooth top. Chill in fridge for 2-3 hours or overnight.
- For the topping:
- Place blueberries, icing sugar and water in a saucepan and warm gently until sugar has dissolved and the berries are starting to soften but still retains their shape.
- If syrup is too thin, take the blueberries out with slotted spoon into a container. Leave a few pieces and mash these to release the juice. Continue simmering the syrup for a few minutes to thicken.
- Remove from heat and mix back in the blueberries. Leave to cool.
- To assemble:
- Remove cheesecake from baking pan then spoon the cold blueberries with syrup over the top.
*Note: For the crust, you can use either Hobnobs (or any oaty biscuit), Digestives, or graham crackers.
Scones here are more or less the equivalent of what the Americans call biscuits. They are favourite staples of afternoon teas. I love to have them with some clotted cream and strawberry jam plus a steaming cup of Earl Grey. They are one of the more easier quickbreads to make. So easy even my daughters can make them without my help at all.
One of the secrets in making a flaky, fluffy and well-risen scones is by using buttermilk. It reacts with the baking powder in the self-raising flour to give us light and airiness in the scones. Also when rubbing the butter into the flour, lift it a little bit to incorporate more air in the mixture. The other one is in dipping the cutter in flour before cutting into the dough. If it's not well floured it tends to crimp the edges which prevents it from rising well.
This particular recipe is adapted from Angela Nilsen's The Ultimate Recipe Book. I reduced the milk to make it less sticky and increased the sugar a little for more sweetness.
Buttermilk Scones
450 g self-raising flour
1/2 tsp fine salt
75 g [5 Tbsp] caster sugar (superfine)
100 g chilled butter
1 cup buttermilk
1/4 cup milk
a little flour for dusting
- Preheat oven to 220°C/fan 200°C/425°F/gas mark 7. Lightly grease a baking sheet.
- Mix flour and salt in a bowl.
- [Optional] Cut butter into small pieces.
- Add butter to the flour mixture and using a pastry cutter or two butter knives, cut the butter into the flour mixture until they are pea-sized. Then shift to using your fingers and rub the butter and flour mixture lifting as you go along to aerate the mixture until it more or less resembles bread crumbs. Try not to over rub as the scones will be lighter if the mixture is a bit flaky.
- Add sugar and mix well.
- Mix the buttermilk and milk. Make a well in the middle of the flour mixture and pour the buttermilk mixture in it.
- Gently mix them together until it forms a soft and sticky dough.
- Put the dough in a lightly floured surface and knead 3 or 4 times only to get rid of the cracks. Do not overwork the dough or it will become tough.
- Pat the dough gently to a thickness of about 1-inch. Dip a 2-1/2 inch round fluted cutter in flour and cut out the scones by pushing down quickly without twisting. Make sure to dip the cutter in flour every time before cutting through the dough.
- Cut out the rest of the dough by gathering the trimmings lightly then patting to 1 inch thick again.
- Place in the baking sheet and sift a light dusting of flour on top or glaze with beaten egg. Bake for 10-12 minutes or until well risen and golden.
- Cool on a wire rack uncovered for crisp tops or loosely covered with a tea towel if you prefer it soft.
- Serve with clotted or whipped cream and strawberry jam.
 We usually go for something different on either Christmas lunch or dinner. In the last one we had the kid's favourite roast rib of beef for lunch so I thought of keeping it a little lighter for dinner.
Often salmon is dealt with in our kitchen by grilling it. This time it is baked with some veggies stuffed in it. I think it still needs a little more seasoning although my husband it was just right. Anyway he said we always have a dipping dish of soy sauce and lemon on the side. However as a variation, this dish can be marinated first with teriyaki sauce to make the salmon more flavoured. But forget my gripes, I highly recommend this as an alternative to your usual turkey or beef roasts.
This was adapted from the Good Housekeeping magazine from the mid 90s. Enjoy!
Roasted Teriyaki Salmon
4 spring onions
225 g asparagus (optional) - halved lengthwise
225 g carrots - peeled and julienned
225 g leeks
1 large red or orange bell pepper
3 garlic cloves - finely minced
50 g canned water chestnuts - julienned or roughly chopped
4 Tbsp olive oil
1/4 cup teriyaki sauce*
2 salmon tail fillet (about 1.8 kg in weight) - skin on and scaled
sea salt flakes
fresh ground pepper
- Cut off the ends of the leek and into about 4-inch lengths crosswise then cut into julienne strips.
- De-seed the bell pepper and cut into julienne strips.
- Heat 2 Tbsp of oil in a wok. Saute the garlic for a few seconds.
- Stir fry the rest of the vegetables for 2-3 minutes.
- Add in the teriyaki sauce and cook for about 1 minute.
- Remove from pan and set aside to cool.
- Preheat the oven to 200°C/fan 180°C/400°F.
- Put the salmon fillets cut side up on a work surface. Sprinkle some teriyaki sauce, sea salt and pepper on them.
- Place the cooled vegetable on top of one then cover with the other salmon fillet, cut side down.
- Tie the salmon tightly together at intervals using cotton strings.
- Brush the of the salmon on top with the rest of the olive oil and sprinkle with sea salt and pepper.
- Put the salmon in a roasting pan and bake in the oven for 20-25 minutes or until cooked through.
- Remove from oven and put under a hot grill (or increase the oven to 250°C/fan 230°C/490°F) for 2-3 mins to brown the salmon.
- To serve, cut into thick slices and with lemon and soy sauce.
*Notes: - You may use store-bought teriyaki sauce.
- This can be prepared ahead by doing to end of step 10 up to one day ahead. Chill in the fridge until ready to use.
- When baking from chilled, cook for 35-40 mins.
- The salmon may also be marinated with the teriyaki sauce for about 15 minutes to increase flavour.
 This was intended as an entry for the SHF #38 with a theme of pudding. I thought the deadline was end of the month I forgot that this is a Friday event. Duh! So I missed it again as I always do ... arrrgggghhhh!
Nevermind, I still want to include this in my list of recipes here as a reference for moi. For I have found my ultimate sticky toffee pudding - at last! I first sighted this in the Good Food magazine as far back as 2006. I have made this before but just forgot (there's that word again) to take a picture. So Christmas dinner this year provided the perfect excuse to indulge in our most favourite of all puddings.
Among the commercial varieties the only one that pass my family's finicky taste is Marks & Spencers. My husband buys only their sticky toffee pudding when he occasionally hankers for one. The rest of the store-bought ones didn't get enough points for us to buy a second time.
This type of pudding is typical of traditional British ones. Though upon research I found out that it was anything but ancient. There is controversy regarding its origins. Some say it's from a Lake District hotel some say it's from somewhere else. In any case, hats off to whoever it was for inventing a totally addictive pud.
When I was making this I realised that the most important bit is really the toffee sauce. Once you get the right balance of the ingredients for the sauce, it does not matter whether the pudding itself does or not have any dates in it. Actually I think even if you have just plain sponge as a base but have the perfect toffee sauce then it is all well and good exactly like the better store-bought ones.
The recipe is very good and easy to do. My only gripe is the black tracle in the toffee sauce causes it to turn a slight greyish tint when it cools off which can be a little off-putting for some people. So I'm recording that down as optional. I highly recommend this especially when served warm with cream or custard. Yum!

*Pudding:
200 g pitted and chopped dates
2/3 cup boiling water
1 tsp vanilla extract
2 eggs
175 g self-raising flour
1 tsp bicarbonate of soda (baking soda)
85 g butter - softened
140 g demerara sugar
2 tbsp black treacle or dark molasses
1/3 cup + 1 1/2 Tbsp milk
cream or custard to serve
*Toffee Sauce:
175 g light muscovado sugar
50 g butter
1 cup double cream
1 Tbsp black treacle or dark molasses (optional)
- Pour the boiling water on the dates in a bowl. Let soak to soften for at least 30 minutes. Mash the dates with a fork or puree with a liquidiser. Set aside.
- Pre-heat the oven to 180°C/fan 160°C/350°F/gas mark 4. Butter and flour seven small pudding molds or cups (about 200 ml in size).
- Mix the flour and bicarbonate of soda well. Set aside.
- Cream the butter and sugar with an electric mixer for several minutes.
- Add eggs one at a time mixing well after each addition.
- Beat in the vanilla extract, then the black treacle.
- Using a large metal spoon, fold in one-third of the flour mixture alternately with half of the milk while making sure not to overmix. Repeat until all the flour and milk are used.
- Add in the mashed dates and stir until just incorporated.
- Divide the batter evenly among the seven pudding molds. Place molds on a baking sheet and bake for 20-25 minutes.
- Remove from the oven, cool for a few minutes then loosen them by running a butter or pallet knife on its side. Turn out from the molds to cool completely.
- While the pudding is baking, make the sauce by combining the sugar, butter and half of the double cream in a saucepan.
- Bring to boil in medium heat while stirring all the time until sugar has dissolved.
- (Optional) Stir in the black treacle if using.
- Let it simmer away for about 2 minutes while stirring from time to time making sure it does not burn.
- Remove from heat then stir in the rest of the double cream.
- To serve, pour the sauce over the upturned pudding in individual plates or bowls with cream or custard.
*Note: The pudding will taste even better if it sits in the sauce for a day or two. Cover the bottom of a baking dish with some of the sauce. Sit the upturned puddings on the baking dish and pour the rest of the sauce over it. Cover with a loose tent of foil so it will not smudge the sauce.
To reheat, you can put the covered baking dish in a 180°C/fan 160°C/350°F oven for 15 minutes. Though I prefer to microwave the individual puddings because baking tends to dry out the sauce a little making it a tad sweeter than I would like it to be.
Here's a recipe for fish fillets with a healthy dose of veg. The sauce is mild and not overpowering at all. Such a nice detour from the usual spicy or strong flavoured dishes we do with fish fillets. I got this from my good 'ol favourite Chinese Cuisine by Huang Su-Huei.
Fish Fillet with Broccoli
500 g white fish fillet
1 Tbsp cooking wine
1/2 tsp sea salt flakes
1 egg white - beaten lightly
1 1/2 Tbsp cornstarch
oil for frying
1 green onion - cut into 1/2-inch slices
6 slices ginger root - julienned
250 g broccoli - cut into small florets
*Sauce:
1 tsp sea salt flakes
1 tsp sugar
dash of black pepper
dash of sesame oil
5 tbsp water
1 1/2 Tbsp cornstarch
- Mix all the ingredients for the sauce in a small bowl and set aside.
- Steam the broccoli for about 3 minutes or until just cooked. Set aside.
- Score the fish fillet lightly in criss-cross pattern.
- Cut the fillets in bite-sized pieces.
- Add cooking wine and salt. Mix well.
- Add in egg whites - mix.
- Add the cornstarch - mix again. Set aside for a few minutes.
- Heat a non-stick pan with about 1 1/2 Tbsp oil.
- Before frying add 2 Tbsp oil into the fish mixture and mix well.
- Once the pan and oil is hot, fry the fish fillets in batches until cooked.
- In a wok, heat about 2 Tbsp oil.
- Stir fry the green onion and ginger for about 30 seconds.
- Add in the broccoli. Stir fry for about 30 seconds until heated through.
- Add the fried fish fillets and the sauce.
- Turn the heat to high and stir quickly to mix.
- Remove from heat and dish up.
 The 21st edition of Lasang Pinoy is brought to you by Bryan of Fire Water Husband (blog under renovation) who has this great idea of Cooking for Heroes. It's just as well that our current logo features the exact hero I want to cook for - Andres Bonifacio.
Even in my elementary school days I feel our dear old Andy Boni got a raw deal. I do believe he should be our national hero for he started the Katipunan, he started the ball rolling to begin the revolution and break free from the colonial masters. And what did he get for all his heroism and troubles? He got salvaged (executed) for being a rival party in the election for the head honcho of the revolutionary government. Then he lost out again almost a hundred years later in being a national hero. If that's not a raw deal I don't know what is.
It's no use arguing now about his place in history but what is undeniable is his courage, heroism, and his love of his country and fellow Filipinos. To you Andres, a big lambanog toast for being a real Pinoy! Thank you for all the things you have done for us.
What I have in mind to cook for him is something that can be considered essentially Filipino and at the same practical and nutritious for a revolutionary who had to eat on the go. And I thought why not our classic pancit. It's a complete meal in itself. It's got carbs, protein from the meat, and some wholesome veggies thrown in the process. Sounds like a good idea to me. :)
For the pancit recipe itself, this is the culmination of several years of my family's sacrifice of eating pancit as soggy and undercooked or dry and a bit tough or almost tasteless (prompting lots of toyo and lemon juice heaped on it). It took me awhile to get the hang of cooking the noodles just right. There is also the case with the oil, I used to put as little oil as possible while at the same time wondering what makes my mother's pancit well separated and really nice. Well I increased the oil exponentially with each batch - et voila! The oil is crucial! (I bet my doctor's not happy about this.) Too little will make it dry (obviously) and will tend to make it clump together. I also took my mother's advice of cooking the veggies separately to prevent it getting soggy. So like most dishes, cooking pancit successfully has a lot to do with timing. One revelation as well is that the richer your stock the better tasting your pancit will be. That my friend is guaranteed. :)
Pancit Bihon Guisado
250 g thin or medium rice noodles (bihon)
3 Tbsp oil
1 Tbsp minced garlic
1 medium onion - sliced
1/3 cup jullienned carrots
1/4 cup sliced celery (optional)
15 pieces mangetout (sitcharo)
1 cup shredded cabbage
1 cup sliced meat - chicken, pork, shrimp or combination of these*
1 1/2 cups rich stock
2 Tbsp dark soy sauce
freshly ground pepper
salt
additional stock or water
- Soak the noodles in tepid water for about 20 minutes or until soft. Using scissors, cut into desired lengths. Drain and set aside.
- In a wok, heat 1 Tbsp of the oil in medium heat. Saute half of the garlic and half of the onions.
- Add the meat and stir fry a little. Season with salt and pepper.
- Add about 1/4 cup stock or water and simmer until done. You may have to add a bit more stock from time to time to keep it from drying out.
- When the meat is done, add the carrots, mangetout, and celery. Stir to combine. There should still be some liquid in the wok if not add about 2-3 Tbsp stock and then cook under cover for 2 minutes.
- Add the cabbage, stir fry for a few seconds and cook under cover for 1 minute.
- Remove from heat and transfer to a dish. Set aside.
- Using the same wok (no need to wash unless there's some burnt crust in the bottom), heat the remaining 2 Tbsp oil on medium heat.
- Saute the remaining garlic and onion until onion is translucent.
- Tip in the stock and any sauce drained from the meat and veg mixture.
- Add the soy sauce and season with black pepper.
- Bring to boil then add the noodles. Cover and bring to boil again then lower heat to medium-low.
- Once the sauce starts getting absorbed by the noodles (about 5 minutes), toss and stir the noodles (preferably with large forks for easier tossing) until all the sauce is absorbed and the noodles are fully cooked. The tossing also make sure that the strands are separated and do not clump together. Don't worry if the bottom is getting a bit crusty. At the end there should be no sauce left but the noodles should still be moist, cooked but not soggy.
- Add half of the meat/veg mixture and toss to mix.
- Dish up and transfer to a dish. Top with the rest of the meat/veg mixture. Serve with calamansi or lemon on the side.
*Note: You may use precooked meat in which case add it in at the same time as the carrots and mangetout.
The short-lived summer here UK is only alleviated by the onslaught of fresh seasonal vegetables. One of my favourites - green peas - is a very much welcome addition to our table anytime. I tell you frozen peas is no match to the sweetness of fresh green peas especially if it's freshly picked right off your garden. I'm still trying to find the numerous ways of cooking it though this marriage with prawns is not bad at all. In fact, it's more than good because in all its simplicity I love it! This is adapted from my all-time trusted Chinese Cuisine by Huang Su-Huei.
Stir-fried Prawns With Peas
250 g raw prawns or shrimps - shelled and deveined
1 tsp cooking wine
1 Tbsp egg whites - slightly beaten
1 Tbsp cornstarch
1 green onion - cut into 1-inch pieces
6 slices of ginger root
1 cup green peas - precooked
oil for frying
*Sauce:
1 tsp cooking wine
1 tsp sesame oil
1/8 tsp salt
2 tsp cornstarch
1/4 cup water
ground black pepper
- Combine all sauce ingredients in a container. Set aside.
- Place prawns in a bowl and season with salt.
- Add cooking wine, egg whites, and cornstarch. Mix well.
- Heat a wok then add about 2 Tbsp oil. Swirl the wok around so the oil coats it well.
- Fry the prawns in medium heat for about 3 minutes. Remove from the wok and set aside.
- Put 1 Tbsp oil in the wok, heat up and stir fry the green onions and ginger over medium heat.
- Add the prawns, stir fry for a few seconds.
- Add the sauce, turn heat to high and stir fry quick just enough to mix.
- Dish up and serve.
In my first few months here in UK (back in the mid-90s), I missed Asian food so much that I was always scouring the aisles of our local supermarket for anything mildly Oriental or Southeast Asian. You could just imagine my delight when I saw a stack of fresh pineapples (pinya or piña in Tagalog/Spanish) in our local supermarket. What's more, it's got a sign saying that they will peel it for free. I thought that would save me a lot of effort and time so off I went and bought one. The lady on the counter got my pineapple, chopped off the top and bottom, sat it on a metal contraption with a big lever. Then she got hold of the lever pulled it down in one big motion - whoosh! Out came my pineapple in a perfect cylindrical shape with a hole in the middle looking exactly like what you get from cans. Well, at least it was done in no time at all but I have to lament the large amount of wasted pineapple! I'm one person who hates waste and I was just flabbergasted with how much was taken off it.
As an alternative I'll show you how pineapple is peeled in the Philippines wherein you can get the most out of your 'multi-eyed' fruit. See the series of pictures below on how you can peel your pineapple. It may take a bit more time but the satisfaction of having a more aesthetically pleasing and less wasteful way of doing things will surely encourage you to try this.
[Click on the pictures for a bigger view]
First off you start with your pineapple. Have a chopping board and a sharp knife ready.
Chop off both ends. If you're using this as a centre-piece in a buffet table, don't take off the leafy end to make it more interesting and exotic looking plus making sure that the bottom is level.
Now slice off the skin from top to bottom taking off just enough to expose the flesh.
Once you have peeled off all of the skin you will be left with just the 'eyes' or 'dots' that go deep into the flesh. We're now ready to connect the 'dots'. The idea is to remove the eyes without cutting out too much of the flesh. If you have a melon baller you can scoop out the eyes one by one thereby making it even less wasteful. But if you only have knife read on ...
If you notice the eyes are arranged by nature so that they have natural diagonal alignments. The lines they form are either slanted left to right or right to left. Choose one of the lines to follow (I usually take the less slanted one). Now, connect the eyes along the line that you chose by making a V-shaped canal with your sharp knife (usually you connect two eyes at a time).
Do this for all the eyes until you get a nicely patterned fruit as shown above.
To serve, slice vertically along the core of the pinapple into wedges. Best served chilled with a little salt on the side. Yum!
An easier tag I have from Stel had me quickly tapping on the printscreen key. Here is my/our current desktop screen ... well actually the picture changes every 4 hours. See we got this neat Magentic software that provides these great background pictures and screensavers. We highly recommend it and the best bit of all is it's free!
The icons I usually click above are Mozilla and iTunes. How's that - music while surfing. :)
I like colourful and calming or funny pictures as my wallpaper on screen hence this Zen-like peaceful image.
Gee, I'm supposed to tag five other people but I don't have any energy left to bloghop around. So if any of you bloggers reading this want to show your current screens, consider yourself tagged.
My Desktop Free View Instruction:
A. Upon receiving this tag, immediately perform a screen capture of your desktop. It is best that no icons be deleted before the screen capture so as to add to the element of fun. :glasses-slip:
You can do a screen capture by:
[1] Going to your desktop and pressing the Print Scrn key (located on the right side of the F12 key).
[2] Open a graphics program (like Picture Manager, Paint, or Photoshop) and do a Paste (CTRL + V).
[3] If you wish, you can “edit” the image, before saving it.
B. Post the picture in your blog. You can also give a short explanation on the look of your desktop just below it if you want. You can explain why you preferred such look or why is it full of icons. Things like that.
C. Tag five of your friends and ask them to give you a Free View of their desktop as well.
D. Add your name to this list of Free Viewers with a link pointing directly to your Desktop Free View post to promote it to succeeding participants. English PatisBabyrambutanThesserieiRonnieDom LawrenceRebeccaBlue PanjeetRevolution MotionKauderwelschA Dialogue With KTales Of A Melodramatic Moron

Here are some pictures from that family outing (click on the picture for a larger view):
After paying our reasonably priced entrance fees, we each got tagged with a red wrist band. J3 said she felt like a pigeon (maybe a homing one at that).
The Soil Association is the organiser of this whole extravaganza.
Here's a view of the harbour and foot bridge at the back of the festival ground.
The one stall I forgot to take picture of is an umbrella-shaded wheeled cart with a young lady giving free Yeo Valley strawberry yoghurt. My daughters loved it so much that we kept coming back to get more from the patient lady. Between us we might have consumed more than a dozen sachet tubes! Other big organic companies were in attendance as well:
There are of course more of smaller producers represented in the different stalls:
One of the most favourite stall (it certainly was mine) is Green & Black's chocolates. They were giving out whole chocolate mini bars in big volumes! They were not even breaking them up in little pieces. You should see how they disappeared once the staff laid down one plateful of these gorgeous chocs.
My husband and youngest (J3) love cheese so it's just natural that they gravitate to the cheese stalls. One such interesting stall is Villanova Food where J3 particularly requested for a chunk of Grana Padano to buy.
I took the opportunity to buy some organic sirloin steaks at a discount (they were doing a buy 2 get 1 free promotion). And Brown Cow's steaks did not disappoint at all. We cooked them on a stove top grill right after we arrived home. It was one of the best I've tasted ever, very tender and flavourful. My only regret was I only bought three thinking my kids won't finish theirs like they normally do. But as it turned out everyone enjoyed it very much that all had clean plates. :)
There was also a kitchen demonstration tent where the likes of Sophie Grigson and Darina Allen did some cooking demos.
Besides food stalls, there are also other non-food organic stalls that were promoting or selling things like plants and herbs, toiletries, clothes, cleaning products, etc.
It's good that they provided entertainment as a minor distraction from all the wonderful food around. Here is the band The Courgettes dishing out funny food-related adapted songs like 'Beat It' which turned out into 'Eat It'. I must say they were good.
A different type of music were performed by the Bollywood Brass Band at the main Millenium Square stage.
We had a good day out that Saturday despite the overcast skies. I just wish the delicious organic food and produce were all more affordable. Well, just goes to show you can't have the best of both worlds.

Early this year my good blogger friend from Boston gave me Mario Batali's Molto Italiano a real gem of a cookbook. Stella must have known that we're a big fan of Italian cooking and what a great gift it is. Full of authentic Italian recipes, you know, the kind that Italian women traditionally cook at home for their families.
My son was nagging me to make this and since I have a batch of lasagna pasta to use up I decided to give it a go. Just a few modifications and alterations later I could say we've successfully adapted Mario's recipe. Actually my favourite of the whole lot is the basic tomato sauce which I like so much I froze the leftovers for use another day.
First you make the basic tomato sauce and beschamel sauce:

2 Tbsp olive oil
1 onion - diced
4 cloves garlic - sliced
1/2 cup finely chopped carrots
3 Tbsp chopped fresh thyme or 1 Tbsp dried thyme
2 x 400 g cans of plum tomatoes or chopped tomatoes
- In a big saucepan, heat the olive oil on medium heat.
- Saute onion and garlic until soft and translucent - about 6-7 minutes.
- Add carrot and thyme; cook for another 5 minutes or until carrot is soft.
- Add the tomatoes and bring to a boil.
- Lower heat and simmer until thick - about 20 minutes. Season with sea salt.
- This can be stored in the fridge up to 1 week or frozen up to 6 months.
Bechamel Sauce
1/4 cup plain flour
5 Tbsp unsalted butter
3 cups whole milk
1 tsp ground sea salt
1/4 tsp freshly grated nutmeg
- Heat a saucepan over medium heat then add butter to melt.
- Add the flour and stir until smooth. Continue cooking until light brown while stirring. This will take about 5 minutes.
- Stir in the milk 1 cup at a time. Bring to a boil while whisking constantly until smooth.
- Cook for about 10 minutes or until thick while still whisking constantly.
- Remove from heat and season with the salt and nutmeg.
- Let cool completely. You may transfer to another container, cover and refrigerate until ready to use.
Cannelloni
(Cannelloni al Forno)
1 Tbsp butter
250 g minced pork
250 g minced veal or beef
3/4 cup grated parmesan cheese
1 cup whole milk
1 Tbsp flour
1 large egg - beaten
1/2 tsp ground sea salt
pinch of freshly ground nutmeg
black pepper
lasagne pasta sheets
1 1/2 cup tomato sauce
1 cup bechamel sauce
stock
- Cook lasagne pasta sheets according to instructions. Drain and lay flat on kitchen towels.
- In a medium sauce pan, melt the butter on high heat.
- Add the meats, cook stirring to break up any lumps until browned.
- Add salt and a little stock. Bring to boil then simmer for 20 minutes, stirring from time to time. At the end of 20 minutes there should be very little juice left in the pan.
- Stir in the milk, 1/2 cup parmesan cheese, and flour. Bring to a boil then reduce heat and cover to simmer for another 15 minutes, stirring frequently.
- Remove from heat and cool completely.
- Add the egg, season with nutmeg and black pepper. Set aside.
- Preheat oven to 350°F/180°C/fan 160°C.
- Put about 3 Tablespoonful of meat filling along the long side of a cooked lasagne sheet. Roll up the pasta around the filling to form a log or cylinder. Repeat with the rest of the pasta and fillings.
- Spread about 1/3 of the tomato sauce on the bottom of a wide baking dish. Arrange the cannelloni 'logs' seam side down in the single layer in the baking dish.
- Top with the remaining tomato sauce and then with the bechamel sauce. Finally sprinkle the remaining parmesan cheese on top.
- Bake in the oven for 25 minutes until the sauces are bubbly and the pasta edges are crisp and brown. Serve hot.


