I love nuts and its but natural to have them as often as I can even among savoury food. One staple Chinese take away dish that I really enjoy is the stir-fried chicken with cashews. I found this recipe in my trusted Chinese Cuisine by Huang Su-Huei and decided to give it a go. It is quite good if I may say so myself although I think I would increase the sauce to double it the next time.
Chicken with Cashews
500 g boneless chicken meat - cut into bite-sized pieces
2 green onions - cut into 1-inch pieces
1 cup diced cucumbers
1/2 cup cooking oil
1 cup fried cashews
*Marinade:
1/4 tsp fine sea salt
1 Tbsp cooking wine
1 1/2 Tbsp cornflour (cornstarch)
1 1/2 Tbsp water
1 Tbsp cooking oil
*Sauce:
1/2 tsp fine sea salt
1 tsp sugar
dash of black pepper
dash of sesame oil
6 Tbsp water
2 tsp cornflour (cornstarch)
- Combine the sauce mixture and stir to dissolve the salt and water. Set aside.
- Combine marinade and stir to dissolve the salt. Add chicken and marinate for about 15-20 minutes.
- Add in the cornflour, water, and 1 Tbsp cooking oil to separate the meat.
- Heat the 1/2 cup cooking oil in a wok and fry the chicken in medium heat for about 3-4 minutes or until cooked and golden brown. Set aside.
- Remove the oil from the wok but retain about 1 Tbsp in it. Reheat and stir fry the green onions until aromatic.
- Add in the cucumbers and stir fry for about 1 minute.
- Stir in the chicken and cashews and stir for a few seconds.
- Add the sauce and stir until thick and covers all the ingredients. Dish up and serve.
I saw this in the latest edition of the Good Housekeeping magazine and thought how seasonally appropriate it is. The cake came out quite nice especially if served with some custard. Although I thought the cake itself is quite crumbly so I adjusted the milk in the recipe to 1/4 cup. This is highly recommended for your afternoon tea and to use up your strawberries.
The picture is not particularly stellar because I honestly thought it would not taste good so I didn't expend much effort in getting a better image. How wrong I was!
Strawberry Streusel Loaf
175 g [scant 3/4 cup] unsalted butter - softened
175 g [scant 1/2 + 1/3 cup] caster sugar
2 large eggs
250 g [scant 2 cups] self-raising flour
1/4 cup milk
grated zest of 1 lemon (optional)
200 g strawberries - hulled and quartered
*Streusel Topping
20 g [4 tsp] unsalted butter - chilled
20 g [scant 3 Tbsp]
1 Tbsp demerara sugar
1 Tbsp chopped roasted hazelnuts
- Preheat the oven to 180°C/fan 160°C/350°F. Grease a 9x5-inch loaf pan.
- Beat the butter and caster sugar until light and fluffy.
- Add the eggs one at a time until well combined.
- Using a spatula or wooden spoon, fold in the flour and lemon zest (if using), then milk until well combined.
- Spread 1/3 of the batter in the prepared pan. Scatter half of the strawberry on top of it.
- Repeat once more ending with the streusel topping.
- Bake for 1 hour or until a skewer poked in the middle comes out clean.
- Cool in the pan for about 10 minutes. Remove from pan and cool completely on a rack.
It's blueberry time again. Every year this time of summer there is a glut of blueberries in the grocery aisle. I thought of baking this with a new recipe from my reliable The New Best Recipe cookbook. I readily found out after taking the muffins out of the pan that I needed paper cases for these. They soon began listing on one side due to collapsing blueberries as they cooked and the cake itself was quite soft which really was not a problem. It was just some aesthetic thing. The topping, by the way, is optional. You can eat straight from the oven as is or put on some topping of your choice.
Blueberry Muffins
260 g [2 cups] plain flour
1 Tbsp baking powder
1/2 tsp fine salt
1 large egg
200 g [1 cup] granulated sugar
60 g [1/4 cup] unsalted butter - melted
300 g [1 1/4 cups] sour cream
200 g [heaping 1 cup] fresh blueberries
*Topping 1:
50 g [1/4 cup] granulated sugar
1/4 tsp ground cinnamon
melted butter
*Topping 2:
50 g [1/4 cup] granulated sugar
1/4 cup lemon juice
lemon zest
100 g [1/2 cup] sugar
- Preheat oven to 180°C/fan 160°C/350°F. Grease a 12-cup muffin pan or line with paper muffin cases.
- Mix the flour, baking powder, and salt in a bowl.
- In another bowl, whisk the egg then add the sugar. Mix well.
- Add the butter and then the sour cream. Mixing well after each addition.
- Stir in the blueberries into the flour mixture and stir to combine.
- Using a spatula, add the flour mixture into the egg mixture. Mix just enough to combine.
- Divide the batter in the prepared muffin tin.
- Bake for 25-30 minutes.
- Cool in pan for about 5 minutes. Remove from pan and cool on a wire rack.
- *For topping 1: While still warm, brush melted butter on top and dip in the combined sugar and cinnamon.
- *For topping 2: Combine the lemon zest and 1/2 cup sugar, set aside. Cook the lemon juice and 1/4 cup sugar in a saucepan over medium heat until the sugar is dissolved. While the muffins are still warm, brush top with the lemon syrup and then dip the top into the lemon sugar.

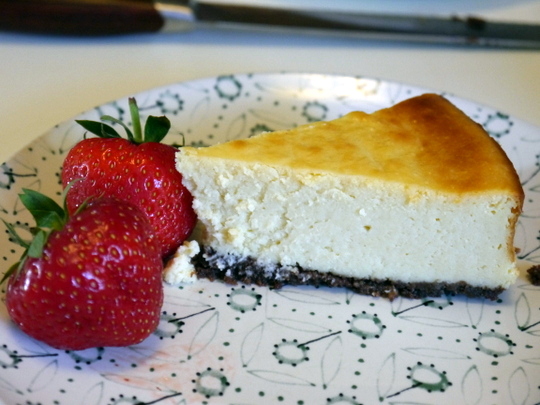
I got this from bonus recipe card from the BBC FoodFood magazine years ago. We paired it with sweet English strawberries which are very much in season today. I only ever buy English strawberries and only when it is in season which is around late May to August.
This is a baked cheesecake compared to some of my other cheesecake here in this blog which required no baking. Maybe later I would try baking this in a waterbath.
White Chocolate Cheesecake
*Base:
12 chocolate digestives (or graham crackers)
85 g [1/3 cup] butter - melted
2 tsp cocoa powder
1 Tbsp caster sugar (superfine)
*Filling:
900 g cream cheese (room temperature)
4 eggs
3 Tbsp plain flour
200 g [scant 1 cup] caster sugar
1/2 tsp vanilla extract
100 g white chocolate - finely grated
*Topping:
2-3 chocolate flakes (optional)
icing sugar (optional)
- Preheat oven to 180°C/fan 160°C/350°F. Grease and line the bottom of a 23 cm/9-inch springform pan.
- Crush the digestives by putting it in a plastic bag and then bashing it with a mallet or rolling pin.
- Mix the crushed biscuits with the rest of the base ingredients. Pour this in the prepared pan. Press the mixture with the back of a spoon to cover the bottom of the pan.
- Bake in the oven for 5 minutes. Remove from oven and cool.
- In a big bowl, combine all the filling ingredients with an electric mixer until well combined.
Pour mixture on top of the biscuit base in the pan.
- Bake for 50 minutes until almost firm but with a slight wobble in the middle.
- Remove from oven and cool completely in the pan.
- To serve, remove the cheesecake from the cake pan.
- [Optional] Dust the cheesecake with icing sugar. Break a few pieces of the chocolate flakes on top.

This is this year's birthday cake for myself. Very nice, moist and chocolatey. I especially like the cream cheese icing. I think I prefer it chilled straight from the fridge since the icing is on the soft side when at room temperature which caused a bit of problem when I brought it to work for my colleagues. The cling film covering it stuck on it so much that it didn't look too appetising.
This recipe is from my favourite epicurious.com food website
Sour Cream Chocolate Cake
195 g [1-1/2 cups] plain flour
3/4 cup cocoa powder
3/4 tsp bicarbonate of soda
1-1/2 tsp baking powder
1/2 tsp fine salt
1 cup sour cream
1/3 cup water
2 tsp vanilla extract
250 g [1 cup] unsalted butter - softened
270 g [1-1/3 cups] light brown sugar - firmly packed
3 large eggs
*For icing:
185 g [3/4 cup] unsalted butter - softened
250 g [1 cup] cream cheese - room temperature
115 g dark chocolate (70% cocoa) - melted and cooled
1 tsp vanilla
2 cups icing sugar - sifted
- Preheat oven to 180°C/fan 160°C/350°F.
- Grease and flour two 9-inch pans or 13 x 9-inch baking pan.
- Sift all the dry ingredients into a bowl. Set aside.
- Combine the sour cream, water, and vanilla in another bowl. Set aside.
- In a large bowl, using an electric mixer, beat butter and brown sugar until fluffy.
- Add eggs one at a time making sure to beat well after adding.
- Add flour mixture in batches alternating with the sour cream mixture beating well until well blended.
- Pour and spread the batter equally between the pans and smooth the top.
- Bake for 25 - 30 minutes for the 9-inch pans (40 minutes for 13x9-inch) pan or until a skewer poked in the middle comes out clean.
- Cool in pans for about 10 minutes. Turn out in rack and cool completely.
- Cake layers can be made 1 week ahead and frozen, wrapped well in plastic wrap. Thaw layers before putting on the icing.
*For the icing:
- Cream butter and cream cheese until light and fluffy.
- Add remaining ingredients and beat until well combined.
*To assemble:
- Lay first layer on the cake plate and spread some icing on it.
- Top with the second layer and spread the rest of the icing on top and around the cake.
I never knew that making pilau rice is so easy. Probably the only thing hard about it is assembling the myriad spices you need. Pilau rice, if you must know, is the spiced fragrant rice accompanying Indian dishes. There so many variations of it much depending on how colourful or how much spices you want in it.
I love how easy it is to cook this resulting in fluffy and soft fragrant rice. Highly recommended!
Pilau Rice
250 g [1-1/3 cups] basmati rice
2 2/3 cups water
1 Tbsp ghee or cooking oil
1 small onion - finely chopped
1/2 tsp fennel seeds
1 cinnamon stick - halved lengthwise
2 cardamon seeds - squashed open
3 cloves
2 tsp ground turmeric
2 bay leaves
- Wash and drain the rice several times with cold water then soak for 30 minutes.
- In a saucepan with a tight fitting lid, heat the oil and saute the onion in medium heat until soft (about 5 minutes).
- Add the rest of the spices until fragrant.
- Drain the water from the soaked rice and add the rice to the saucepan and stir to coat with the sauteed spices and oil.
- Add the water, stir, cover saucepan and bring to boil. Lower heat to simmer for 10 minutes.
- Turn off heat and keep covered and leave to steam for 15 minutes.
- Fluff up the rice with fork and serve while hot.
*Note: You can use rice cooker cup to measure the rice and water (1 rice cooker cup = 2/3 cup). The ratio is 1 cup rice to 2 cups water.
Okay I'm not too familiar with this Parmesan Chicken over on this side of the pond. I would assume this is name is popular over in the US. Over here it is called other things like chicken schnitzel or escalope. They may or may not have parmesan cheese but sure does make it very tasty. Some other variations of these involves brining the meat and also putting some tomato sauce and mozarella on top before grilling it for a few minutes. So those would be my next experiments in the mean time I leave you this recipe which I got from the lovely Ina Garten over at the Food Network.
Parmesan Chicken
(Chicken Escalope / Schnitzel)
2 chicken breasts
65 g [1/2 cup] plain flour
1/2 tsp fine sea salt
1/4 tsp ground black pepper
1 large egg
1 1/4 cups breadcrumbs
1/4 cup grated parmesan cheese
olive oil
unsalted butter
- Butterfly each of the chicken breast into two thin pieces. Pound each piece so that it will be about 1/4-inch thick.
- Combine the flour, sea salt, and black pepper. Set aside.
- Beat the egg with a teaspoon of water.
- Combine the breadcrumbs and parmesan cheese. Set aside.
- Dredge the pieces in flour then dip in the egg and then finally coat it with the breadcrumb mixture.
- Heat 1 Tbsp of the butter and 1 Tbsp of the olive oil in a pan. Fry the battered chicken pieces in the pan on medium-low heat of about 2 minutes each side.
- Serve with green leafy salad with vinaigrette.
Here's another version of the classic chocolate chip cookie with emphasis on being thick and chewy. This recipe is adapted from The Best New Recipe of Cook's Illustrated. There is an optional step on chilling the dough to make it spread less when baking. I prefer to chill it after balling it since it is easier to do so rather than the other way around.
Thick and Chewy Chocolate Chip Cookies
300 g [2 1/2 cups] plain flour
1/2 tsp bicarbonate of soda
1/2 tsp fine salt
185 g [3/4 cups] unsalted butter - melted
200 g [1 cup packed] light or dark brown sugar
70 g [1/3 cup] granulated sugar
1 egg + 1 egg yolk
2 tsp vanilla extract
200 g [about 1 1/2 cups] chocolate chips
- Pre-heat oven to 180°C/fan 160°C/350°F. Grease or line baking sheets with baking paper.
- Combine the flour, bicarbonate of soda, and salt in a small bowl until well mixed.
- Mix, either by hand or electric mixer, the butter and sugars until well combined.
- Add eggs and vanilla and mix until well blended.
- Add the dry ingredients until combined.
- Add the chocolate chips with a wooden spoon and stir until combined.
- Roll the dough into 1 1/4-inch (about 50 g) balls.
- [Optional] Chill the dough balls for about 2 hours or until firm.
- Arrange dough balls on the baking sheets about 2 inches apart.
- Bake for about 11 minutes or until the outer edges start to brown and the centres are still soft and puffy.
- Cool the cookies right in the baking sheets for about 5-10 minutes.
- Remove from the baking sheets with a wide spatula and cool completely on a rack.
Tried jazzing up the brownies with fruit and nuts. So I got this recipe from the BBC Good Food magazine of years gone. I don't even know what month and year it came out. All I had is the torn out page with the recipe. It turned out quite nice being a quite different variation of the usual brownies. Although I noticed that it isn't as popular as the ubiquitous intensely chocolatey brownies. Nevertheless, quite a good change from the usual especially if you have some dried fruits and nuts to use up in your pantry.
Cranberry Pistachio Brownies
200 g [1/2 cup + 1/3 cup] butter
300 g dark chocolate (at least 50% cocoa content)
300 g [1-1/2 cups] light muscovado sugar
4 Tbsp milk or cranberry juice
4 medium eggs
200 g [1-1/2 cups] plain flour
1/2 tsp ground cinnamon
80 g dried cranberries
100 g [1 cup] pistachio - chopped
icing sugar for dusting (optional)
- Heat oven to 180. Grease a 9-inch/23 cm square baking tin.
- In a saucepan, heat the butter, sugar, chocolate, and milk (or cranberry juice) gently while stirring constantly until the chocolate is melted and everything is well combined. Remove from heat and cool completely.
- Whisk in the eggs one at a time.
- Add the flour, cinnamon, and dried cranberries. Mix well.
- Pour in half the batter to the prepared baking tin. Sprinkle the pistachio over and then pour the rest of the batter.
- Bake in the oven for about 30-35 minutes or until a skewer poked in the middle comes out with no wet batter.
- Turn out and cut into squares while still warm.
If you need a simple sauce to cool down spicy food (especially curries) have this easy to assemble and make this yoghurt-based condiment.
Raita
1/2 cup plain yoghurt
1/2 cup grated cucumber - seeded first
2 Tbsp finely chopped fresh coriander or mint
salt to taste
2 Tbsp chopped green onion (optional)
1/4 tsp ground cumin (optional)
1/4 tsp ground coriander (optional)
- Using a tea towel or muslin cloth, squeeze out water from the grated cucumber.
- Mix all ingredients in a bowl and add salt to taste.
Serve with curry.
There are many variations in cooking pancit canton. You can be as elaborate as you want with cooking/blanching each vegetable to something as simple as a all-in-one cooking method. This version of mine is a happy compromise. It is very similar to what I do with pancit bihon but the main difference is in the type of noodles used. The one here is wheat-based which is certainly more flavourful than the bland rice noodle bihon. Also, liver and mushrooms are used lending difference in the filling. Do serve this with lemon juice to foil the saltiness of the sauce.
As with most of my recipes, this is a work in progress so I will be updating this from time to time.
Pancit Canton
250 g pancit canton noodles
100 g chicken meat - sliced into serving pieces
100 g chicken liver - sliced into serving pieces
50 g prawns (optional)
2 Tbsp cooking oil
2 pieces dried shiitake mushrooms
2 tsp minced garlic
1 medium onion - sliced
1/4 cup julienned carrots
1/2 cup shredded cabbage
1 1/2 cup chicken stock
1 Tbsp oyster sauce
2 tsp light soy sauce
1 Tbsp cornstarch
2 Tbsp water
salt and pepper
- Divide the garlic and onion. Soak the dried mushroom in boiling water for at least 30 minutes. Once mushroom is soft, remove stems and slice into thick strips. Set aside.
- Combine the cornstarch and 2 Tbsp water and mix well. Set aside.
- In a wok, heat 1 Tbsp of the cooking oil. Saute half of the garlic and onion.
- Add in the meats, season with salt and pepper. Cook for 2 minutes.
- Add the vegetables, saute for 30 seconds and then add about 1/4 cup water or stock. Bring to boil and simmer covered for about 3-4 minutes or until the vegetables are almost done.
Transfer to a bowl or container and set aside.
- Heat up the same wok with the rest of the cooking oil.
- Saute the rest of the garlic and onion.
- Add the chicken stock, oyster sauce, and soy sauce. Bring to boil.
- Add the cornstarch mixture and cook until thick.
- Add in the pancit canton noodles. Bring it back to boil. Lower heat and simmer until noodles are soft (about 5 minutes).
- Mix in the vegetables and meat. Stir to combine well. Dish up and serve while still hot.
This is another hit from my trusted The New Best Recipe cookbook from Cook's Illustrated. I especially love the intense chocolate taste of this cookie while remaining quite soft and chewy. I do have to go grocery shopping for 50% cocoa content dark chocolates since my baking chocolates in my pantry is always 70%. The coffee in my opinion can be omitted since it really made the flavour very intense. But other than that they were very nice cookies indeed.
Double Chocolate Cookies (Thick & Chewy)
260 g [2 cups] plain flour
35 g [1/2 cup] cocoa
2 tsp baking powder
1/2 tsp fine salt
4 large eggs
450 g dark chocolate (50% cocoa content) - chopped
2 tsp vanilla extract
1 tsp instant coffee (optional)
185 g [3/4 cup] unsalted butter - softened
300 g [1 1/2 cups packed] light brown sugar
100 g [1/2 cup] granulated sugar
- Mix flour, baking powder, salt and cocoa in a bowl and set aside.
- Combine eggs and vanilla and beat lightly. If using, sprinkle the coffee over and beat until dissolved.
- Melt chocolate in a heat-proof bowl over a simmering saucepan of water. Cool slightly and set aside.
- Beat the butter with the sugars.
- Add the egg mixture while beating.
- Mix in the melted chocolate.
- Add in the combined dry ingredients while mixing at low speed or with a wooden spoon.
- [Optional] Cover bowl and chill in th fridge until scoopable (about 1 hour).
- Pre-heat the oven to 180°C/fan 160°C/350°F.
- Scoop or shape the dough into balls about 1 1/2-inch in diameter or about 55 g in weight and arrange in baking sheets 1 1/2-inches apart.
- Bake in the oven for about 11-12 minutes or until the edges have begun to set but the middle is still soft.
- Cool in the sheets for about 10 minutes and then transfer to racks and cool completely.
One of my favourite comfort food is Bread and Butter Pudding. It has that ability to be classified as both a dessert or a snack depending on how you serve or how much you eat.
A lot of bread puddings I have the experience of buying in shops are too stodgy. They resemble more like slightly sweetened thick chewy bread. But not this one. I do love this recipe because is lighter and the ratio of the egg to milk/cream is just right. Plus the sugar is just right - not too sweet. I got this from an old ripped-off page of the BBC Good Food magazine with the recipe coming from the chef Paul Heathcote. Thanks Paul.
I know I burned some of the pudding top but believe me it's not that badly burnt. It's probably just the lighting angle of the picture. Not a problem for me because I'm partial to slightly charred food!

6-7 slices of white bread - crusts removed
65 g [1/4 cup] butter - softened
100 g sultanas or raisins
250 ml [1 cup] full-cream milk
250 ml [1 cup] double cream (heavy cream)
3 medium eggs (or 2 large eggs)
50 g [1/4 cup] caster sugar
1 tsp vanilla extract
25 g icing sugar
25 g apricot jam - warmed and sieved (optional)
- Preheat oven to 190°C/fan 170°C/375°F. Grease a 1.5 litre ovenproof dish, about 2.5 inch deep.
- Butter the bread slices generously and cut each into 4 triangles.
- Arrange a layer of the bread in the prepared dish.
- Sprinkle the sultanas on top.
- Then arrange the remaining bread slices on top of this.
- Make the custard - mix the cream, milk, eggs, vanilla, and caster sugar in a bowl.
- Strain the cream mixture over the bread slices and leave to soak for about 5 minutes.
- Put the dish in a larger roasting tin in the oven. While the oven rack (with roasting tin) is about a third out of the oven, carefully pour hot water in the roasting tin to come halfway up the side of the dish.
- Bake for 30 minutes until the top is golden and the custard is lightly set.
- Remove the dish from the roasting tin and leave to cool for about 15 minutes.
- Preheat grill to the highest setting.
- Generously dust the top of the pudding with sifted icing sugar and glaze under the grill until golden brown. If it starts to puff up remove and leave to cool a little longer before returning to the grill.
Note: It will be more efficient if you use a cooking torch to glaze the icing sugar.
- [Optional] Brush the top with the warmed apricot jam. Serve with clotted cream or warm custard.
One of the ways Filipinos flavour and preserve fish (especially bangus or milkfish) is by marinating and drying them. One such technique is called 'daing'. By which the fish is marinated for hours and optionally dried out in the sun afterwards.
I don't have the luxury of having the delicious bangus in our neck of the woods. So I go for the nearest one available - sea bass. The one advantage of sea bass over the bangus is its got less bones. So there's less to be wary about.
It's been years since i have marinated bangus and I have forgotten that it takes several hours or overnight to make the vinegar-based marinate to permeate the fish completely. Otherwise, once you've pan-fired it, the flavour is hardly noticeable. So make sure to marinate it for a long time - I reckon at least 8 hours or overnight.

(Fried Marinated Fish)
2 pieces bangus (milkfish) or other white fleshed fish like sea bass
2/3 cup palm vinegar or any white vinegar
2 tsp sea salt flakes
1 tsp black pepper corns - cracked
4 cloves (or more) garlic - smashed
- Ask your fishmonger to butterfly or fillet your fish.
- Combine all the other ingredients and stir until the salt is dissolved.
- Put in a non-reactive container (plastic, glass, or ceramic) and marinate the fish in it for at least 8 hours or overnight.
- Remove from marinade and drain briefly.
- Heat oil in a frying pan on medium-high heat. Pan fry the fish about 3-4 minutes on each side. Serve hot with steamed rice.
It's that time of the year again for my husband's birthday. Another excuse to experiment with one of the listed cake recipes in my to-bake list. I chose a caramel cake because I know my husband's fond of caramel. So Corinne's wonderful looking Filipino-style caramel cake recipe gets taken out.
It is essentially an airy chiffon cake with a pourable icing. The cake was good although I would have liked the caramel icing to be a little bit sweeter so I adjusted the recipe. And be very careful in caramelizing the sugar. I found out it burns very easily after it starts turning brown. Also, I didn't bother with cutting the cake in half horizontally and ice the middle. I thought there was not enough icing to spread around. This step is marked optional because our cake was just fine as it is.
Filipino-Style Caramel Cake
*For the Vanilla Chiffon Cake:
4 large egg whites
1/4 tsp cream of tartar
1 cup plus 2 Tbsp sifted cake flour (or plain flour)
1 1/2 tsp baking powder
1/2 tsp salt
3/4 cup white sugar - divided
1/4 cup corn or vegetable oil
4 large egg yolks
1/3 cup water
1/2 tsp vanilla extract
- Preheat oven to 180°C/fan 160°C/350°F.
- Line the bottom of an ungreased 20cm/8-inch round 3-inch high pan.
- In a large bowl, beat the egg whites and cream of tartar on high speed until frothy.
- Add in half of the sugar (6 Tbsp) gradually while beating until stiff peaks form.
- In another bowl, combine the cake flour, baking powder, salt and the rest of the white sugar. Mix well.
- Add in the egg yolks, water and vanilla. Beat with electric mixer or by hand until smooth and well blended.
- Pour batter into the prepared pan.
- Bake for about 50 minutes or until top springs back when lightly touched or a skewer poked in the middle comes out clean.
- Invert pan into wire rack immediately and cool completely. To release cake from pan, carefully run a thin knife around sides of pan and invert cake onto a large serving plate.
- [Optional] Cut the cake in half horizontally. Invert the top half onto a cake plate and spread a little icing on it. Top it with the other cake half cut side down.
- Pour the rest of the icing on the cake spreading evenly on top and the sides.
**Tip: For easier handling, wrap your cake very well in cling film, then refrigerate overnight before frosting.
*For the Caramel Icing:
2 egg yolks
1/2 cup white sugar - divided
1 1/2 cups evaporated milk (one 375 ml can) - divided
1 1/2 Tbsp cornstarch
1/4 cup boiling water
1/4 cup butter - cubed
1/2 tsp vanilla extract
- Whisk the egg yolks with 2 Tbsp of the sugar in a small bowl/jug. Add in 1/4 cup of the evaporated milk and all of the cornstarch. Mix well and set aside.
- In a heavy saucepan, over low to medium heat, carefully caramelize the remaining (1/4 cup) sugar.
- When sugar is completely melted and a golden brown colour, add boiling water (careful it will splatter).
- Bring back to a boil while stirring ocassionally making sure all the caramel well mixed into the water.
- Gradually add in the rest of the evaporated milk (1 1/4 cups) while stirring. Heat mixture just until it starts to boil.
- Without turning off the heat, pour a little of the caramel mixture into the egg yolk mixture while constantly stirring to temper the eggs. Mix until smooth.
- Pour this back into the remaining caramel mixture in the saucepan. Mix until icing reaches a thick consistency.
- Remove from the fire and then add in the butter and vanilla extract. Let cool just a little bit, whisking once in while. The mixture will thicken more as it cools.
- Pour onto cake while still warm.
Note: This icing is pourable. Let it flow smoothly over the top and sides of the cake. Put strips of baking paper under your cake to catch the drips.
Mamon is a well-loved little sponge cake snack in the Philippines. For this recipe, the sponge is essentially a chiffon cake. I adapted the recipe from the wonderful baking blog Heart of Mary which is penned by a Filipina based in Australia.
She suggested there that greasing of the little cake tins is optional. Well you know me, anything to save labour is most welcome. But it did not work for me. The cakes stuck in the tins especially at the bottom. So that's one thing required in mine - grease the tins well.
The cakes came out really fluffy and they did not sink (which I was afraid it might do). They tasted wonderful, too, and not dry at all. I just had to reduce the salt because it came out a bit salty. So this recipe is well recommended.

{A}
1 cup plus 2 Tbsp sifted cake/plain flour
1 1/2 tsp baking powder
1/4 tsp fine salt
6 Tbsp white sugar
{B}
1/4 cup vegetable oil or melted butter
4 large egg yolks - at room temperature
1/3 cup water
1/2 tsp flavouring (vanilla, butter, lemon, or orange extract)
{C}
4 eggwhites
1/4 tsp cream of tartar
{D}
6 Tbsp white sugar
- Preheat oven to 180°C/fan 160°C/350°F.
- Grease 10 small mamon tins. You can also use small brioche tins or small metal pudding moulds.
- In a bowl, beat {C} on high speed until frothy. Gradually add in the sugar {D} and beat until stiff peaks are formed.
- In another large bowl, combine {A}, mix well. Add in {B}. Beat with electric mixer or by hand until smooth and well blended.
- Gradually and gently fold in egg whites into the egg yolk mixture.
- Pour the cake batter equally into the 10 tins. Give the tins a gentle shake and a tap to remove air bubbles and to level off the batter. Arrange them on a large baking tray.
- Bake for 25-30 minutes or until tops are golden brown and a skewer inserted into the centre of the cakes come out clean.
- Immediately invert the tins onto a baking paper-lined wire rack. Tap the tins to release the cakes. Turn the cakes over and let ir cool off completely.
- [Optional] While still warm, brush the tops with melted butter. This will allow the cakes to absorb some of the butter thus giving it more flavour. Finish off by sprinkling some granulated sugar on the tops.

 It's that time of the year again where baking and blogging for breads is compulsory for the World Bread Day. I don't mind it at all. In fact, I look forward to it come October knowing that I will add something in my list of breads that I've tried. As always every year this is hosted by the very generous Zorra of Kochtopf.
I have decided to bake something with chocolate to hit two birds with one stone. For it is also Chocolate Week here in UK. This recipe I adapted from a special insert in the current September issue of Waitrose's magazine. It is very good except that the filling was quite runny. So the instructions said to cut it in half lengthwise and then twist them together, I knew that it will be a messy affair if I did that. Hence, I just twisted them intact. I expected that it won't be too good looking when finally baked but I was rewarded with a nice swirl inside that was revealed when cut. And the taste of the bread itself was excellent. This is a definite keeper of a recipe. I just have to tweak that filling so it won't ooze out too much.

*Dough:
7 g sachet easy bake yeast
250 g strong white bread flour
3 Tbsp dark brown sugar
1/2 tsp fine salt
1/4 cup whole milk
1 large egg - beaten
75 g unsalted butter - softened
*Filling:
1/4 cup whole milk
75 g milk chocolate - finely chopped
50 g dark chocolate - finely chopped
1 Tbsp cocoa
3 Tbsp caster sugar
1/2 tsp vanilla extract
1/2 tsp ground cinnamon
*Glaze:
3 Tbsp dark brown sugar
3 Tbsp water
*For the dough:
**Manual method:
- Gently warm the milk in a pan until it is just lukewarm, remove from heat. Stir in the yeast and set aside for about 5-10 minutes. By then, then yeast should be foaming (it is activated). If not, discard it and start again from the beginning with fresh milk and yeast.
- Mix all the dry ingredients in a bowl. Make a well in the centre and add the milk-yeast mixture, egg, and butter.
- Knead mixture in an electric mixer with a dough hook attachment for 6-8 minutes or mix and knead by hand for 10 minutes until smooth.
- Cover with cling film, put in a warm place and leave to double in size (about 2 hours).
**Bread machine method:
- Put all ingredients according to the manufacturer's instructions (usually with the yeast first) and put on the dough program. This will include its first rising.
*For the filling:
- While dough is doing its first rise, heat the milk until steaming. Remove from heat and then add the chopped chocolates.
- Stir until chocolates has completely melted.
- Add in all the other ingredients. Stir to mix completely. Set aside to cool completely.
**Assembly:
- Punch down dough and lay out on a floured surface. Roll out to a rectangular size about 12 x 18 inches (30 x 45 cm).
- Spread the chocolate filling all over the dough. Roll up tightly like a log starting from the short end. Pinch the edges to seal it.
- Trim the ends of the roll. Cut in half lengthwise with a floured knife.
- Tightly twist the two strips over each other with the filling facing outwards.
- Transfer to the prepared tin. Cover with cling film or tea towel and leave to rise in a warm place to double size (about 1 hour).
**For the glaze:
- While the dough is doing its second rise, place the sugar and water in a saucepan and boil for about 2 minutes until syrupy. Set aside.
**Baking:
- Preheat oven to 180°C/fan 160°C/350°F. Bake for 25-30 minutes until cooked through.
- Brush half the syrup over the babka and leave for 15 minutes.
- Brush again with the rest of the syrup then cool completely on a wire rack.

A surprisingly delicious beef stew was unearthed from the Bon Appetit website. I bought a kilo of meaty beef ribs (short ribs) in the Birmingham market a few weeks ago and was looking for a recipe to make a tasty dish out of it. And I was not the least disappointed. The things that made it standout are the bones, which gave extra flavour, the garlic (surprising I know) and the excellent red wine I got in our pantry.
This is great with rice, mash potatoes, or just boiled new potatoes with steamed veggies on the side. I only cooked half of the recipe so I adjusted it accordingly.
Red Wine Braised Short Ribs of Beef
1 kg bone-in beef short ribs, cut crosswise into 2-inch pieces
sea salt and freshly ground black pepper
2 Tbsp vegetable oil
1 large onion - chopped
1 large carrot - peeled, chopped
1 celery stalk - chopped
1 1/2 Tbsp plain flour
2 tsp double-concentrated tomato puree (tomato paste)
375 ml [half a bottle] dry red wine (preferably Cabernet Sauvignon)
5 sprigs flat-leaf parsley
4 sprigs thyme
2 sprigs oregano
1 sprig rosemary
1 fresh or dried bay leaves
1/2 head of garlic - halved crosswise
2 cups beef stock
- [Optional] Preheat oven to 180°C/fan 160°C/350°F.
- Season short ribs with salt and pepper.
- Heat oil in a large oven-proof pot over medium-high. Brown short ribs on all sides in batches, about 8 minutes per batch. Transfer short ribs to a plate. Pour off all but 2 Tbsp. drippings from the pot.
- Saute onions, carrots, and celery in the same pot and cook over medium heat. Stir often, until onions are browned and tranlucent, about 5 minutes.
- Add flour and tomato paste. Stirr constantly, until well combined and deep red, about 2-3 minutes.
- Stir in wine, then add short ribs with all of its juices. Bring to a boil; lower heat to medium and simmer uncovered until wine is reduced by half, about 20 minutes.
- Add all herbs including the garlic. Stir in stock. Bring to a boil, cover, and transfer to oven. Cook until tender for about 2-2.5 hours.
OR
Cook on the hob in very low heat until short ribs are tender, about 1.5 hours.
- Transfer short ribs to a platter. Strain sauce from pot into a measuring cup. Spoon fat from surface of sauce and discard.
- Season sauce to taste with salt and pepper. Serve in shallow bowls over mashed potatoes or boiled new potatoes with sauce spooned over.

I quickly post any recipe I find that worked marvellously first time I tried it. This particular one came from the recent Waitrose Magazine for September 2016. The combination of chocolate (milk or dark) with the banana and toffee glaze is so moreish. My only complaint is that it is hard to make the glaze settle on top since the suggested cake tin is a bundt cake pan. Next time I will bake this in a square or rectangular pan so that the delicious glaze will stay on top and nothing will go to waste.
For the Daim chocolate bars, the equivalent of these are Hershey's Skor or Heath bars or any chocolate covered hard toffee bars.
Chocolate Banana Toffee Cake
200 g unsalted butter - softened
75 g caster sugar (suprefine sugar)
100 g light muscovado sugar
4 large eggs
4 very ripe medium bananas - mashed (about heaping 1-1/2 cups)
3 Tbsp sour cream
2 tsp vanilla extract
50 g cocoa powder (plus extra for dusting)
225 g plain flour
50 g cornflour (cornstarch)
2 tsp baking powder
1 tsp bicarbonate of soda (baking soda)
75 g chopped Daim bars or dark/milk chocolate chips (plus some chopped for topping)
Glaze:
200 g light muscovado sugar
75 g unsalted butter
100 g double cream
25 g dark chocolate - chopped
1/2 tsp vanilla extract
pinch of salt
- Preheat oven to 190°C/fan 170°C/375°F. Butter 10-inch bundt pan and then dust with cocoa powder. Tap out the excess cocoa powder.
- In a bowl, mix thoroughly the plain flour, cocoa powder, cornflour, baking powder, and bicarbonate of soda.
- In another bowl, add sour cream to mashed banana and vanilla.
- Cream the softened butter and the caster and muscovado sugars in a big bowl for about 5 minutes or until light and creamy.
- Keep beating while adding eggs one at a time.
- Add the banana mixture. Beat until well combined.
- Using a wooden spoon or spatula, fold in the flour mixture.
- Fold the chopped Daim chocolate bars or chocolate chips (whichever you're using).
- Pour into the prepared pan and bake for 40 minutes or until a skewer poked in the middle comes out clean.
- Take out of the oven, cool for 5-10 minutes and then invert into a rack and cool completely.
*For the glaze:
- Gently heat butter, cream and sugar in a small saucepan until the sugar is dissolved.
- Bring to boil, lower heat and simmer for 30 seconds.
- Remove from heat and add dark chocolate, vanilla and pinch of salt. Stir until smooth.
- Cool for 10 minutes or until a bit thickened while stirring from time to time.
- Drizzle over the cake. Let set for a few minutes.
- [Optional] Scatter chopped Daim over the top.
This recipe is from one of the hundreds of torn-off magazine pages that I save in the hope of trying it out "later". That "later" is now ten years and I reckon it's high time I try it again. The first time it was quite bland so I upped the sugar this time. It turned out quite good although it's more cake-like than a chewy/crispy cookie. The self-raising flour has a lot to do with that.
I adapted this from an advertisement feature in the BBC GoodFood magazine of December 2006 - almost 10 years!

125 g [1/2 cup] unsalted butter - softened
200 g [1 cup packed] light muscovado sugar
2 eggs
2 tsp vanilla extract
225 g wholemeal(or plain) self-raising flour
25 g cocoa
75 g dried cranberries
100 g white chocolate chips
100 g milk chocolate chips
12 pecan halves (optional)
- Mix together the butter and sugar in a bowl using a wooden spoon.
- Add eggs one at a time making sure to mix well everytime.
- Add vanilla extract.
- Sift the flour and cocoa into the bowl and mix well.
- Add in the cranberries and chocolate chips and combine well.
- Cover with cling film and chill in the fridge for about 1 hour.
- Preheat oven to 180°C/fan 160°C/350°F.
- Shape the dough into 2-inch (about 75 g) balls - yields 12-14 pieces.
- [Optional] Press a pecan piece on top of each of the balls.
- Arrange the balls about 1-inch apart on greased baking trays. Flatten them slightly. If necessary bake in batches.
- Bake for 15 minutes or until firm to the touch.
- Leave on the tray for about 5 minutes and transfer on a rack to cool completely.