My oldest and youngest kids love things Japanese. And that includes watching lifestyle shows in NHK World channel - the only one in our cable subscription that caters for anything Japanese. Well nowadays I'm watching them, too, but as expected mainly the food and cooking shows. One of these is the very informative Dining with Chef. They do step-by-step demonstrations of dishes including a lot of tips and tricks from Chef Tatsuo Saito.
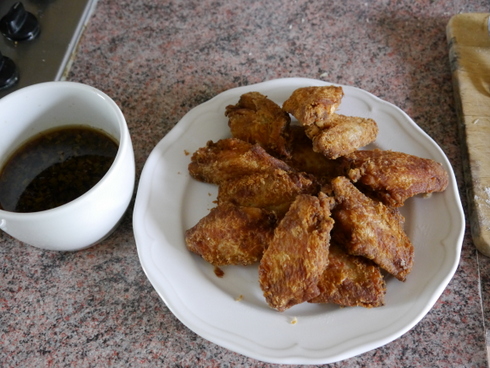
One particular dish I adapted from that show is the fried chicken wings. Wings are my favourite part of a chicken. But to be honest I really only care for the middle section. I'm not particularly fond of the little wing drumettes. So to find this recipe from the Dining with Chef using only the middle section really delighted me. And it's so good especially when paired with the sauce. You should try it with hot steamed rice.

(Japanese Fried Chicken Wings)
12 mid-section chicken wings
1 Tbsp sake or rice wine
1 Tbsp soy sauce
plain flour
oil for deep frying
*For the sauce:
1 Tbsp sesame oil
2 Tbsp chopped green onions
1 Tbsp chopped ginger
1/3 cup dashi or chicken stock
3 Tbsp soy sauce
2 Tbsp rice vinegar
1 Tbsp sugar
- Dry the chicken wings with kitchen towels. Make a cut between the bones on the underside of the chicken wings - do not cut all the way but at the tip separate the wing bones by cutting through the joint. For illustrations go to the Dining with Chef website.
- Combine the sake and soy sauce in a bowl. Mix in the prepared chicken wings and marinate for about 30 minutes.
- Dredge wings in flour and deep fry in oil heated to 180°C/350°F for about 4 minutes or until crispy.
- Serve hot or warm with the sauce.
*Sauce:
- Saute the green onions and ginger in the sesame oil in a pan. Cook until aromatic.
- Add in the rest of the ingredients. Bring to boil then lower heat and simmer for 2-3 minutes or until the sugar is fully dissolved.

 The lovely Zorra of Kochtopf is again hosting the World Bread Day 2014 food blog event. An annual virtual gathering of food bloggers to celebrate anything to do with bread.
For my entry, I'm harking back to the very first bread I ever successfully baked. When I started baking more than two decades ago I got really stressed when baking with yeast (well nowadays I still get a little anxious). I think it's the worry that the dough won't rise that I constantly peek while it is proving. This might have contributed to my first few attempts at bread making to fail. So when I saw the Make-Ahead Potato Bread Rolls in my beloved hardbound Betty Crocker cookbook, I lost no time in trying it. See, in that recipe the rising is not done in a warm place but in the fridge - overnight! How great is that? No more stressing, hand wringing and peeking to see if the dough rose at all. Anyway, the bake was successful but I never got to bake that bread again until now more than 25 years later.
One thing I only remembered now is that the shaping of the dough into balls can be a bit hard. They would not follow easily the shape I want. Maybe I should let it come to room temperature first before shaping? I'll find out next time. There's also one thing I remembered - how delicious it is especially when warmed. My youngest daughter loved it so much she slathered it with strawberry jam - one of the few times I saw her do that. This is a definite keeper of a recipe.
Potato Bread Rolls
1 package [2 1/4 tsp] active dry yeast
1 1/2 cups warm water
2/3 cup sugar
1 cup unseasoned mashed potato
2 eggs
1 1/2 tsp fine sea salt
2/3 cup butter - softened
7 - 7 1/2 cups plain flour
- In a bowl, dissolve the yeast in the warm water together with 2 tsp of the sugar. Set aside. It should foam and bubble after 10 minutes. If it did not, this means the yeast is dead so discard the mixture and start again with a new batch of yeast.
- Add the sugar, potatoes, eggs, butter, salt and 3 cups of the flour. Mix with electric mixer on low speed until smooth.
- Add in enough of the rest of the flour to make the dough easy to handle. Knead on a floured surface for about 5 minutes of until smooth and springy.
- Grease a bowl and place dough in it. Turn dough to grease all over. Cover tightly with cling film and let rise in the fridge for at least 8 hours but not more than 5 days.
- Punch dough gently and knead for a few turns. Divide dough into 2 equal pieces for loaf and 4 equal pieces for rolls.
*For small dinner rolls:
- Shape dough into 1 1/2 inch balls. Arrange on a greased baking sheet 1 inch apart. Cover and let rise in a warm place until double (about 1-2 hours).
- Brush with melted butter or egg wash (beaten egg with 1 Tbsp water or milk).
- Bake in an oven preheated to 200°C/fan 180°C/400°F for 15-20 minutes.
*For clover leaf rolls:
- Grease muffin pans. Shape into 2-inch balls and put in the muffin pans. Using scissors, cut balls into halves and then into fourths.
- Brush with melted butter and let rise in a warm place until double (1-2 hours).
- Bake in an oven preheated to 200°C/fan 180°C/400°F for 15 minutes.

The October Daring Cooks’ Challenge was brought to us by Andrea from 4pure. She introduced us to one of her family favorites which is soon to become one of yours, too. Welcome to the world of Dutch Bitterballen!
Actually before I made these Dutch treats I haven't tried nor heard about bitterballen. But it's not foreign to most people - it is a variant of a deep-fried croquette. I did the cheese bitterballen and was gearing up to make the prawn version but I ran out of time for the deadline. You can head to the Daring Kitchen's website for the recipes of the beef and prawn renditions of this delicious snack.
I froze my bitterballen for deep-frying a week later. They froze rather nicely.
As instructed by Andrea, you have to add 1 minute to the deep-frying time for frozen bitterballen. It was delicious! Although next time I would do the egg dip and breadcrumbs at least twice to make the breaded crust thicker and crunchier. Plus also making the balls smaller - perhaps 3/4-inch in diameter only. I would prefer more starch/crust in the crust-cheese ratio to make it less rich. All these personal changes are reflected in the recipe below.
Everyone in the family loved it including my youngest who was busy speed reading the very recently released book of her favourite novel series.

1/2 cup [125 g] butter
3/4 cup [110 g] plain flour
2 cups [500 ml] full-fat milk
1/2 tsp grated nutmeg
2 egg yolks
1/3 cup [80 ml] single cream (light cream)
2 tsp gelatine
80 g hard cheese (parmesan, grana padano, pecorino, etc.) - grated
80 g soft cheese (brie, camembert, cream cheese, etc.) - sliced into small pieces
80 g matured cheddar - grated
salt and pepper
*For the breading:
plain flour
2 eggs - beaten
dry breadcrumbs
- Melt butter in a heavy-based saucepan.
- Add flour all at once and stir to cook for 3 minutes on medium heat.
- Add milk and bring to boil while stirring continously.
- Bring heat to lowest and simmer for about 10 minutes stirring from time to time.
- While it is simmering, dissolve gelatin with about 2 Tbsp water. Set aside.
- Add nutmeg. Taste sauce and add appropriate amount of salt (about 1/2 tsp) and pepper.
- Stir in the cheese until well mixed in the sauce.
- Add in the dissolved gelatine and stir until well combined.
- Remove from heat and spread out the sauce in a baking dish or plate.
- Cool for about 30-60 minutes then cover and refrigerate for at least 2 hours or overnight.
*Breading:
- After refrigeration, the mixture would have hardened. With a spoon, scoop out enough cheese mixture to form into a 3/4 - 1-inch ball.
- Roll the ball in the plain flour; then dip in the beaten egg; then roll in the breadcrumbs. (The breading may be repeated if you want a thicker crust.) Do the same for the rest of the mixture.
- Rest the breaded balls on a plate in the fridge for about 30 minutes.
- At this point you may freeze the bitterballen if you wish.
*Deep frying:
- Heat at least 3/4-inch of oil in a heavy saucepan to 180°C/350°F.
- Deep fry the bitterballen for 3-4 minutes until golden. (For frozen bitterballen, add 1 more minute in cooking time.)
- Serve warm with mustard or chutney.


