 Sorry 'bout that nuked piece of sausage patty. It was supposed to be an imitation of Sausage Mcmuffin - sausage patty, English muffins, and eggs. But we got so excited I promptly forgot to lower the heat in frying the patty. Anyways, this for the record, is for my kids to remind them on how to do scrambled eggs. Funny, the thing we call scrambled eggs when I was small is actually called omelette here. Something must have been lost in translation. ;)
The key for scrambling eggs successfully is patience. You have to constantly tease, push and prod, back and forth the eggs on low heat to achieve the fluffy, soft, creaminess that is a scrambled egg. Some (my son) likes it a little bit well done. Some (my husband) loves it runny. However you like it finished, you have to start it the same way - beaten eggs cooked slowly on low heat until at a point of equilibrium it starts to curdle and form that sort of 'bubbly' texture. For me, the best way of doing this is by using a wooden fork with the tines scratching the newly formed film of cooked eggs at the bottom. A lot of cookbooks use just beaten eggs but we do like to put a little bit of milk for that extra creaminess.Scrambled Eggs
2 eggs
1 Tbsp milk
1/2 Tbsp butter
freshly milled salt and pepper (optional)
- Beat eggs with the milk in a bowl. Add salt and pepper if desired.
- Heat butter gently a heavy-bottomed saucepan or frying pan (preferably non-stick) until melted.
- Still on low heat, pour the beaten eggs in the pan.
- Stir with a wooden spatula or fork, pushing back and forth making sure the spatula is scraping the bottom. Do this until the eggs starts to solidify - about 3-5 minutes.
- If you want your eggs runny, take it out of the pan while the eggs still soft and moist and there is only a little liquid left. If you want it firm, cook further until there is no more liquid and the eggs thoroughly cooked.
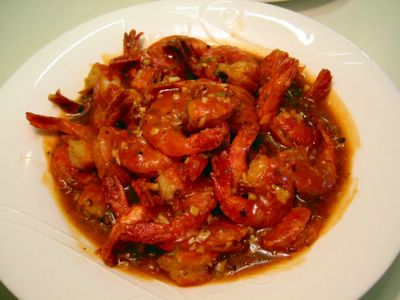 The current IMBB theme is quite easy - anything fried. Host Linda of At Our Table chose it of course. And because of the sooo many possibilities and choices, I couldn't quite make up my mind on what to offer. It's just like arriving early at a shopping car park and finding yourself with 200+ empty car spaces to choose from - it's a nightmare! Do I choose near the stairs? Or the one where I can backout easily? Or is it the one near the pay machine? Arggghh! (Why am I talking about car parks here?)
Anyway, the dietary needs of an impending dinner time solved it for me. I need something quick and easy to prepare - stir fry to the rescue! It's been awhile since I've cooked this so I totally forgot what to avoid and watch out for. And as we were eating it I remembered what it was - when using smaller prawns, shell it completely otherwise a lot of the delish spicy sauce is wasted on it which you're going to discard anyway. If you're using jumbo prawns it's okay to have the shell on. The 'spicy' name is a bit misleading. It's not spicy hot, just lots of garlics, green onions and ginger. Bean sauce added gives it a little heat and the ketchup lends the sweet-sour tang. Enjoy!
Spicy Stir-fried Prawns
500 g big prawns - beheaded, deveined, shell on*
1 Tbsp cornstarch
oil for deep frying
1 1/2 Tbsp oil
1/2 Tbsp finely chopped garlic
1 Tbsp finely chopped ginger
2 Tbsp finely chopped green onion
1 tsp hot bean sauce/paste
1 Tbsp cooking or rice wine
1/4 cup ketchup
1/2 tsp sea salt
2 tsp sugar
1/2 Tbsp cornstarch
1 cup water
- Mix together hot bean paste, rice wine, and ketchup in a small bowl; set aside.
- Dissolve the sea salt, sugar, and 1/2 Tbsp cornstarch in the water in a separate bowl. Set aside.
- Drain as much water as you can from the prawns (pat dry with paper towels if possible). Mix in the 1 Tbsp cornstarch.
- Heat enough oil for deep frying in a saucepan. When hot, drop prawns in batches and deep fry for 2 minute or until cooked*. Drain in paper towels. Set aside.
- Heat wok, add in 1 1/2 Tbsp oil and wait until it is smoking hot.
- Stir fry the green onions, garlic, and ginger in the wok until aromatic.
- Add in the ketchup mixture. Stir fry for a few seconds.
- Add the water mixture. Bring to boil.
- Tip in the prawns and stir to mix. Dish up and serve.
*Note: If the prawns are small, shell completely and also reduce the deep frying time to about 1 minute only.
I found via Ang Sarap blog on Amateur Gourmet's review of the NYC restaurant Cendrillon. That is one of my must visit restaurants if ever I set foot in noo yok. I've been telling friends that for the longest time. 'Hope they can hang on 'til I arrive - wait for me!
I was food blog hopping when I came by this heartening article at the Honolulu Advertiser via Reid's blog:
News that Cris Comerford, a naturalized U.S. citizen from the Philippines, was appointed as the White House executive chef got me thinking about our own homegrown Filipino chefs who hold similar positions at some of the Island's more popular restaurants.
...
"I think her (Comerford's) appointment to such a high-profile position is a tribute to all Filipinos who work in the restaurant industry, and there a lot of us," said Limcaco, who last week served military generals an amuse bouche (teaser) of kare kare, the Filipino version of oxtail stew flavored with peanut butter. " I think Filipino cuisine is a sleeper, which means it has yet to be discovered."
To see the original article, click over here.
 The Soil Association in the UK is organising a number of events for a week to promote British grown organic produce. The highlight of which (at least for me) is the Organic Food Festival on the weekend of 3-4 September in Bristol. (Now I've got a reason to drag my family there!) Thanks to Andrew for drawing our attention to an undoubtedly delectable event.
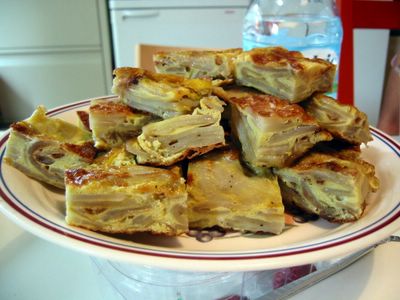 Spanish omelette, a mainstay of tapas bars, also comes in the monickers of - Tortilla Espanola or Tortilla de Patata. It's amazing that the lovely simple dish of Spanish origin (obviously!) made up mainly of only potatoes, onion, and eggs can be such a good comfort food. You can enjoy this either warm or cold so it's good for barbecues and picnics.
My mother used to cook this all the time though her version has the potatoes cubed while here its sliced very thinly. If you've got a mandolin slicer, slicing the potatoes would be a doddle just watch out for those fingers. And make sure to season it well with salt (sea salt has always been my choice). I consulted several sources for this recipe to come up with my own. Most of them uses a lot of oil, even though it's olive oil I tend to shy away from too much greasiness. Some have, in my opinion, too much eggs. I'd rather have a more 'equal' balance of potatoes and eggs in my omelette.
Spanish Omelette
500 g waxy potatoes (Charlotte, Desiree, Jersey Royals) - peeled and sliced very thinly
1 medium onion - sliced
6 eggs - beaten and seasoned with salt and pepper
salt and pepper
olive oil
- In a 23cm (9-inch) frying pan (preferably non-stick), heat about 2 Tbsp. olive oil.
- Once hot, tip in the onions then the potatoes. Season well with salt and pepper. Stir a little to mix with the oil. Lower down heat, cover, and cook for about 10-15 minutes stirring to turn carefully midway through.
- Remove potatoes and onions from the pan with a slotted spoon and drain on paper towels for about 30 seconds or just long enough to remove excess oil.
- Mix the potatoes and onions with the beaten eggs making sure it seeps in between the layers of potatoes.
- Remove excess oil from the same pan leaving just enough to coat the bottom. Heat again with hob on high.
- Put the egg and potato mixture into the hot pan and continue to cook for 2 minutes. Lower down the heat to the lowest setting and leave to cook for about 20 minutes.
- After this, there would be very little liquid left on top. Loosen the edges and bottom of the omelette. Cover with a plate larger than the frying pan. With one hand on the plate and the other on the pan handle, quickly flip the omelette onto the plate.
- Heat up the pan again with a little olive oil. Once hot, slide in the omelette back to the pan uncooked side down. Let cook on medium heat for another 3-5 minutes.
- Dish up and serve warm or cold with green salad.
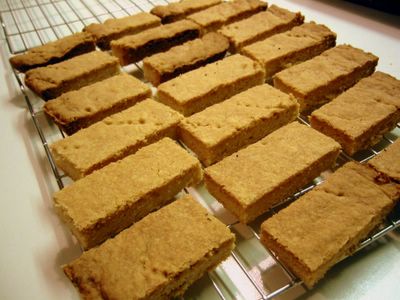 Don't they look like barges marching straight to your mouth? :LOL: What am I thinking?
My littlest one, J3, requested for shortbread since it's one of her favourite biscuits (cookies). I haven't done any shortbread in my life except for that Millionaire's Shortbread. This is very easy to make and can be varied according to one's texture preference. I used cornstarch for a melt in the mouth feel while if you want a bit more crunch use fine semolina. That's according to Sue Lawrence from whose Book of Baking cookbook I got this recipe. Some other versions use rice flour I'm not sure what the effect of that will be. I'm thinking of putting in pinipig (pounded rice) or puffed rice for added crunch, just not sure if it's going to make it over crumbly. You will hear of any triumphs or disasters here in case I make good of my 'threat'. ;)
Shortbread
250 g butter - softened
115 g [scant 2/3 cups] golden caster sugar (extra fine sugar)
225 g [heaping 1 3/4 cups] plain flour
100 g [1/2 cup + 1/3 cup] cornflour (cornstarch) or rice flour or fine semolina
- Preheat oven to 300°F/150°C/fan 130°C/gas mark 2. Butter a 13 x 9-inch baking pan.
- Beat the butter and sugar with an electric mixer until fluffy and light coloured (about 4-5 minutes).
- Sift in the flours into the mixture and mix by hand with a wooden spoon until just incorporated. Do not overmix.
- Pour into the prepared baking pan. With floured hands, press down the dough and pat level. Prick all over with fork.
- Bake for 45-50 minutes or until evenly golden brown.
- Remove from oven then cut into squares or fingers. Leave to cool for about 5-10 minutes then carefully remove each cut piece onto a wire rack to cool completely.
 In the initial launch of this new food blogging event - Lasang Pinoy (literally means 'filipino taste') cooked up by Karen and Stef - we honour Benigno 'Ninoy' Aquino who was assassinated last 21st of August 1983 when he returned to Manila from 3 years of exile in Boston, MA, USA. His death sparked the wick of rebellion and opposition against the two decade repressive rule of Ferdinand Marcos which culminated in the peaceful EDSA or People Power revolution in February 1986 that saw the overthrow of Marcos' government. (Please click on the links for a backgrounder on Ninoy and all the events leading to the EDSA revolution.)
It was a time when I was so proud to be a Filipino. Even as I was reliving those memories now, I've got goose pimples and tears welled up in my eyes. It was a time of unity among most of the Filipinos, of intense emotions, of sacrifice, and rising up against a formidable foe in the guise of Marcos administration. During all these, I was a teenage working student of engineering in Manila. We were thunder struck when word spread that Ninoy was shot as he was descending from his airplane on his way back from US exile. There was a universal indignant and angry response from everybody with the realisation that Marcos' government has gone too far.
 Then came Ninoy's funeral where between 1 to 2 million people marched in the procession or lined the roads from Sto. Domingo church in Manila to a memorial park in a southern Manila suburb. Never has the Philippines seen such great outpouring of solidarity for a person. My husband (my boyfriend at that time) would remember it well. He was standing at one of the elevated base pillar of the Manila Post Office in Plaza Lawton watching the funeral cortege of Ninoy go by, with people numbering in the hundreds of thousands. When a classmate of ours in the procession saw him and shouted, "Hoy Aquino! Sayang ang pangalan mo, bumaba ka dyan at sumama ka sa amin." ("Hey Aquino! It's a shame about your name, come down from there and join us.") - see, his family name is same as Ninoy's, no relation by the way. Probably hundreds of people around within earshot looked at him and he got so embarassed at the attention that he went down and joined the march. And that's how he walked the approx 20 miles from Lawton to Paranaque for Ninoy. Hahaha! Such sacrifice, all just to save face. :LOL:
 But he redeemed himself when he joined the barricade at the EDSA revolution near Camp Crame. He was there when the tanks came to break up the blockade mingling among the priests, nuns, professionals, policitians and the average joe like him wanting to oust Marcos. You may ask where was I in all these? I was sitting at home with my family perpetually listening to Radio Veritas. Frustrated from being prevented by my family and the boyfriend (yeah that Aquino) from joining in EDSA because he said it was dangerous. He did have all the fun. :( Shame.
You might think when is she getting to the point of the food? Ah okay, you see my inspiration for submitting this dish is the yellow confetti (made from shredded yellow phone directories) that greeted every Laban rally (opposition party led by Ninoy's widow Cory) in the financial district of Makati during the campaign for the presidential snap election that Marcos called. There were also these noise barrage where at a certain day and a certain time people all over the country were asked to make noise as a sign of solidarity with the opposition. And glorious noise they were - people honked their horns, blew whistles, while our neighborhood banged pots, pans, batya (large basins), even fireworks. Such fun actually! But the beautiful sight of yellow confetti falling like snow on the streets was the one image that I always felt so magical that got embedded in my memory.
 And what's the relation to the recipe? I'll get to that ... be patient. ;) This dish is the Filipino version of the Chinese wonton soup. The main difference is that our version has some minced meat mixed with the soup. On a tangent, I don't know why they called this as such because I always thought 'pancit' has noodles. There's not a thread of that in here for sure. Maybe some of you who knows about food names' origins and history can give us a hint on why this is so. Our family's version has extra wonton wrappers snipped into small pieces and cooked in the soup in the final stages. I used yellow wonton wrappers so that at serving they look like and perfectly remind me of those raining yellow confetti. Finally!
In echo of Laban's battlecry:
Tama na! Sobra na! Masyado ng mahaba ang post mo!
LOL!
 Pancit Molo
*Wonton Filling:
250 g minced pork
250 g shrimps - shelled and minced
1/3 cup finely chopped waterchestnuts
1/3 cup finely chopped carrots
1/2 medium onion - finely chopped
1 egg
1 Tbsp soy sauce
1/4 tsp freshly ground pepper
about 40 pieces of wonton wrappers
*Soup:
10 cups chicken stock
1 1/2 Tbsp oil
3 Tbsp minced garlic
1/2 medium onion - chopped
100 g shrimps - shelled and finely minced [about 1/3 cup]
100 g minced pork or shredded cooked chicken [about 1/2 cup]
1 1/2 Tbsp patis (or to taste)
freshly ground pepper
*Garnish:
chopped green onion
fried garlic
*For the wonton:- Combine all the ingredients in a bowl.
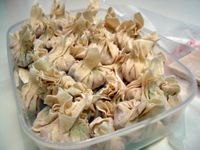
- Lay one wonton wrapper on a plate or clean working surface. Put a teaspoonful mound of the filling in the middle. Wet the wonton wrapper around the filling then bring all edges together to seal and form like a pouch with the filling in the center. (see small picture above - click to enlarge)
- Repeat until all fillings are used up.
- Reserve a few wonton wrappers and cut or shred them into small confetti-like pieces.
*For the soup:- Heat the oil in a medium sized stock pot.
- Saute the garlic in medium-low heat. Do not burn, if you think the oil is too hot remove the pot from the hob right away and reduce the heat.
- Once garlic is golden crispy brown, scoop out 2/3 of it and set aside.
- Add in the onion and saute for about 2-3 minutes or until translucent.
- Bring up heat to medium-high and stir in the minced pork and shrimps. Cook for 1 minute.
- Mix in the patis, stir. Cover pot and cook for 2-3 minutes.
- Add in the stock and bring to boil.
- Gently drop the wontons in the boiling stock. (Put in just 20-30 wontons, the rest can be fried and served with sweet n sour sauce OR frozen and used the next time you cook this).
- Turn down heat to low and simmer under cover for about 30 minutes.
- Add in the shredded reserved wonton wrappers, cook for a further 2-3 minutes.
- Remove from heat. Serve in bowls topped by chopped green onion and fried garlic.
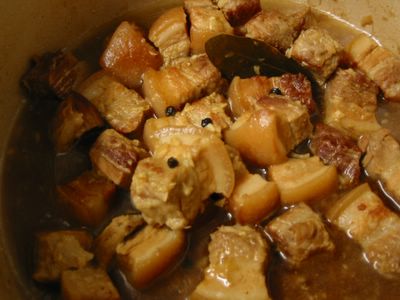 Karen must be rolling her eyes now and saying - 'Adobo na naman?!' (Adobo again?!) :LOL: I honestly don't know the official name for this adobo variation. I know the Ilocanos cook it this way but same with lots of Batanguenos. Hence, I'm not too sure of its origin as well. I took the liberty of naming it as 'blonde' since it's not as dark as the usual adobo - nothing western about it just something about the colour. When I read Reggie Aspiras' column in the Lifestyle section of the Philippine Inquirer way back in January this year, I was intrigued by her description and recipe of this soy sauce anaemic dish that I vowed that I will use my seldom-a-year quota for fatty pork on giving this a try. Normally, people just use salt though like Reggie I like patis with it. But go ahead if you want just salt to make it even 'blonder'. It's important by the way, to keep a close watch when browning the pork. Keep the heat on medium-low. You don't want the nice gravy-like sauce tasting burnt. Here is my adaptation of Reggie's recipe:
Blonde Adobo
1 kg pork belly (or any fatty pork part) - cut into 1-inch cubes
1 head of garlic - minced (about 3 Tbsp)
1/2 cup vinegar
1 tsp whole peppercorns
1 bay leaf
1-2 Tbsp water
1 tsp sea salt
1 Tbsp patis (or another 1 tsp sea salt)
additional water
- Heat a heavy saucepan or pot. Once it's hot, rinse the pork pieces in water and drop it straight into the hot saucepan. Add 2-3 Tbsp of water.
- Simmer the meat. Soon the water would evaporate and the pork will render fat.
- Cook pork in its own fat until golden brown. Keep the heat on medium-low to avoid burning the bottom.
- [Optional] Remove excess oil leaving only about 1-1/2 Tbsp in the pot.
- Stir in the garlic, peppercorns, and bay leaf. Saute for about 30 seconds.
- Add vinegar and scrape the bottom of the saucepan. You want the brown bits at the bottom for flavour that's why it's important not to burn it.
- Add just enough water to cover the meat.
- Bring to boil again then turn heat to low and simmer until pork is tender. If the sauce is drying up too much add hot water, again just enough to cover the meat.
- Season with salt and/or patis (or if you prefer it really 'blonde' season just with salt). Taste and adjust seasoning according to taste.
The US White House hired their first woman head chef - what’s more she’s Pinay! Philippine born and bred Cristeta Comerford graduated from the University of the Philippines with a bachelor's degree in Food Technology and has just been promoted to head chef of the White House kitchen where she's been serving since 1995. See the article on Yahoo News.
Congratulations Cris !
 Talk about crisis, this post for the Sugar High Friday 11 (coffee) is so late. I meant to have an entry for SHF at the same time celebrate the 1 year anniversary of my blogging. I just hope Ronald would be kind enough to include this in the round up.
Yep folks, it's been 1 year (actually I started 8th Aug 2004) since I decided to join the horde of internet addicted people punching their keyboards for inane ramblings, recipes, experiences, rants and raves in the hope that at least 2 of their relatives and pets would read it. I have enjoyed this blogging experience immensely since. Not only did I get to record all my recipes (which is the raison d'etre of this food blog), hits and misses in the kitchen, but most of all I got to meet new online friends. Some of whom I've met, some I now harangue on the phone. ;)
As for the recipe, I took the easy way out (I'm in crisis remember!) and baked an easy cupcake also so I can stick a happy anniversary candle on it which J3 enjoyed blowing out over and over again. I ran out of paper liners so the soft moist cupcakes were practically falling apart when I pried them from the baking pans. :sigh: Even the icing joined in the crisis making itself overbeaten as reflected in all its lumpy glory. But that's okay, it still tasted great. Oh the cupcakes, I adapted them from a recipe in the Seasoned Cooking site. It's got that deep chocolatey-coffee flavour with a hint of cinnamon that I adore. Nice! And the delish icing is from the lovely Stel of Baby Rambutan. I just added just a tad bit more sugar and reduced the coffee. Regardless of all the problems, I would still do this cupcake again.
Mocha Cupcakes
1/2 cup boiling water
1 Tbsp instant coffee powder
1/2 cup melted butter
1 cup granulated sugar
1 egg
1 1/2 tsp vanilla
1/2 cup sour cream
1 1/3 cups flour
1/2 cup cocoa powder
1 tsp baking powder
1/2 tsp bicarbonate of soda (baking soda)
1/4 tsp salt
1/4 tsp ground cinnamon
- Preheat oven to 180°C/fan 160°C/350°F. Line a 12-hole muffin pan with paper muffin liners.
- Dissolve instant coffee in the boiling water. Let cool and set aside.
- Combine in a bowl - flour, baking powder, bicarbonate of soda, salt, cinnamon, and cocoa powder. Mix well.
- Beat the melted butter and sugar until well combined.
- Add the eggs, vanilla, and sour cream. Beat until well mixed.
- Using a spoon, stir in half of the flour mixure.
- Then add all the coffee mixture. Mix.
- Finally add the rest of the flour mixture. Stir until well combined.
- Spoon into the lined muffin pans.
- Bake for 20 minutes or until a toothpick inserted in the middle comes out clean.
- Remove from the pan and cool completely.
- [Optional] Frost with your favourite icing.
Mocha Cream Icing
1 cup whipping cream - chilled
1 1/2 Tbsp caster sugar (extrafine sugar)
1 tbsp cocoa powder
1/2 tsp instant coffee powder
- Chill the bowl and metal whisk (or electric mixer attachment) first before using.
- Mix all ingredients in the bowl and beat with an electric mixer at high speed until beater marks form (watch closely).
- Continue beating until stiff peaks form. Do not overbeat or the cream will be lumpy.
- Spoon or pipe decoratively on cake.
 I've been itching to blog this and I just got my go ahead when Anne emailed me that she finally received my package as part of this month's EBBP event. Woohoo! I genuinely thought it got lost since the postman told me it will be in Sweden in 3 days, well she got it in 1 week! Serious slip in delivery time that is. I'm just glad it finally reached Anne and hope she liked it.
The mother and daughter team of Alisha delos Reyes and Susan Middleton made these oatmeal cookies at a US state fair and won the top prize. Problem is, I don't know which state or what year or what magazine I clipped the recipe from. A big thanks to them in coming up with these lovely cookies filled with morsels of apricot and chocolate chunks. And since I'm a nut lover the hazelnuts further endeared it to me.
I adjusted the recipe according to the preference of the main cookie customers in my family (meaning my kids). Originally they had white chocolates (Mec would love that!) but I subtituted milk chocs and reduced the salt plus altered the method a little bit. The dough was too soft to my liking after the final stir. Problem is, when it's too soft it melts easily once inside the oven resulting in flatter cookies. So I did what I usually do with my cookie dough - stuck it in the fridge (in the freezer actually since I'm in a hurry) for about 20-30 minutes until it's firm enough to handle. Sometimes I even put it back to the fridge after I formed them into balls - which I think results in even better cookie heights. With this extra step I sometimes use melted butter in the batter since I'll be chilling it anyway. If you forgot to take the butter out of the fridge way ahead of time it can be patience-trying waiting for it to soften. But thankfully I've solved that and I don't think the melting and chilling part is not detrimental to the taste of the cookie.
OT: All these talk of butter and batter reminded me of a tongue twister I learned in Grade 5. Yeah that long ago and I still remember it something along these lines:
Betty Botter bought a bit of butter.
But she said, "This butter is bitter."
"If I put it in my batter it will make my batter bitter."
"But a bit of better butter will make my batter better."
So she bought a bit of butter
Better than her bitter butter
To make her batter better
Oatmeal Cookies
250 g [1 cup] unsalted butter - softened at room temperature
1 cup sugar
1 cup firmly packed light brown sugar
2 large eggs
1 tsp vanilla
1 1/2 cups all-purpose flour - sifted
1 Tbsp all-purpose flour (for dredging)
1 tsp bicarbonate of soda (baking soda)
1/2 tsp salt
2 1/2 cups porridge oats
1 cup finely chopped hazelnuts
1 cup finely chopped apricots
1 cup coarsely chopped white or milk chocolates
- Preheat oven to 180°C/fan 160°C/350°F.
- In a bowl combine 1 1/2 cup flour, salt and bicarbonate of soda until well mixed. Set aside.
- Toss the apricots with the 1 Tbsp flour in another container. Set aside.
- Beat together in a big bowl the butter, sugar, brown sugar, eggs, and vanilla at medium speed until well combined.
- Add in the flour mixture to the beaten butter mixture with a wooden spoon.
- Stir in oats and hazelnuts.
- Add in apricots and chopped chocolates. Mix well.
- Shape dough into 1 1/2-inch balls and flatten slightly. Place them about 2 inches apart on ungreased baking sheets.
- Bake for 11 - 13 minutes or until slightly moist in the centre and browned at the edges.
- Remove from oven and let cool for a couple of minutes before carefully removing from the baking sheets onto a cooling rack. Cool completely.
Note: If the dough is too soft, the baked result tends to be too spread out or flat. You can put the dough in the fridge for about 30 minutes before shaping them into balls. Or you can shape them into balls first then put in the fridge for the same amount of time or you can do both (chill before and after shaping into balls).
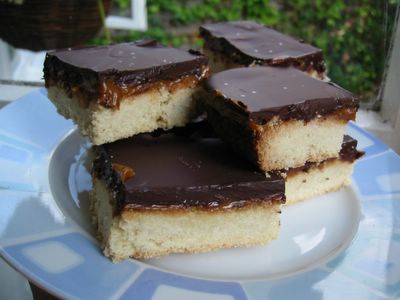 This is one homemade cookie that I was supposed to send to somewhere in the European continent as part of the EBBP#1 event. I baked it, sliced, packed and almost sent by post. Just so happened I forgot to include something in the box so I opened it again and saw that these delicate babies' topping and filling melted and smeared all over its plastic container. Not a very appetising sight. So I reluctantly removed it from my package. :sigh: Don't get me wrong this is a very nice cookie with your afternoon tea. I love it! If you use dark chocolate the more it will contrast with the sweetness of the dulce de leche and the relative blandness of the shortbread. Though if the temperature is too warm, it's best to put these in the fridge a few minutes before serving to avoid the choc and dulce from getting too runny. The only problem I can think of with chilling is that the 'bloom' of the chocolate might rise. These are light coloured spots on the chocolate which is actually the chocolate butter that separates when it's stored in a too warm place or if there is an extreme change in temperature. If yours has got this don't worry 'coz it's still edible and does not detract that much in the taste although it can feel grainy if there's too much.
As for the dulce de leche, you can substitute any caramel or toffee thick enough but spreadable. You can also make your own by cooking a whole can of condensed milk (not opened) in a simmering pot of water for about 2 hours. I don't know about you but I'm scared of trying (maybe if I'm desperate) for fear of explosions. I adapted this from Sue Lawrence's excellent Book of Baking - my favourite at the moment. Not sure why this is called "millionaire's". Maybe it makes you feel like a million bucks with the indulgent bites of the rich ingredients. ;)
Millionaire's Shortbread
450 g [3 1/2 cups] plain flour - sifted
115 g [2/3 cups] golden caster sugar (superfine sugar)
250 g [1 cup] butter - softened
*For the filling and topping:
1 x 450 g jar of dulce de leche
250 g good quality milk or dark chocolate
- Butter a 13 x 9 inch baking pan. Preheat oven to 180°C/fan 160°C/350°F.
- Mix the flour and sugar in a bowl.
- Add in butter, kneading it in the flour mixture to form a dough. (This can be also done in a food processor.)
- Press the dough into the baking pan making sure to level it. Prick all over with fork.
- Bake in oven for 30 - 35 minutes or until pale golden brown.
- Remove pan from oven and cool for about 30 minutes.
- While it's cooling off, warm the dulce de leche either by: microwaving/steaming in the jar with the lid off *or* spoon into a saucepan and heat very gently.
- Once the pan (with shortbread) has cooled off, spread the warm dulce de leche evenly on top. Cool for about 30 minutes.
- Put a heatproof bowl on a saucepan of simmering water and let the chocolate melt in it.
- Spread it on top of the dulce de leche, gently spreading it to cover completely.
- Leave to cool completely before cutting into squares and removing from the pan.
*Note: You may substitute any thick caramel or toffee for the dulce de leche or make one yourself by cooking an unopened can of condensed milk in simmering water for about 2 hours.
After what seems like a hundred years, I finally was able to cook and document a recipe of pinakbet as I promised Roh Mih. :) Pinakbet or pakbet is a melange of vegetables braised under cover traditionally in a clay pot. The northern region of Ilocos is acknowledged as its origin which is quite appropriate since a large part of the diet there is made up of veggies. As with any popular dish, there are numerous variations. One of which is that in our family we use fresh salted alamang (tiny shrimps) instead of the usual bagoong. Due to the fact that our hometown is by the seaside so there is usually an abundance of fresh seafood. Only when alamang is nowhere to be found do we use the cooked bagoong. I do have a jar of homemade bagoong sitting in my kitchen but since I found this Cincalok (fermented alamang) in our local Chinese supermarket it's but natural that I use it. I believe the Baby Rambutan has blogged about this ingredient before. Cincalok has this pungent aroma that really complemented the vegetables. Although like the bagoong it's not for everybody.
As for the veggies, any number of combination can be tipped in the pot. I banned okra since I'm not too fond of the slimy sticky texture of it. Also I did not bother to rid the amplaya with its bitterness since my husband likes them as they are. In case you want to, marinate the ampalaya in salt for 30 minutes, squeeze out juice, then rinse well with water. I almost did not include ampalaya and sitaw because of the atrocious prices. But I can't call it pinakbet with just squash and aubergine so I have to buy them with my eyes closed. :)
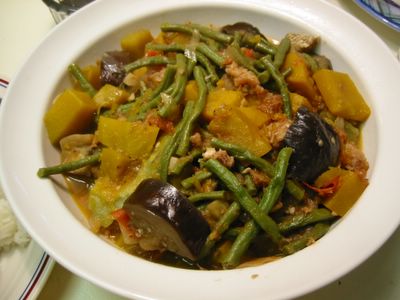 Pinakbet
1 cup diced pork belly (or any fatty piece of pork) [optional]
1 Tbsp oil
2 tsp minced garlic
1 medium onion - sliced
3 medium tomatoes - sliced
2-3 Tbsp salted alamang (tiny shrimps) or bagoong
250 g squash/pumpkin - sliced roughly into 1-inch pieces
1 medium aubergine - sliced and quarted
125 g sitaw (yard long beans, snake beans) - cut into 2-inch pieces
250 g ampalaya (bitter gourd/melon)
1 cup water
salt and pepper
- Slice ampalaya lengthwise, remove inner white membrane with a spoon and discard. Slice each half diagonally into 1/4-inch thick pieces. Set aside.
- Put pork in a clay pot or medium size pot. Pour about 1/2 cup of water on it. Bring to boil then simmer until tender adding more hot water a little at a time if needed.
- Once almost all the water has evaporated, drizzle the oil on it. Bring up heat to medium - by this time the pork will be rendering fat. Fry the pork until crispy and golden brown.
- Put to one side of the pot and spoon off excess oil. You should only have about 1-2 Tbsp oil left in the pot.
- Saute garlic and onion for a few minutes. Add in tomatoes, salt and pepper to taste. Mix in the pork and cook until tomatoes are a bit soft.
- Stir in the alamang or bagoong. Cook for a few minutes.
- Add 1/2 cup water, bring to boil.
- Add the squash, aubergine, and sitaw. Simmer under cover for 3 minutes.
- Tip in the ampalaya and cook for a further 3 minutes or until all the vegetables are cooked.
- Remove from heat and serve.
Note: If you're not going to serve immediately after cooking, leave the cover slightly ajar to let the steam out and prevent the vegs from getting overcooked or else it will lose its bite and vivid colour.
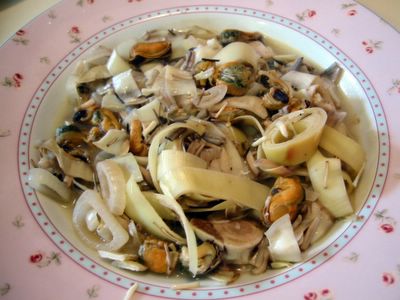 As a direct aftermath of our trip to the London Thai Food Festival, I cooked the puso ng saging or banana heart (blossom) that we bought into a kilawin. Kilawin is what we call, in the Tagalog region of the Philippines, a method of cooking with vinegar - lots of it actually.
When I was still living in the Phils. I noticed that this dish is not common in the Metro Manila area unlike in our place in Cavite where you can find it in most carinderia (eateries). Anyhow, I have to call my aunt and my Nanay because it's been more than a decade since I cooked one of these and I badly need directions. My main pet peeve was the amount of dagta (plant sap) that you have to deal with and the banana plant have a lot of it which I think it got concentrated in the heart. The soaking in water and squeezing out before putting it in the pan can only help so much. It can get really sticky. Much of it thankfully sticks on the side of the pan as you cook so you just have to spoon it off. I have to admit this recipe is still on update mode since I'm not perfectly satisfied with the result (probably because I didn't use shrimp juice) but good enough for your everyday meals.


Kilawing Puso Ng Saging
1 Tbsp oil
2 tsp minced garlic
1 small onion - sliced
1 puso ng saging (banana heart) - about 500 gm
125 g cooked shelled clams/mussels - roughly chopped or flaked canned tuna
3/4 cup vinegar
1 1/2 cup water or shrimp juice*
salt and pepper to taste
- Unwrap the banana heart (see above left) until you get to the mainly white part (see above right). Cut off the stem part and discard together with the skin that you unwrapped.
- Put 8 cups of water in a large bowl and add around 3 Tbsp salt. Make sure salt is dissolved in the water.
- Slice the banana heart into 1/2 inch thick pieces. As you slice, immediately put them in the bowl of salted water. This is to prevent them from turning black. Set aside.
- Heat oil in a saucepan. Saute garlic and onion.
- Add in the clams or mussels meat. Season with salt and pepper according to taste. Cook for about 2-3 minutes on medium heat.
- Add in vinegar and water, bring to boil.
- Drain the banana heart and squeeze out excess water.
- Stir in the the banana heart into the saucepan. Simmer until fully cooked - about 5-10 minutes.
- Remove from heat and serve.
Note: For the shrimp juice - mash heads and shells of fresh shrimps with mortar and pestle; mix well in water then strain. Discard shrimp shells.
The threat of terrorist bombings did not deter my husband and I in going to this year's London Thai Food Festival last 24th of July. I was determined to explore more of Thai food and no bomb threat can discourage me from it. Battersea park was the venue where I've always loved coming to, admiring its attractive gardens, well maintained lawns, to its towering old trees. Though we only get to see it when we pass by on the way to central London, this time (which is probably only our third) we purposely set off to imbibe its refreshing atmosphere. I think the organisers picked an excellent venue.
By the way, prior to this I called on a fellow blogger's Thai food knowledge to point me in the right direction on sampling the food. A big thanks is in order to ever helpful Thess of Eet Smakelijk. Cheers mah dear!

Unfortunately, our food orgy was rudely interrupted by a bomb scare and we only managed ogling around and sampling food for about 1 hour before police came to escort everybody out of the park. As you can see from the above picture (click on it for a bigger view) there were quite a number of things and stalls to nose around. They have lovely smelling barbecues, lots of spicy looking dishes with offal and seafood - two things that my husband is very interested in. Also stalls with handicrafts, mobile phones, freight companies, even ones doing Thai massage, plus Thai dancers in native costumes. 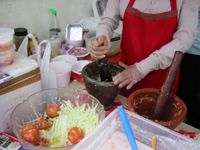 Almost all of the food stalls were serving the popular fresh papaya salad where ladies prepare it right on the spot only when somebody ordered it which makes it ultra fresh. The lady who did it for us asked me if I want it spicy and I made the mistake of nodding my head. All I can say is I only managed one spoonful before throwing my hands up in spicy defeat. It was really really spicy hot - phwoarr! While my husband happily finished it noting that it would be good with barbecued or fried meats or fish. Next time I'll make sure not to overestimate my wimpy self and order it mild only. But I did notice its lovely crunchy texture and from watching the lady do it I think I can make it at home I just have to find green papayas around here which is like trying to find fresh peaches in a tropical country - nearly impossible.


We also tried their longganisa or sausage which has noodles in it! Quite yummy. And of course my day wouldn't be complete without my favourite Pad Thai. I need to gripe with what I got - though the prawns were excellent, the flavouring itself was so-so. It seriously need more patis/nam pla and lots of lime juice.

One of the more attractive stalls there was the Blue Elephant restaurant's. They even have chefs who demonstrated the making of desserts cooked in a cast iron pan with lots of 2-inch holes where they first poured some kind of galapong or rice flour batter. They let this cook for about 15 minutes then topped with sweet coconut cream - cooked again for about 5 minutes. Then finally topped alternately with sliced green onions and sweet corn. Delicious!
They also had lots of Thai veggies and fruits on display which are familiar to us Pinoys, too. Since it was closing time they were selling these off. The only thing that prevented me from buying them all is the steep London style price. It was like £2 for 1 piece of atis (apple custard)! So we just contented ourselves with 1 atis, 1 slice of pumpkin, and 1 banana heart. We cooled ourselves from the heat of the haggling with fresh buko (young coconut) - you sip the coconut water then spoon the meat from the shell. Nice ...
Despite having limited time there, we did enjoy getting a food adventure that day. In the words of the Terminator - I'll be back!


What a lovely surprise first thing in the morning! I just received my package for the first Euro Blogging By Post (incited by Andrew of Spitoon) last Tuesday. The lovely Christina of Thorngrove Table gifted me with such delectables as - homemade Lemon Curd and Gelee de Shiraz plus Gentlemen's Relish and our family's old favourite almond and chocolate covered pretzels (brand name: Peppero). Yum!
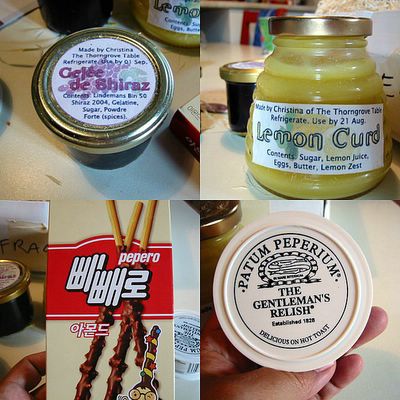
As for the lemon curd and gentlemen's relish, I've seen these countless of times in supermarkets and delis but I've never tried them. First off the relish, I must admit I was overwhelmed by the strength of flavour on my first bite. It was only then that I saw the sign on the lid that says - "spread sparingly" - or something like that. 'Well,' my husband said, 'that's not the first time you've tried out something before reading the manual !' Okay okay, stop the lecture I get it now - the procedure is similar to eating Marmite. Spread verrrry thinly over toast then munch. Hmmm ... very nice I quite like it. Me and the husband was having it over breakfast and tried out having both the relish *and* the lemon curd in one toast. The strange combination was actually good! I certainly am gonna have more of these. We now are in a running debate on what to do with the lemon curd. Husband insists on having it in his toast every morning while I want to make a pastry or dessert with it. Let's see who can use it up the fastest. ;)
The gelee de shiraz is still jelling in my fridge - Christina said this is good as a condiment to meats. I'll keep that in mind next time we have roasts. I love trying these food for the first time they're such an adventure and revelation. And don't ask about the choc pretzels, the kids found it so they were long gone before I came home from work. :(
A big big thank you to Christina for these delectables. I really appreciate it. I wouldn't have tried these if she hadn't sent them. It was so nice to answer the door first thing in the morning and be handed a package of goodies. Now I just have to pack up *my* box and send it off somewhere in the continent. This is such fun!
 We were having longganisa with rice for lunch that day. Husband checked in the cupboard for atchara (pickled papaya) and realised we just ran out. I had to think fast on what to serve with these sausages - I need veggies that is a bit tart, refreshing and would be a foil to the sticky salty-sweet flavour of the longganisa. Immediately I remembered the carpaccio that Jeanne of Cook Sister brought to our first London blogger's EB (her original recipe is here). Fortunately, I had a couple of courgettes (zucchinis) in the fridge. It was perfect! I think this is good to serve with any grilled or barbecued meat just like what Jeanne did. Anyhow, I took the liberty of renaming the latter part of the recipe name to 'courgette' instead of the original 'zucchini' since that is how it is known around here. A very big thanks to Jeanne for sharing the recipe and I hope she doesn't mind the change in name.
Carpaccio of Courgette
500 g courgettes (zucchini)
parmesan or pecorino shavings
parsley - finely chopped
*For the dressing:
1/3 cup of olive oil
3 Tbsp fresh lemon juice
1 clove garlic - crushed or finely minced
1 Tbsp capers (optional)
1 tsp wholegrain mustard
1 tsp honey
salt & milled black pepper to taste
- Wash and dry the courgettes. Using a sharp vegetable peeler, slice/shave the courgette lengthwise into ribbons.
- Mix all ingredients for the dressing together by whisking in a bowl or shaking in a jar. Pour over the courgette ribbons. Stir and mix carefully. Arrange on a platter.
- Refrigerate for an hour or two to allow the flavours to develop.
- When ready to serve, top with shavings of parmesan and sprinkle with the chopped parsley.
- Serve with good bread to mop up the dressing.


